The Smart Home Has Finally Come of Age

1

Almost 15 years ago I attempted to convert our house into a smart home. Back then many smart devices were controlled using the X-10 protocol, which communicated over power lines. It was cool when it worked, but it was far from reliable. Fortunately the connected home has come a long way since then. Here’s why I believe the smart home is now ready for prime time:

Why Smart Devices Have Come of Age

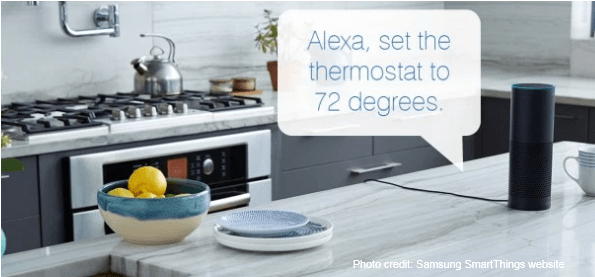
  • Voice-activated – Smart controllers like Amazon’s Echo control thermostats, light bulbs and smart hubs using your voice. Voice-activated controllers are easy to use because they respond to natural language commands like “Alexa, turn off the family room light.”
  • Better reliability – Many smart devices are now controlled using ZigBee or Z-Wave. These newer smart home protocols have many advantages over the earlier home automation protocols like X-10. First, they don’t communicate over power lines, so they are much more reliable. Products like light switches and outlets act as signal repeaters, so they extend the range of your network. Second, they communicate over a mesh network, so any smart device can talk to any other smart device. Finally, some of these new protocols don’t use the same frequencies as Wi-Fi products, so they are much less susceptible to wireless interference.
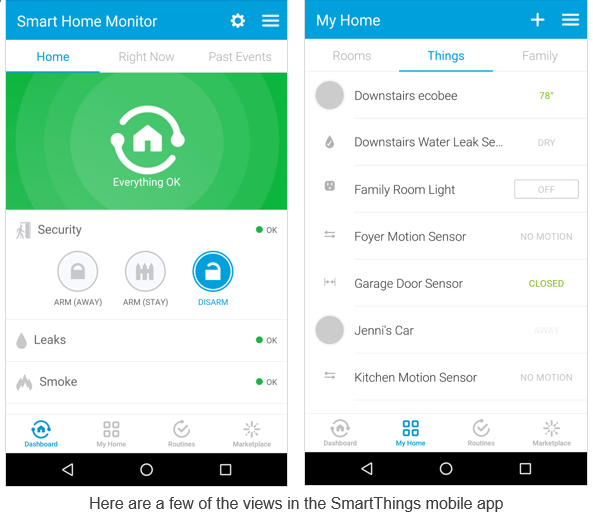
  • Interoperability – Smart hubs like Samsung’s Smart Things work with Wi-Fi, ZigBee, Z-Wave and cloud-connected products like Amazon’s Echo. In fact, over 1,000 different products work with SmartThings today, so you won’t hard a hard time finding compatible products. Although SmartThings is a Samsung product, it works with iPhone as well. In the future, the SmartThings hub is supposed to work with the Thread home automation protocol, which Google and others are using, as well as Bluetooth, which Apple’s HomeKit uses.

3.PNG

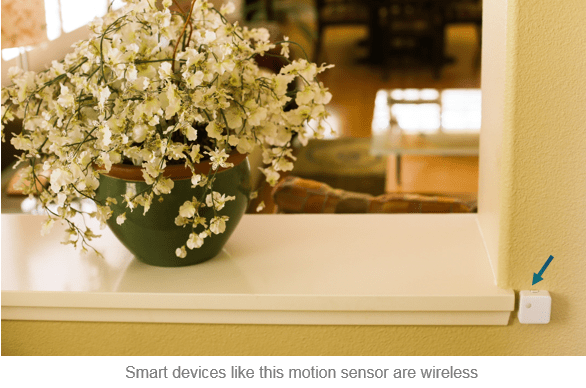
  • Easy to install – The first smart home devices were connected using wires. Now, many devices are wireless. To add a motion sensor, you just stick it to the wall using adhesive tape. If you decide to move it later, you can do so without leaving any holes in your wall. These smart devices are battery-powered, so they don’t need an AC adapter, or connection to wall power. They even report their battery level to the smart hub, so you’ll know when it is time to purchase a new battery. In case you are wondering, batteries last about a year.
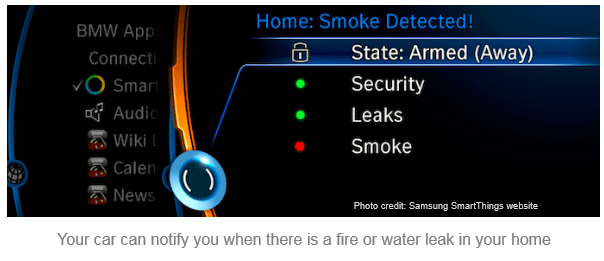
  • No security keypads or loud alarms – Today’s smart home can be programmed to automatically arm itself after every family member has left. Only then will you be notified when there is motion. There’s no need for a loud alarm that annoy your neighbors. You’ll receive a text that tells you what triggered the alarm (e.g. smoke, fire, motion or a water leak). If you have cameras installed, you’ll see what caused the motion. When the first family member returns home, the alarm will be automatically turned off, without the need to enter a long security code. And the best part is, you get all of these services and more without a monthly fee.
  • Mass appeal – Smart home products are no longer just for nerds. Nest thermostats, Dropcam and Amazon’s Echo are all extremely popular. Over 100,000 Nest thermostats are sold every month. Over 3 million Amazon Echos have been sold to date. These companies have also done a good job explaining how these devices work with other smart home devices, so they have effectively primed the pump for other smart home products. Once Apple’s HomeKit catches on, and Google comes out with their smart hub, millions of additional consumers are likely to create their own smart homes.
  • Smart devices do more – Samsung’s multi-sensor can detect contact open and closed status, movement, vibration, and orientation (vertical or horizontal). Smart outlets measure energy usage and act as signal repeaters. Some smart thermostats also detect motion, so they can automatically turn off your air conditioning when you are away. Some wireless smart devices also report temperature, so they could detect a fire in an area of your home that does not have a smoke detector.
  • Better software and services – The first smart hubs only worked with software from a single company. Today’s smart hubs and controllers work with apps, plug-ins and services from a wide range of different developers. Apps are available that do a wide range of things. If you can’t find an app that does what you want, you can create your own, or modify existing apps. The best part is that you do not have to an experienced programmer to do this. Amazon Echo users can use a wide range of plug-ins called Skills and services including Pandora, Spotify, iHeartRadio TuneIn, Audible, Amazon Music and Prime Music.

4c

Things a Smart Home Can Do for You


There is almost no limit what is possible in today’s smart home. Here are just a few examples of the things you can do:

  • Have your air conditioner automatically turn up it’s thermostat so it doesn’t run after all of cars used by your family have left your neighborhood
  • Setup your Sonos to play the sound of a loud dog barking when there is motion and you’re not home
  • Have your Jawbone to automatically open your window blinds and disable your alarm when you get up in the morning
  • Recieve a text after your mail has arrived
  • Use your phone to start a “Good morning” mode that adjusts thermostat, turns on a coffee maker and starts your favorite music playlist, or a “Goodbye” mode, that opens your garage door, turns up the thermostat, turn off all of your lights and locks your doors
  • Get a notification on your BMW dashboard if there is an intruder, fire or water leak in your home
  • Use a sensor to monitor the moisture in your soil and only turn on sprinklers when needed
  • Use your iPhone or Android smartphone to control any smart device in your home. Have you ever left your home and realized that you forget to turn something off? You can now address issues like this using your phone – no matter where you are.
  • Make a voice call on an Ooma Telo using an Amazon Echo
  • Turn on a ceiling fan after the temperature rises above 78 degrees
  • Change the color of your lighting based on different events. For example:
    • If there’s a water leak, turn my lights blue
    • If there’s a smoke alarm, turn my lights red
    • If there’s a fire, turn on all of the lights in my home
  • Record 10 seconds of video prior to the start of an event, so you can see what triggered an alarm. For example, if someone were to kick in your front door, you’d see the door fly open and the face of the person as they entered, not just the back of their head

And last, but not least, a smart home will save you money. Nest Labs released a white paper last year, which showed a smart thermostat saves its owner 10-12% on heating and a 15% on cooling. That’s a savings of up to $145 a year. ecobee claims an average savings of 23%. If you live in Southern California you can get two $150 ecobee thermostats for free if you agree to raise your thermostat on peak usage days. You’ll save even more if you have your lights automatically turn off when you exit a room. I could go on, but you get the idea. If you can dream it, you can probably do it.

How to Get Started


2
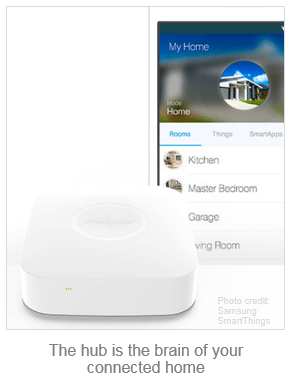
Start by buying a smart hub. The hub is the brain of your smart home, connecting you and your devices via apps on your phone, tablet or computer. Once you select a hub, you can start buying smart devices. I started with an Amazon Echo. Then I bought a smart hub and two motion controllers for $180. Discount coupons and sales are common. There are also money-saving bundles available that include a smart hub, motion sensor, two multipurpose sensors (that monitor whether doors, windows, or your garage are open or closed) and an outlet to control lights, or small appliances. Here are some tips how to make your smart home more reliable:

  • Locate your hub wisely – It’s tempting to put your smart hub next to your Wi-Fi router, but that’s not the best place for it. Locate it in a central location that is not too close to your router and other wireless devices.
  • Watch for interference – Because ZigBee devices share the same 2.4 GHz band as Wi-Fi products, they could have problems with interference. When possible, have your smartphone, laptop and media streamers to use the 5 GHz band to eliminate wireless interference. If you must use the 2.4 GHz band, use a mobile app like this one to change to a less congested Wi-Fi channel. Sonos products can also interfere with ZigBee devices. Z-Wave devices are more reliable because they use a less congested wireless band.
  • Create a device map – It’s a good idea to draw a simple map of your connected home and the estimate the distance of each device from the smart hub or the closest device with the same protocol.

      11.PNG

    • Pay attention to the distance between your smart hub and ZigBee devices, because their maximum range is 35 feet. Every time ZigBee or Z-Wave signals go through a wall, their range drops. Z-Wave has a maximum range of 100 feet however, if you have metal junction boxes and dense walls, the range can drop to only 17 feet. Try to arrange devices and repeaters to have line-of-sight communication with each other, or at most one wall (or floor) between them.
    • Color code Z-Wave and ZigBee devices differently on your map, because ZigBee devices can only communicate with other ZigBee devices and Z-Wave devices can only communicate with other Z-Wave devices.
    • Circle all devices that act as repeaters. Keep in mind that battery-powered devices cannot act as repeaters.
    • Techie tip: Rotating your smart hub can solve signal problems. Try to determine which direction your antennas radiate and position the hub so it doesn’t radiate away from your devices.
  • Use repeaters to extend your range – Z-Wave and ZigBee device utilize mesh networking, which allows signals to “hop” through other devices to reach the destination device. However, both have range restrictions (as discussed above). Add a repeater if some of your smart devices don’t respond reliably. Keep in mind that a ZigBee repeater won’t extend the range of a Z-Wave device.
  • Tune-up your network – As you add smart devices, the topology of your network changes. There are several things you can do to improve the communication between your smart devices and hub:

    • Z-Wave devices do not automatically look for new “parents.” Once a device picks a parent, it will hold on to it until it cannot talk to it any more, even if a different parent is added to the network that would be a better choice. To make sure your Z-Wave devices are routing optimally, look for a “Repair Z-Wave Network” command in the software for your hub.
    • You can force a ZigBee device to pair with a better parent by turning off your hub, and leaving it off for up to 10 minutes so the device loses communication with its former parent (the hub). After you turn back on the power to your hub, your ZigBee devices will find better parents (if they exist).

The Last Word

The smart home has come a long way. The best smart home hubs support multiple connected home protocols so you can choose from a wide range of devices. Interoperability between products is good and there is a wide range of products available including motion sensors, presence sensors, moisture sensors, door locks, electrical outlets, voice activated controllers, smoke detectors, smart light bulbs, garage door openers, vents, sprinklers, blinds, speakers, thermostats and much more. Smart devices communicate over a mesh network, which improves as you add more devices and connected to the cloud so you can monitor and control your smart home anywhere in the world. It’s time for you to think about automating your home. Start simple and add products over time. There are many good videos online that will help you get started. Have fun!

2.PNG

Copyright 2016 Rick Schwartz. All rights reserved. Linking to this article is encouraged. All of the comments in this blog are Rick’s alone, and do not reflect the views of his employer.

How to use less than 100MB of mobile data each month

I recently switched carriers from Verizon to Google’s Project Fi. Google only charges you for the data you use, so it is in your best interest to use as little as possible. I used to use 3GB or 4GB of data each month. Now I use less than 100MB of data every month. You read that right. I reduced my data usage by 40x. Read on to learn how to do it and still use your phone every time you need it.

  1. 1
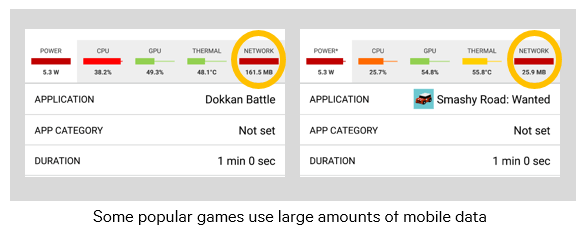
Turn off cellular data when you don’t need it– Some apps use cellular data when Wi-Fi is available. Almost all apps use data in the background when you are not using them. I found that I had apps that I never used that wasted large amounts of data. Over an entire month, this really adds up and eats into your monthly data plan. Even with cellular data off, you’ll still be able to make calls and send or receive texts over the cellular network.
  2. Monitor your data usage and uninstall problem apps– It’s essential that you go to Settings and review your cellular data usage. Be aware which apps use the most amount of mobile data. Social media, news and weather apps are notorious for syncing often – even if you rarely use them. If you uninstall Facebook, Snapchat and popular news and weather apps, you’ll be surprised how much data and battery life you save. You can still access Facebook using your mobile browser whenever you want to. News and weather sites can be accessed via browser as well. You can even bookmark them so they appear on your home screen like an app. Try to only use apps like Instagram and web browsers over Wi-Fi, because they use lots of data.
  1. Restrict background data usage– It’s highly recommended that you go to Settings > Data usage and view the app background data for your apps. I’ve enabled ‘Restrict app background data’ on all apps and haven’t had any problems. When you do this, a warning will appear, but you can ignore it. I’ve been doing this for almost a year without any problems whatsoever. I was surprised to find that apps I never use consumed a lot of background data. There is a global setting to restrict background data, but I recommend you do this on a per app basis, so you can enable any apps that have a problem in the future.

Restrict2

  1. Only update apps on Wi-Fi – Make sure you go to Settings in the Play Store app and go to ‘Auto-update apps’ and set it to ‘Do no auto-update apps’ or to ‘Auto-update apps over Wi-Fi only.’ This will save you large amounts of data.
  1. Avoid streaming over mobile – Streaming audio or video uses much more data than text. Download your favorite songs and playlists so you can listen to them offline. Avoid streaming video from sites like YouTube or Netflix over mobile because this can consume extremely large amounts of data. Consider switching to a carrier like T-Mobile with their binge-onplan, which lets you stream endless amounts of music or video without eating into your data plan.
  1. Never use maps with cellular enabled – Google Maps consumes huge amounts of data when you use it for driving directions. Most people don’t know that you can use turn-by-turn driving directions without using any mobile data if you load your directions while you are connected to Wi-Fi. If it ever says “Lost data connection” turn on cellular data for a few seconds and it will fix the problem. Then turn it back off. You can do this with the quick settings menu, so it doesn’t distract you from driving. Better yet, do this when you are waiting for a stop light to change. You can also cache maps before you leave or select a region on a map and have it work offline, but I find that to be unnecessary.
  1. Use Wi-Fi whenever it’s available– Almost everyone has Wi-Fi access at home and work so the only time you should turn on mobile data is when you are on-the-go and out of range of Wi-Fi. Free public hotspots are common and there are apps that will help you find them. Most broadband providers provide access to free Wi-Fi hotspots as well. Another tip is to go to your favorite sites before you leave home in the morning. I sync my email, news app, Twitter and RSS feed apps before I leave the house. This saves me over 100MB a day.

2

  1. Change your sync settings – You might want to try disabling ‘Auto-sync data’ by going to Settings > Accounts > Google and touching the 3 dots in the upper right. When you are connected to Wi-Fi, you can manually sync all of your Google accounts at any time by going to Settings > Accounts > Google and touching the 3 dots in the upper right and selecting ‘Sync now.’ You can also reduce data consumption by adjusting your Inbox to check for mail less often. I have mine set to ‘Never’ and I still receive notifications when new mail comes in. This change is made in the mail app and not on the Settings pages.
  1. Know your daily data budget – If you want to consume less than 1GB of data a month, you need to keep your average data usage under 33MB a day. If you consume 60MB in a single day, don’t worry. It won’t be a problem as long as consume less than 32MB on a few other days. I try to use an average of 3.33MB a day, so I stay under 100MB. It’s not hard to do because I often go days without using any mobile data. If you suspect an app is using too much data, download software like App Tune-up Kitand use it to select the app you want to test. It will run for one minute and measure the amount of mobile data used by the app. [Disclosure: I was on the team that created this app.] Most popular games use large amounts of mobile data. You should only play these apps when you are connected to Wi-Fi.
  1. Avoid apps with ads – Apps with ads consume more mobile data than apps without ads. If the apps you use have ad-free versions available, purchase them. Spending a few bucks will save you money in the long run.

data with title 2

  1. Use other people’s data – If you have a friend or family member with unlimited data, ask if you can tether and share their data. If you’re phone doesn’t support this feature free of charge, there are apps in Google Play like FoxFi that do this very well. Make sure they work with your phone and carrier before buying them. They generally have a trail version.

Using mobile data consumes over twice as much power as Wi-Fi data, so following the above steps won’t just save money, you’ll also extend your battery life. I ended up reducing my monthly phone bill from over $70 to about $23 a month. That’s a savings of around 60%.  Check to see if your carrier offers discounts if you change your plan to one that uses less data. If they don’t consider switching to a carrier who does. The savings add up quickly. In five years, I’ll save $2400.

You don’t have to follow all of the above steps to save data. Even if you only try a few of these suggestions, you could cut your mobile data usage in half. The more steps you follow, the more you’ll save.

– Rick

Copyright 2016 Rick Schwartz. All rights reserved. Linking to this article is encouraged. All of the comments in this blog are mine alone, and do not necessarily reflect the views of my employer.

Follow me on Twitter @mostlytech1

How to Protect Your Online Identity

Last updated: April 13, 2014

Snapchat just joined the long list of hacked sites

Snapchat just joined the long list of hacked sites [Image courtesy of TechCrunch]

UPDATE: The Heartbleed security bug makes all previous security exploits look all small. It has the potential to affect everyone, so it is important you protect yourself soon. See the Heartbleed section below, for a quick summary of the actions you need to take now.

Ever wonder why some people get their Facebook accounts hacked and others don’t? It’s because they use easy-to-guess passwords on multiple sites. Start the year out right by protecting your online data. It’s free and easy to do.

Gone in 60 Minutes

As our lives move to the cloud it’s important that we protect our online identities. If you’re like most people, you use the same password on multiple websites. This is a problem, because once a hacker gains access to one of your passwords, they can use it to access your other accounts. Imagine having a big part of your digital life erased by a hacker in less than an hour. This happened to a reporter last year. His first sign there was a problem was when his iPhone powered down and his iCloud restore didn’t work. Next, he found his Google account had been deleted and hackers used his Twitter account to send offensive messages. His problems weren’t just limited to his iPhone, the hacker gained access to his Apple account and remotely erased all of the data on his iPhone, iPad and MacBook. As bad as this was, it could have been worse. Since the hacker had access to his Amazon account, he could have bought thousands of dollars worth of merchandise or gained access to his online banking and financial accounts.

A Wired reporter had his entire digital life erased in less than an hour

A Wired reporter had his entire digital life erased in less than an hour

According to the victim, “one wouldn’t have to call Amazon to pull this off. Your pizza guy could do the same thing, for example. If you have an Apple ID, every time you call Pizza Hut, you’re giving the 16-year-old on the other end of the line all he needs to take over your entire digital life.” The reporter added that the Apple ID “has evolved into a single point of entry that controls my phones, tablets, computers and data-driven life. With this Apple ID, someone can make thousands of dollars of purchases in an instant, or do damage at a cost that you can’t put a price on.” He continued, “It’s shameful that Apple has asked its users to put so much trust in its cloud services, and not put better security mechanisms in place to protect them. Apple IDs are too easily reset, which effectively makes iCloud a data security nightmare.” This isn’t just an Apple and Amazon problem. The list of high-profile online security breaches includes Adobe, Evernote, Facebook, Gmail, LinkedIn, LivingSocial, Microsoft Xbox 360, Snapchat, Sony PlayStation, Twitter, UltraViolet and many more. Chances are you’ve used one of more of these hacked sites. Read more about the nine biggest security breaches of 2013.

73% of people use the same password for multiple sites

73% of people use the same password for multiple sites

Heartbleed: The King of All Exploits

    Although it’s not really new, a newly exposed bug called Heartbleed can reveal the username and passwords of many popular websites. As a result, it is recommended you change your password on all affected services after you confirm they have fixed their systems. This chart shows which sites have been affected. Also keep in mind that this vulnerability could have revealed more than just passwords, it could have allowed attackers to obtain information including credit card numbers, medical information, private emails and more.

    A 3-Step Solution

    1. Never use the same password for two sites – It’s essential you use unique passwords for every website. This isn’t as hard as it sounds because there is special software that keeps track of every password for you. This software automatically fills-in the correct username and password every time you visit a website. Although your browser can do this, your password data isn’t encrypted and can be easily viewed by anyone with access to your computer. A better solution is to use a cloud-based password locker like LastPass or 1Password. See the next section for tips how to setup a password locker.
    2. The 5 most common passwords

      The 5 most common passwords

    3. Use strong passwords – It’s hard to believe the most common password of 2013 was 123456. That’s not exactly hard to guess. Even if you create a password that has numbers, letters and special characters, it may not be strong enough that no one could guess it. Here is a website that will check your passwords to see how secure they are. If you need help creating strong passwords that avoid common mistakes check this out. Fortunately you won’t need to create your own secure passwords, your password locker software will do this for you.
    4. Backup your important data – It’s a good idea you backup all the important data on your computers and mobile devices. The easiest way to do this is to make sure all of your important documents, photos and other files are stored in folders that are synced with a cloud storage locker like Dropbox, SkyDrive or Google Drive. This backs up your data, and provides access your files from any smartphone, tablet or computer.
    LastPass detected that I had three different Adobe accounts that were compromised

    LastPass detected that I had three different Adobe accounts that were compromised

    Tips for a Smoother Transition

    Here are some tips that will make your transition into a more secure online world smoother.

    1. Start by installing free password locker software on all of your computers and mobile devices. Based on my research, LastPass is the best solution for Windows PC, Chromebook and Android users, while 1Password is the best solution for Mac and iOS users. If you decide to use LastPass, I recommend you use it with the Chrome browser.

      You’ll be asked to create a new password for your locker. I strongly recommend you use a long password you can easily remember — but have never used before. Here are some good tips how to do so. For example, you can easily convert the first part of the Gettysburg Address into a secure password that is easy to remember. “Four score and seven years ago our fathers brought forth” becomes “4Sa7yAoFbF.” Notice how I alternate capitalized letters and replace the numbers to make it more secure.

    2. After installing your new password locker software, I recommend you disable your browser’s built-in password manager. If you’re a Chrome user, click on the Chrome menu in the upper right-hand corner and select ‘Settings.’ Then scroll down and select ‘Show advanced settings/Passwords and Forms’ and make sure the two options below are not checked. I also recommend that you click on the ‘Manage saved passwords’ link and delete all of your saved passwords several weeks after you are confident your new password locker is working fine.
    3. Make sure to disable your broswer's built-in password manager

      Make sure to disable your browser’s built-in password manager

    4. Your password locker software will import all of your existing passwords, but you need to manually change them to secure passwords. I suggest you start by only changing a single password using your computer and the auto-generate password option on your password locker (e.g. LastPass). Since you’ll never need to remember or type your new secure passwords, I suggest you create passwords that are 12 characters long. Then, go to the site and make sure your password manager logs you in correctly. This is important because once you convert your passwords to secure passwords, you won’t be able to remember them.
    5. Here is the LastPass password generator

      Here is the LastPass password generator

    6. Next, you should try accessing the same site on your smartphone and tablet and make sure it logs you in as well. I’ve had some problems in this area. Here is how I handle this with LastPass:

      – For websites, I access the site using the LastPass app. After you log-in, you’ll be shown a list of websites. Select the site you want and touch ‘Launch.’ This should take you to the site and automatically log you in using your new secure password.

      – For mobile apps that require passwords like Evernote, I suggest you go to the your password locker app and copy the password first. Then open the mobile app and paste the password in the log-in screen. In most cases you’ll only have to do this once. The next time you open the app, it should remember the password for you.

    7. Once you are sure your password locker is working reliably on all of your devices, you should create new secure passwords for any of the sites listed above which have been hacked. Next, create passwords for the rest of your high-risk sites. This includes your online banking and other financial accounts, e-mail accounts, e-commerce sites (Amazon, eBay, Ticketmaster, etc.) and social media sites (e.g. Facebook, Twitter and LinkedIn). This is easier to do on your computer than your mobile devices. Once this is done, you can do this for lower-risk sites.

      Important: I can’t stress enough that you should copy and paste each new password you create to a temporary document that you keep around until you verify your password locker has correctly captured the new password and logs you in correctly. Although it doesn’t happen often, a few times I’ve had to manually copy and paste the new secure password into the password locker because it wasn’t automatically saved.

    8. When you’ve finished creating secure passwords for all your websites, use your password locker to run a security scan to identify remaining problems. You’re not done until you make sure that no two sites are using the same password and all passwords are secure.

    Congratulations! You’re Now Safe and Sound

    Your online data is now much better protected than before. It is now extremely unlikely that a hacker could log-in to your accounts as long as you keep the password to your password locker safe. If you want even more security, here are a few more extra tips. Back up your data to a NAS (or a large thumb drive) and store these backups outside of your home. Don’t store your credit cards with online merchants and lastly, consider using two-factor authentication for data that is really important to you. I’ll leave you with a few extra tips for mobile security. Have a safe new year!

    Extra tips to keep your smartphone secure

    Extra tips to keep your smartphone secure

    – Rick

    Copyright 2013-2014 Rick Schwartz. All rights reserved. Linking to this article is encouraged.


    Follow me on Twitter @mostlytech1

How to Upload Photos Directly from Your Camera to Facebook or Instagram

Last updated: January 5, 2013

This article has had over 20,000 views. Thanks for reading it.

The Canon EOS 6D is one of several new Wi-Fi enabled cameras

The Canon EOS 6D is one of several new Wi-Fi enabled cameras

Most Instagram photos are poor quality because they were taken with a smartphone. You can now take great-looking photos from a Wi-Fi-enabled camera and upload them directly to the Internet without using a laptop. I’ll describe how this is done using a Canon EOS 6D, but the process is similar with other Wi-Fi cameras. The Canon EOS 6D is pricey, but you don’t have to spend a lot of money on a camera to do the things I’m describing. Wi-Fi enabled cameras like this Samsung model start around $150. Canon has affordable Wi-Fi cameras as well.

Canon's EOS Remote running on a smartphone

Canon’s EOS Remote running on a smartphone

Getting the Right Software

Start by downloading the free EOS Remote app from Google Play. After you’ve installed EOS Remote on your smartphone or tablet, you need to activate Wi-Fi on your camera and connect it to your mobile device. The next section describes how this is done.

Making Your Camera a Wi-Fi Hotspot

Wi-Fi Setup
The first time you setup your Canon EOS 6D camera as a Wi-Fi hotspot you’ll need to follow these steps:

  1. Press the Menu button on the EOS 6D and use the main dial to select the wrench icon with three dots next to it.
  2. Set Wi-Fi to ‘Enable’ and then move down to ‘Wi-Fi function’ and set a nickname for your camera (e.g. Canon 6D). Press the ‘Q’ button to tab down to the letters and the main dial to select them.
  3. Enter the desired name and press the ‘Menu’ button when you are finished. Press ‘Set/OK’ to proceed.
  4. Wi-Fi Function

  5. Now move the main dial to the second position labeled ‘Connect to smartphone’ and press Set. Then press ‘Set’ again to make the camera an access point and press ‘Set’ for OK.
  6. Press ‘Set’ again for ‘Easy connection.’ Then press ‘Set’ for OK.
  7. Now go to Settings > Wi-Fi on your tablet and select the nickname you entered for your camera.
  8. You’ll need to enter the encryption key that appears on the camera display into your tablet and touch ‘Connect.’
  9. Now launch the EOS Remote software on your tablet and touch the name of your camera on the tablet display. Then press ‘Set’ on the camera twice to save your settings.

This might seem like a lot of steps, but most of these only need to be performed once. After you’ve setup Wi-Fi, all you need to do is press the ‘Menu’ button and use the main dial to select ‘Wi-Fi function.’ Then you select ‘Connect to smartphone’ and ‘Connect.’ That’s it. If that choice isn’t available, first select ‘Exit’ and ‘OK’ and ‘Connect to smartphone’ will appear.

Once your camera is connected to your mobile device, you can use your smartphone or tablet as a remote control and viewfinder. You can also view all of the photos on your camera on your tablet at full resolution.

You can view, save or delete photos on your camera using  your tablet

You can view, save or delete photos on your camera using your tablet

Viewing Photos from the Camera on Your Tablet and More

Now that you are connected to your camera, there are many things you can do. Here are several examples:

  • Touch ‘Camera Image Viewing’ in the EOS Remote app to view all of the images on your camera.
  • Touch a photo to view it and swipe to the left to view the next image.

  • Touch the trash can icon to delete a bad photo.
  • Touch the icon on the far left to save your favorite photos to your smartphone or tablet. Keep in mind that these are reduced-quality images, so you should not delete the originals on your camera.
  • Now we're ready to upload our photo to Instagram

    We’re now ready to upload our photo to Instagram

    Uploading Your Photo to Instagram

    Instagram
    After you’ve completed the preceding steps, you are now ready to upload a photo to Instagram (or another social media site). You’ll probably only need to read this section if you haven’t used Instagram before.

    1. After you’ve saved the photo you wish to upload, you need to go to Settings > Wi-Fi on your tablet and select the wireless access point you use to access the Internet. Then touch ‘Connect.’ Note: This step is not required if you’re using a smartphone.
    2. Now touch the Home button and go to All Apps > Gallery
    3. Open the folder with the same name as your camera (e.g. Canon EOS 6D)
    4. Touch the photo you wish to upload. Then touch the share icon near the top of the screen.
    5. If you don’t see Instagram, touch ‘See all’ and select Instagram from the list.
    6. Now crop your photo, add a filter and touch the icon in the upper right to save your changes.
    7. Now enter a description and hashtags for your photo and touch the green checkmark to upload it to Instagram.

    Follow me on Instagram @rickschwar . You can see higher-resolution pictures taken by the Canon 6D on Google+ as well.

    More Fun With Wi-Fi

    This is just one of many things you can do with a Wi-Fi-enabled camera. You can use similar steps to upload a photo to Facebook or other sites. You can also do the following:

  • Transfer images between cameras
  • Remote control your camera
  • Send photos from your camera to a Wi-Fi printer
  • Upload photos to a Web service without using a mobile device (requires direct connection to a computer)
  • Send images directly to a DLNA-certified TV
  • Please refer to the documentation that came with your camera to learn how to do these things.

    Here are some other fun things you can do with a Wi-Fi-enabled camera

    Here are some other cool things you can do with a Wi-Fi-enabled camera

    Closing Thoughts

    If you don’t already have a Wi-Fi-enabled camera, you should make sure your next camera has this feature. It’s nice to be able to upload great looking photos without using a computer.

    – Rick

    Copyright 2013 Rick Schwartz. All rights reserved. Linking to this article is encouraged.

    Follow me on Twitter @mostlytech1

    More Great Tips & Tricks for the Nexus 10

    Last update: October 17, 2013

    This article has had over 110,000 views! Although it was written for the Nexus 10, many of these tips apply to other Android tablets as well. Enjoy!

    Because my original Nexus 10 tips and tricks article was so incredibly popular, I’ve decided to write a follow-up. This time I’m including a few outside sources, however I assure you these tips will be every bit as good as the original ones and there will be no duplicates.

    1. Improve lag and choppiness – Some other Nexus users have found a simple fix to lag, choppiness, and stuttering performance that occurs when swiping across the home screens, opening the app drawer, typing on the keyboard, scrolling in the browser or even simply unlocking the device. I haven’t experienced too many problems like this, but still recommend you make the following change to see if it improves things. First, locate Google Currents in All Apps and open it. Tap “Settings” (the three dots) and uncheck “Enable Background Sync.” Reboot your Nexus 10. Source: TalkAndroid
    2. Ad-blockers can be useful utilities

    3. Unblock ads – There are several good Android ad blockers, but most require a rooted device. Adblock Plus is free and removes ads on a stock Nexus 10. Important note: One of my readers reported some serious problems after installing this app (see the comments section of my original tips article if you want details). For this reason, I’m recommending everyone hold off on installing this app until the company releases an update which addresses this issue. Source: Phandroid
    4. Maximize your battery life – To increase the battery life of your Nexus 10, try these suggestions:
      – Turn off your tablet when you go to sleep and charge it all night.
      – Set your screen brightness at 50% or lower. To do this go to Settings > Display > Brightness
      – Uninstall power hungry apps – Go to Settings > Battery and look at the top battery users . On my Nexus 10, Yahoo Weather consumes as much power then the screen and the OS combined! To uninstall go to the All Apps folder and drag the problem app on top of the Uninstall label at the top of the screen
      – Turn off your GPS when you don’t need it. To do this go to Settings > Location Access and set ‘Access to my location’ OFF. If you do this, any app which requires the GOS including Google Now will not function correctly.
      – If you rarely use Bluetooth or NFC, make sure both are off. To turn off NFC, go to Settings > More…
      – Check the Sleep setting (under Display) and make sure it is set to 1 minute or less.
    5. Tether your tablet to your phone for free – As long as you have an Android smartphone, there’s no need to purchase a tablet with cellular support, or pay extra to use your phone as a Wi-Fi hotspot. Just download and install FoxFi on your phone and check ‘Activate WiFi Hotspot.’ Then go to Settings > Wi-Fi on your tablet, and connect to ‘FoxFi14.’ Now you’ll sharing data with your mobile phone. Make sure to keep tabs on the data usage shown in the upper right hand corner of the FoxFi app, and do not use this app if you sometimes come close to using all of your available mobile data. I cannot be held responsible for any extra data charges you incur because of the use of this app. Other caveats: The free version of FoxFi now has a usage limit that requires you to restart FoxFi at some point. You can purchase the full version key to unlock this. Currently WiFi mode does not work on most phones with Jelly Bean and most HTC phones (except for HTC One). However, Bluetooth mode works for all phones.
    6. Import contacts from other sources – If you have contacts stored in Outlook, Yahoo or another source, export them as a comma-separated value or CSV file. For contacts from Apple’s Address Book, expert as vCard. It’s not essential, but is a good idea if you open this file using a spreadsheet and make some edits on your computer to clean up things. Now you’re ready to import your contacts. Open Google Contacts on your computer and click on ‘More.’ Select ‘Import’ and select the file you exported. After your contacts have been imported, you should go to ‘More’ again and select ‘Find and merge duplicates.’
    7. Scrubly cleans your contacts for free

    8. Clean up your contacts and add photos to them – If you have problems with duplicate contacts or contacts with missing info, you should go to Scrubly.com. Scrubly is a free service for people with less than 250 contacts. In addition to cleaning your contacts, Scrubly will import photos, birthdays, company, job title and more. Make sure to link Scrubly with your Facebook and LinkedIn accounts, so it can pull from those sources as well. I’ve used this service and was very impressed, but if you don’t like it, you can revert back to the way things were.
    9. Send SMS texts directly from your tablet – There are several different ways to send SMS texts from your Nexus 10, but one of the better ones is an app called Tablet Talk. This app uses Bluetooth to talk to your Android smartphone. This app is nice because the person you’re texting does not need to install any special software and all texts are sent using your mobile number. With Tablet Talk you can have a text conversation on your tablet just like you would on your phone. This is a paid app ($3) but I think it’s worth it. Install it on your tablet first and then connect to your Android phone via Bluetooth. Once you do that, you can download Tablet Talk on your Android phone for free. Tip: If you’re having problems connecting your Nexus 10 with your phone using Tablet Talk, make sure the Tablet Talk app is open on your phone first and then press the orange button in the lower-left hand corner of the Tablet Talk app on your Nexus 10. If you live in the U.S. and don’t want to mess around with Bluetooth, Google Voice allows you to easily send SMS texts as well and it’s free. The only negative is the fact that your texts will come from your Google number, and not your normal mobile number. Update: Mysms is now my favorite app for this purpose because it’s available in a tablet-optimized version for Android and can send texts to iOS devices, Windows phones, Macs, Chrome devices and Windows PCs. The tablet-optimized Android version is $2, while most other versions are free.
    10. Kingsoft Office is one of the best free office apps

    11. Install an office app – At some point you’re going to need to open a file which was created with Microsoft Office. There are many apps that do this. Consider Kingsoft Office (free), Quickoffice Pro HD, OfficeSuite Pro, Documents To Go or Google Drive (which replaced Google Docs). Most of these apps also create Word or Excel-style docs as well.
    12. Try another web browser – Chrome is good, but there are other good third-party browsers as well. Check out Firefox Browser for Android, Dolphin Browser, Opera (Mobile or Mini web browser), Puffin Web browser Free and xScore. Each have advantages over the others. You can read more about them in Google Play.
    13. Speed up animations to make your tablet feel snappier – There’s another quick way to make your Nexus 10 feel snappier. By speeding up (or disabling) the animated fade-in effects you see when switching between tasks, you’ll see a boost in performance and faster screen transitions. Start by unhiding “Developer options” as described in Tip #11 here. Once in “Developer options,” scroll down to the “Window animation scale” and “Transition animation scale” options and set both to .5x. You can even turn each of these off and transitioning between apps and pages will be almost instant. If you ever want to go back, remember the defaults for both of these settings are 1x. Source: Cult of Android
    14. Learn how to use your camera – Because there is no information about using the camera in the Nexus Guidebook, I’m adding some info here. You’ll find the ‘Camera’ app in the All Apps folder. Long press its icon and drag it to one of your home screens. To take a picture using the rear camera, press the big blue button. You’ll hear a sound which indicates you’ve taken a photo. To view the photo you’ve just taken, swipe to the left. Swipe back to the right to return to the camera. To switch to the front camera, press the circle to the right of the blue button. Then click on the camera icon with the arrows under it. In a few seconds you should see yourself on the view finder. The +/- controls are for exposure. To make a photo less bright press -1, -2 or -3. Next to that is the Settings button. From here you can access presets for things like action shots, night photos and sunset photos under ‘Scene mode.’ ‘Store location’ tags your photo with GPS info. Next to that are the white balance settings for different types of light. Next are the flash settings, To turn off the flash, touch the lightning bolt with an ‘x’ next to it. Press the Back button when you’re finished. To switch to the video camera, press the camera button to the left. From top to bottom, the buttons are ‘Photo Sphere,’ Panorama, Video, and Still Camera. Here is the most comprehensive guide to using the Android 4.2 camera that I’ve seen so far.
    15. Get a stylus for more control – Although the Nexus 10 doesn’t have the same level of sensitivity of a Galaxy Note II, a stylus will give you more control and make it easier to take shorthand notes. Make sure to check out the reviews before you buy any stylus and never buy the cheapest one available, because you probably won’t be happy if you do.
    16. You can quickly send photos or videos to another device using Wi-Fi Direct

    17. Transfer files quickly using Wi-Fi Direct – Wi-Fi Direct lets you send any type of file from your Nexus 10 to another Wi-Fi Direct device like a Samsung Galaxy S III. To send a photo or movie over Wi-Fi direct from your tablet to your phone, go to the ‘Photo Gallery’ app and select the file you wish to send. Then touch the item so the Share button appears. Next, select an app from the list which you know has Wi-Fi Direct support. I use the ‘OfficeSuite Wi-Fi Direct’ app. If you don’t have that, try Wi-Fi Shoot. Now, select the device you want to send your file to from the list of available devices. Photos only take a few seconds to transfer. Sending a 200MB movie took less than 5 minutes. Note: The receiving device may be sluggish while a file is being sent to it. On the sending end, you can swipe down on the Notification bar to see the transfer progress of the file. After the file transfer is complete, select the app on the receiving end that you want to view the file with. The file sent/received notifications cannot be cleared manually. They will go away after you restart your devices.
    18. Long press a notification for app info – If you long press a notification, an “App info” button will appear and you will be able to find out more about the application that sent it. You can clear its cache, data, stop it, uninstall it or disable sending notifications. Source: Android Geeks
    19. You can speak into your Nexus 10 and it will translate just like the Droid commercial shown here

    20. Speak and translate – You may have seen the new Droid RAZR M commercial where the girl speaks into her phone and it speaks the words back in a different language. You can do that with your Nexus 10 as well. Just launch Google Translate. Touch the microphone icon, and speak the words you want translated. Touch the speaker next to the translated words to hear them back.
    21. Fix problems with some apps – If you find an app that is giving you trouble, try wiping its cached data. To do this, go to Settings > Apps, then pick the problem app from the list which appears and tap the ‘Clear cache’ button. If that doesn’t fix the problem, you want to try the ‘Clear data’ button as a last resort. But keep in mind if you do this you could lose stored data like photos. Source: Android Geeks
    22. Scribble and your tablet translates for you

    23. Scribble and translate – You can scribble on your tablet’s screen and Google Translate will translate the words into to any language.
    24. Try these tablet charging tips – For best results, power off your Nexus 10 and let it charge all night. If you do this, you should be able to get through an entire day of normal use without running out of power. On peak usage days, charge your tablet for an hour during lunch or early afternoon.
    25. Turn your tablet into a media server – Although the Nexus 10 is not pre-loaded with a DLNA media server like Samsung’s AllShare Play, there are free alternatives this work even better. Download and install Twonky Beam. It will let you access media on your tablet from your Xbox 360, Sony PS3, Roku box, connected TV — or any of the 13,000 other DLNA-certified devices. [Disclosure: I used to work for the company who makes this software]
    26. Enable auto-fill on third-party browsers – Although Chrome has an ‘Autofill forms’ setting, there are other apps which give you more control over this. Install Dolphin Browser and the Autofill Form add-on for it.
    27. Lower your screen brightness even more – If you sometimes like to use the Nexus 10 in a room with all lights off, you may find that the screen is still too bright even when brightness is turned all of the way down. Apps like Screen Filter allow you to adjust the brightness of the screen as dark as you like.
    28. Yopu can beam media from your phone to tablet

      You can beam media from your phone to tablet (or vice versa)

    29. Beam something from your phone to tablet – If you have another Android device with NFC support like a Samsung Galaxy S III you can beam browser pages, YouTube videos, contacts and more from your phone to your tablet (or vice versa). Start by finding the media you want to beam and make sure both devices are unlocked. Next place your phone on the Nexus 10 as shown in the photo. In a few seconds you should feel each vibrate and hear a sound. Touch the screen after you see the image get smaller and the words ‘Touch to beam’ appear on the screen. If you’ve done it successfully, the image will continue to get smaller on the screen until it disappears. More info. In case you’re wondering where the two NFC sensors are on your Nexus 10. One is on the back to the right side of the camera near the top. The other one is by the front camera.
    30. Transfer files from your Mac to your tablet – If you’ve got a Mac, you’ll want to download and install the Android File Transfer app. Then plug your tablet into your Mac and the transfer app should automatically launch. Now can copy or move files by simply dragging and dropping them into the folders on the Nexus 10.
    31. Control your computer's mouse

      Control your computer’s mouse with your tablet

    32. Control your Mac or PC using your tablet – When I first read about this tip, I didn’t think I would like it, but I was wrong. This may sound like a gimmick, but it’s really useful. First install WiFi Mouse on your tablet. Next, download mouse server software and install it on your computer. Launch the WiFi Mouse app on your tablet and touch ‘Auto Connect.’ You should now be able to control your mouse using your tablet. You can even right-click, but in order to type using your tablet and have that text appear on your computer you’ll need to upgrade to the full version. Source: Redmond Pie
    33. Disable notifications on a single individual application – If you want to turn off notifications for a single app, follow these steps: First swipe down the notification bar. Then long press the notification until a box appears that says, “App Info.” Touch that and then uncheck the “Show Notifications” checkbox. Then touch OK to approve the change. Source: Droid Life
    34. Boot into Safe-mode to troubleshoot problems – If you are experiencing a problem with your Nexus 10 and you want to determine whether they are being caused by a third-party app, press the power button for seven seconds until your tablet reboots. Then press and hold both the volume up and down keys until you see the words ‘Safe mode’ appear in the lower left-hand corner of the screen. If the problem goes away when you’re in safe mode, you should reboot your tablet and start removing recently installed apps until the problem goes away. Source: How-To Geek
    35. Upload your music to the cloud – Since the Nexus 10 has a limited amount of internal storage and is not expandable, you should upload all of the music on your computer to the cloud. Google Music allows you to store up to 20,000 songs for free. Using the Google Music app, you’ll be able to access all of them as long as you have a Wi-Fi connection. To upload your music, download Google’s free Music Manager software to your computer.
    36. Canon users can preview photos and change camera settings using their Nexus 10

      Canon DSLR users can preview photos and change camera settings using their Nexus 10

    37. Control a DSLR with your tablet DSLR Controller is a popular app that allows you to fully control your Canon EOS DSLR from your Nexus 10 with only a USB cable. Use your tablet to control, Live View, Image review, Auto Focus, Manual focus, Zoom control, HDR, Timelapse, Wi-Fi Passthrough, Shutter speed, Aperture, ISO speed, White balance and much more. It’s $8, so make sure your camera is on its supported device list before you buy. If you have a Canon camera like the 6D with Wi-Fi support, check out Canon CameraWindow and EOS Remote. Both of these apps are free.
    38. Download USA-restricted apps & media anywhere – If you have rooted your Nexus 10 and want to free access territory-restricted apps and media, download and install Droid VPN and follow these instructions. I do not recommend that you root your tablet for this reason alone, because it may prevent you for getting OS updates directly from Google. Also, as one of my readers points out in the comments section below, this tip may only be helpful on content that does not require a credit card, because Google Play restricts purchases by country. Source: One Click Root
    39. Sync your tablet with iTunes – It’s easy to copy music or videos from your iTunes library to your tablet. However, I recommend that you don’t move everything – unless you have a 32GB Nexus 10 with lots of free space. You can find detailed instructions how to do this here. Source: CNET
    40. Here are just a few of the free wallpapers available on Google Images

      Here are just a few of the free wallpapers available on Google Images

    41. Upgrade your screen background and save battery life – Upgrade your screen background and save battery life – Most of the stock Wallpapers that come with your Nexus 10 tablet are not great. They use bright colors and do not take advantage of the full resolution of your display. Although you can download wallpaper apps, your best bet is to find some images you’ve taken with your DSLR camera or do an advanced search on Google Images. Enter a description in the first box, if you’re not sure what your looking for try “HD wallpapers”, “high resolution images” or ‘2560×1600 wallpaper’ in the first box. Select ‘Larger than 4 MP’ as the image size. If you want the best quality available, search for images above 12 MP. You’ll see a wide range of images to choose from. Click on a few that you like, and make sure to click ‘Full-size image’ on the right-hand side of the screen.

      You’ll find there are a lot of decoy images, which are smaller than they are supposed to be. If it doesn’t say 2560×1600 or larger under ‘Full-size image’ you should go back and select another image. If can’t find anything good on Google Images, try Google+ Communities or Picasa Web Albums. There are some good dark Nexus 10 backgrounds on this Google+ page. Now right-click on the large image and select ‘Save image as…’ Move all of your saved images into a folder called ‘New wallpapers’ and copy that into the ‘Pictures’ folder on your Nexus 10 using a USB cable. You could select your images from the Gallery, but you’d be asked to crop them and that would lower their resolution. Although the Nexus screen is 2560×1600, I’ve been told that the size of the wallpapers that Google includes with the Nexus 10 are 3966×2560. That’s because they pan when you change home screens. I use an app called ‘Simple Image Wallpaper Free’ which displays your wallpaper at its full resolution, doesn’t require cropping and doesn’t pan when you move to another home screen.

      If all this seems too hard, try a wallpaper app from Google Play like Wallbase, Interfacelift or Wallpaper Wizardii. Just make sure to select images which are 2560×1600 or higher, (3966×2560 is even better if possible).

    42. Transfer files wirelessly from an iPad to your Nexus 10 – You can send or receive, photos, videos, music, contacts or notes over Bluetooth from any iOS device to any Android device. In order to do this, you need a jailbroken iOS device, and the AirBlue Sharing app which you can purchase for $5 from Cydia. See it in action here. Source: Redmond Pie
    43. Here are some nice Live Wallpapers (Lonely Tree, Mystic Halo, Ocean HD)

      Here are some nice Live Wallpapers (Lonely Tree, Mystic Halo, Ocean HD)

    44. Install a better Live Wallpaper – All of the Live Wallpapers that come with the Nexus 10 are poor quality. You should install a good Live Wallpaper like Light Grid, Mystic Halo LW, Blue Skies Free, PanoPlanet, or Ocean HD ($1.99). My current favorite Live Wallpaper is Lonely Tree. It really shows off the Nexus 10’s screen with its 60fps motion and extreme detail. If you watch carefully, you’ll notice the clouds, tree branches, snow all move independently. Avoid most wallpapers in Google Play which claim to be HD. Most do not look good on the Nexus 10’s display. Once you’ve installed your new Wallpaper, go to Settings > Display > Wallpaper > Live Wallpapers and select the one you wish to use. Then touch Set Wallpaper and press the Back button to return to the Home screen.
    45. Stop Google from reading your email – Google Now is able to do some cool things by scanning your Gmail. If this bothers you and you want to turn it off, open the Google Search app, go to Settings > Google Now and uncheck “Show cards based on Gmail.”
    46. A tablet-optimized website

      A tablet-optimized website

    47. Bookmark some tablet-optimized websites – More websites are starting to update their layouts so they look great on the Nexus 10. Checkout sites like Engadget, Google News, TNW (The Next Web) and BGR to see great examples of this.
    48. Maximize your screen’s contrast – Because the Nexus 10 uses a different screen technology than the Samsung Galaxy S III or iPad, you can’t set the brightness as high if you want the best contrast between black and white. I recommend that you set your screen brightness at 50% to 60% — unless you’re outside.
    49. Quickly review your photos and delete the bad ones – Within the Gallery app, touch where it says ‘Grid view’ to change to ‘Filmstrip view’. In this view, you can swipe right to move from photo to photo, or swipe down to delete any photo you don’t like. If you accidentally delete a photo, touch ‘Undo’ in the lower-right hand corner, but do this quickly because this option goes away after you go to the next photo.
    50. Expand your storage with an external Wi-Fi drive – Companies like Kingston have solid-state drives that add 32GB, 64GB or 128GB of additional storage to your tablet. These drives are small and communicate over Wi-Fi.
    51. Transfer files, photos or contact info using Bump Bump is a free app which lets you transfer files wirelessly between any two devices (Android or iOS) — even if they don’t support NFC. To use, open the ‘Bump’ app on both devices and select the file (or files you wish to transfer). Then tap the two devices together and press the blue Connect button on both of the devices. You can bump photos to your computer by going to http://bu.mp and bumping your spacebar with your device. Bump works with videos, docs, spreadsheets, presentations are more.
    52. Stream full high-definition movies directly to your tablet using VUDU

      Stream full high-definition movies directly to your tablet using VUDU

    53. Stream a high-definition movie directly to your tablet from VUDU – You can now stream or download an HD movie or TV show from VUDU . The Nexus 10 is one of only four devices that support VUDU currently. All you need is the free VUDU app and a VUDU account. Vudu has a number of advantages over Google Play including on-the-go access to your UltraViolet Digital Collection of Blu-ray movies. [May not be available to Nexus users outside the U.S.]

    54. Fix auto-brightness problems – Android 4.2 has an auto-brightness setting, but it doesn’t work very well. You should download Lux Auto Brightness to fix this problem. Lux automatically adjusts the brightness of your display based on your environment. When you go into a dark room, Lux will automatically lower the brightness of your display after you unlock your screen to make reading more enjoyable.

      To setup Lux you need to go through their setup wizard. I suggest you leave the factory default settings as is. After you do that, you’ll need to go back and launch the app again and touch ‘Press to enable Lux.’ Lux will adjust every time you unlock your screen. Although there is a dynamic setting, it doesn’t work as well, because it’s possible for your finger to occasionally block the light sensor when you hold the tablet in Portrait mode. If you sometimes use your tablet in a totally dark room, I suggest you go to the settings page and set ‘Night Mode’ alpha to 10.

    55. A Bluetooth keyboard allows you to type much faster

      A Bluetooth keyboard allows you to type much faster

    56. Get a Bluetooth keyboard – You can hook up a wired keyboard to the USB port on the Nexus 10, but a Bluetooth keyboard is much more convenient because its wireless. One of the best keyboards for the Nexus 10 is the Logitech keyboard for Android devices. It’s only $51 and is easy to setup. Just turn it on and press the Connect button on the button of the keyboard. Then go to Settings > Bluetooth on your tablet, touch Search for Devices, and select the Logitech keyboard. Next, type the number which appears on your tablet and press the Enter key to pair it. Now anytime the Bluetooth keyboard is on, you can type on it instead of your tablet. This keyboard comes with a carrying case which doubles as a tablet stand.
    57. It's easy to increase your Wi-Fi signal strength

      It’s easy to increase your Wi-Fi signal strength

    58. Improve your Wi-Fi signal strength – If you have a few spots in your residence where you’re not getting a strong Wi-Fi signal, you should consider purchasing a $40 Wi-Fi booster like this one. It’s easy to setup and designed for use with tablets. Just plug it in and wait for its LED to turn green. Then press the WPS button on the extender and your router and you should be ready to go. The new Wi-Fi network will be called the same as the old one, but end with “_EXT”. Make sure to select that network when you’re having signal strength issues. After connecting to a Wi-Fi Extender, I’m getting speeds that are almost 4 times faster than I was before.
    59. Create your own photo albums – You can use a file explorer app like ES File Explorer to make new photo albums inside of the Pictures folder. This is done by going to the Menu and selecting New and Folder. If you do this, your newly created albums will appear when you open the photo Gallery app. You can also delete any albums you don’t want by pressing Select and then touching the items you wish to delete. When you are finished touch the trash can.
    60. Get cut and paste to work every time – Several people have written to tell me they are having problems with cut and paste, so I thought I would try to help with this. To select a word, touch and hold on a word until the highlight and arrows pop up. When you do this on a text document, you’ll be presented with the following choices at the top of the screen: Select All, Copy, Cut and Paste. Drag the two blue region selection handles around the desired text and select Copy (or another one of the available commands). Then touch where you want to insert the copied text and hold until the word Paste appears. Press Done when you’re finished.

      If you do this on a Web page or most other screens, you’ll be presented with the following choices: Select All, Copy, Share, Search Web or Find. If the handles are orange and you don’t see Select All, Copy, Cut and Paste at the top of the screen, you should long-press the selection and Copy, Select All and Share will appear in a pop-up menu. Once you cut or copy the desired text, you’ll be able to paste it — after you long press where you want to insert it. If the paste option goes away, just touch one of the region selection handles again and it will reappear.

    61. Left your wallet at home? No problem. Use your tablet to buy lunch.

      Left your wallet at home? No problem. Use your tablet to buy lunch.

    62. Use your tablet to buy things without a wallet – Since most U.S. carriers block Google Wallet on their smartphones, Nexus devices are the only way for most of us to use NFC to purchase things. Before you go to the store you need to run the Google Wallet app once to link it to your credit card and enter a PIN for security. You do not need to be connected to a Wi-Fi network in order to Tap and Pay. Just tap the back of your tablet near the camera on the cash register. You do need to be connected to setup a card or switch between default payment cards however. You can use Google Wallet in-store anywhere contactless payments are accepted, at over 300,000 merchants across the United States. Learn more about Google Wallet here.
    63. Use NFC to change settings – Another nice application for NFC is automatically changing settings when you move your tablet from one location to another. You can purchase low-cost sensor tags like these that can be placed anywhere and programmed to do many different things using an app like NFC Task Launcher. For example, when I set my tablet on my desk, it turns Bluetooth on so my keyboard works, changes Wi-Fi to a nearby 5GHz access point and turns up the system volume. When I go into to my bedroom, and touch my phone on the night stand it changes to my Wi-Fi extender network, and turns Bluetooth and system volume off.
    64. Simply tap your Nexus 10 to enjoy your music playlist through your home stereo speakers

      Simply tap your Nexus 10 to enjoy your music playlist through your home stereo speakers

    65. Stream music directly to your stereo speakers – Even though the speakers in the Nexus 10 are much better than other tablets, they are not as good as the ones that come with your stereo. By purchasing Belkin’s low-cost HD Bluetooth Music Receiver you can stream music wirelessly from your Nexus 10 (or the cloud) directly to your stereo up to 30 feet away. This works with Google’s Play Music app as well as other great free music services like Spotify, Songza and Pandora’s Internet radio app. Setup is made easier because it uses the Nexus 10’s NFC chip for “tap-and-play” pairing. I want this.
    66. Get 50GB of free cloud storage – You can never have too much storage. That’s why I use SkyDrive, Dropbox, Google Drive and MediaFire. MediaFire isn’t as flexible as the other storage lockers I mentioned above, but it’s the only one that gives you 50GB of FREE storage. You’ll need to first go to their website and create an account, then you can download the MediaFire app from Google Play.
    67. Changing your download directory – Several people have asked how they can change the default Download directory. You can do this with Dolphin Browser by going to Menu> More> Settings> Privacy & Personal Data> Download Directory.

    – Rick

    Copyright 2013 Rick E. Schwartz. All rights reserved. Linking to this article is encouraged

    Follow me on Twitter @mostlytech1

    50 Great Tips & Tricks for the Nexus 10

    Last updated: November 24, 2013

    This article has received over 500,000 views! Although it was written for the Nexus 10, many of these tips apply to other Android tablets as well.

    Welcome to the most comprehensive list of tips and tricks for the Nexus 10 you’ll find anywhere on the Internet. This started off as part of a Nexus first impressions article, but quickly grew into a list of 50 tips, so I’ve broken it out on its own. Because this article is intended for everyone from beginners to experts, there will be some things here you already know here, but you’ll also find tips you won’t find anywhere else.

    1. Upgrade to the latest version of Android – There have been several updates to Android since the first Nexus 10 tablets left the factory. Make sure to install the newest Android system update. If your tablet isn’t already running Android 4.2.2, and it doesn’t appear under Settings > About tablet > System Updates, scroll to the bottom of this article to learn how to force an update to Android 4.2.2. What’s new in Android 4.2.2? You can see a list of all changes here.
    2. Choose your screen orientation – The startup screen, volume control and speaker placement seem to indicate Google intended the Nexus 10 to be used horizontally in landscape mode. However I prefer the vertical portrait mode for the following reasons: First, it’s better suited for most web pages. Second, apps like Instagram and Spotify can’t be used in landscape mode. Third, it’s easier to hold the Nexus 10 vertically with one hand. Of course you’ll want to use landscape when watching most movies. In the end the choice is yours, just keep in mind if you use it in portrait mode the volume control will be reversed (e.g. pushing the lower button turns the volume up.)
    3. Google Now delivers information without you needing to ask

      The Nexus 10 Guidebook is massive

    4. Activate Google Now – Swipe up from the bottom of your tablet screen near the center to access Google Now. Before using Google Now you must go through a tutorial and then activate it. Then make sure location services are on. To do this you need to check the box next to ‘Wi-Fi & mobile network location’ and agree with the prompt. Then go through the settings for Google Now and enter your favorites sports teams and adjust a few other settings. When you’re finished Google Now will start presenting you with information tailored to your needs like the local weather. You can see what my first Google Now page looked like in the screenshot above. It’s worth mentioning I’ve never taken my tablet to the gym, or asked Google for my drive time to work. It provided that info based on my previous behavior. I know some people have privacy concerns, but I think this feature is great.
    5. Download the official Nexus 10 Guidebook – Google just made available a new 159 page Nexus 10 Guidebook. You can download this excellent guide here. Once downloaded, I recommend you copy it to your tablet, so you can refer to it anywhere you go. Make sure you have a PDF reader on your Nexus 10 however. You can download Adobe Reader here.
    6. Download some tablet-optimized apps – You’ll quickly discover not all of your Android smartphone apps adapt well to the extremely high pixel density of the Nexus 10. For this reason, Google recommends you download some of the following apps: Autodesk Sketchbook Pro for Tablets, Cat in the Hat, Cut the Rope Experiments HD, Evernote, Expedia, Fandango Movies for Tablets, Friendcaster, Google Currents, Fancy, Heros Call HD Widgets, Hipmunk, Hulu Plus, Magic Piano, Mint.com, Netflix, News Republic for Tablets, Ocean HD, Office Suite Pro, OpenTable, Picsay Pro, Plume, Pinterest, Pulse News, SplashTop Remote Desktop HD, Strikefleet Omega, Sprinkle, SwiftyKey3 Tablet, Pocket, SeriesGuide, Taptu, TED, Trulio, Zappos and Zoomingo. In addition to the above apps, I would add the following apps which have all been optimized to run on tablets like the Nexus 10: 500px, AccuWeather for Android, AirCalc, Amazon Mobile (Tablet), BaconReader for Reddit, Business Calendar, Calendar, Ebay, Engadget, FIFA 2014, Flipboard, Google+, Google Pinin Input, Hotel Tonight, Kingsoft Office, NYTimes for Android, Pandora, PicsArt, Pinterest, Sing! Karaoke, Smart Tools, SkyDrive, Solid Explorer, Songza, SoundHound, Tasks, Temple Run 2, The Weather Channel, Twitter (tablet-optimized version), USA Today, Wunderlist 2 and Yahoo! Weather.

      Here’s a list of the top 150 Android apps. Many, but not all are tablet-optimized. Also, check out the Tablified Market app. It highlights apps that are designed and optimized for tablets.

    7. Install the Adobe Flash plug-in – Flash may be a dying format, but there are still millions of Flash videos around and the Nexus 10 should be able play some of them. To install Flash from the official Adobe website, follow the instructions at the bottom of this page.
    8. The Nexus 10 has several different keyboard layouts like this one with number keys

    9. Expand your keyboard – Since the Nexus 10 has such a large screen you may want to expand to a full-sized PC-style keyboard that includes number keys and extras like the screenshot above has. It’s tricky to set up, but worth it if you like to type in landscape mode. Go to Settings/Language & input and then touch the settings Sliders next to ‘Android keyboard.’ Next, touch ‘Advanced settings’ and touch ‘Custom input styles.’ It will say Deutsch and Francais, but you can ignore that. Touch ‘Add Style’ near the upper right. Then select your language and change the layout from QWERTY to ‘PC’ or one of the other styles. Now touch ‘Add’ and you’ll see your new style appear in the list. Touch ‘Enable’ and use the back key to go back to the Language & input screen. Now touch ‘Input languages’ near the top and uncheck ‘Use system language.’ Lastly, touch ‘English (US) (PC)’ and you’re done. Source: AndroidPIT

      Note: Mostly-tech reader Craig has reported the above tip changed his default input language and broke voice and image responses via GoogleNow. If you experience either of those problems, switch back to the (US English) keyboard input setting.

    10. Control your tablet using your voice – Most people don’t know you can have your tablet open an app, create a calendar event, display a map, navigate to a place, send an email, set an alarm, define a word, show movie times, take a note, display a weather forecast, identify a zip code or area code, provide flight info, find a restaurant, run a calculator or provide a translation by simply speaking. Start by touching the microphone next to the search box. For more info, go to pages 58-64 in the Nexus 10 Guidebook (See Tip 3 to find out where to get this). There’s also a list of all 53 types of voice requests here.
    11. Watch “Timescapes” if you want to see what the amazing display on the Nexus 10 is capable of

    12. Download a high-quality video – If you really want to see what the Nexus 10 display is capable of when it comes to video, download Timescapes. It it the first 4K movie that you can purchase for $29.95. It has almost twice as many pixels as a normal high-definition video. If you’re not ready to shell out $30 bucks, but want to watch a free 1080p preview of the movie click here. If you decide to buy the movie, make sure to download the 2560×1440 version and not the others. The movie is over 6GB, so you should back it up to your computer, so you can free up space on your tablet if you need to later. In order to play this video, you may have to download free MoboPlayer software (or equivalent).
    13. Turn off haptic feedback if you don’t like it – When touch the screen on the Nexus 10 to navigate, you get a little vibration. If you don’t like this, go to Settings > Sound and uncheck ‘Vibrate on touch.’ Making this change will not turn off the vibration you get when you type on the onscreen keyboard. To turn that off, go to Settings > ‘Language and input.’ Then touch the Setting icon for the ‘Android keyboard’ and uncheck ‘Sound on keypress.’ Make sure ‘Vibrate on keypress’ is unchecked as well. If you’re using SwiftKey 3 Tablet, go to its settings page, touch Advanced. Touch ‘Audio and haptic feedback’ and uncheck Haptic feedback.
    14. Shoot and edit your own home movies on your Nexus 10

    15. Shoot and edit video on your tablet – If this is your first Android tablet, you probably haven’t used ‘Movie Studio’ yet. Movie Studio lets you edit video clips together in a timeline with transitions, music, effects and titles. Movie studio has been around since Android 3.0, but the tablets back then didn’t have enough power to run it well. Here are some good instructions how to use Movie Studio.
    16. Unhide Developer Options – Earlier versions of Android had a ‘Developer options’ area in Settings but that’s no longer present in Android 4.2. However, you can still put your tablet into Developer Mode by going to Settings and touching ‘About tablet.’ Then click the build number seven times. After you do that you will see ‘Developers options’ appear in the Settings menu! This great tip came from Wai Ho Cheung.
    17. SwiftKey 3 is Tablet a great tablet-optimized keyboard app

    18. Try a tablet-optimized keyboard – If I had to pick one single app that softened my transition from the iPad 3 to the Nexus 10 the most it would be the SwiftKey 3 Tablet Keyboard. The reason for this is because I type a lot and I like to work in portrait mode. That squeezes the keys closer together and makes typing harder on the stock keyboard. I can’t say enough good things about this app. It takes a while for you to learn it, and for it to learn you, but when that happens, you’ll never go back.
    19. Toggle between MTP and PTP – Here’s another tip you won’t see anywhere else: You can put the Nexus 10 into Camera (PTP) mode by going to Settings > Storage and then selecting the menu in the upper right-hand corner. From there, you can select ‘USB computer connection,’ which allows you to toggle between MTP (which is the default) and PTP which lets you transfer photos using camera software. PTP also works on computers that don’t support MTP.
    20. Learn how to use Quick Settings – You can use the Quick Settings menu to turn on/off Wi-Fi, change screen brightness, turn off auto-rotate and more. To open Quick Settings, swipe down from the top right corner of any screen. You can even access the full settings menu from Quick Settings.
    21. An Actionable Notification

    22. Try the new Notification Shade – To open the Notification Shade, swipe down from the top left corner of any screen. You can do this even when your Nexus 10 is locked. Certain notifications like emails or calendar events can be expanded to show more information. Some notifications let you take action by touching icons. For example, Calendar notifications allow you to Snooze or send email to other guests. To collapse a notification, pinch it. To expand a notification, glide using two fingers. When you’re finished with a notification, just swipe it to the right to make it go away. To dismiss all notifications, touch the icon at the top right of the notification shade. If you long-press on an open task, you’ll be taken straight to the settings page for that app.

    23. Uninstall unneeded apps – After you’ve been using your tablet for a while you’ll probably have apps that you never use. You may want to remove any unused apps to free up space. The easiest way to uninstall an app is to press and hold the app icon in the app drawer and drag it to the top of the screen where it says ‘Uninstall.’ If it only shows App Info, it is a system app and cannot be uninstalled. However, if you drag the app to where it says App Info you’ll have the option to disable the app, which frees up memory.
    24. Games like “Asphalt 7” look great on the Nexus 10

    25. Download a new game – Playing games on your Nexus 10 tablet is very different than playing games on your smartphone. The large screen, killer graphics, faster processor and great sounding stereo speakers take gaming to a whole new level. Make sure to download a game with great graphics like Asphalt 7, Dead Trigger, or Shadow Gun. All of these will cost you, but there are many great free games as well, including Temple Run 2.
    26. Improve your gaming graphics – If you’re a hard-core gamer, you probably already know what 4x anti-aliasing is. You can enable this on the Nexus 10 if you know a secret trick. First, enable Developer Options as described above in Tip #11. Then go to Settings and click on Developer Options. You will now see an option on the right to enable Force 4x MSAA. Multisample anti-aliasing (MSAA) is a technique used to improve image quality. Since the Nexus 10 has a GPU capable of supporting MSAA, this setting should make your graphics look more detailed when you’re playing advanced games. Keep in mind this will also cause your GPU to work harder and your tablet may get hotter and consume more power than normal. It’s also possible that all games may not support this, but this seems to work great with games like Asphalt 7. Source: Wai Ho Cheung.
    27. This wireless gaming controller was designed for the Nexus 10

    28. Use a gaming controller with your Nexus 10 – If you game a lot, you might try using a gaming controller with your Nexus 10. You have three options: If you own a Sony PS3, you can use up to four PS3 controllers with your Nexus 10 at the same time. Instructions here. You can also plug an Xbox gaming controller into the Nexus 10, as long as you have a micro USB to USB adapter. Lastly, you can purchase a wireless gaming controller like the Nyko Playpad.
    29. Copy your media to your tablet – One of Android’s best features is the ability to plug your charging cable into the USB jack on your computer and have your tablet appear as a hard drive. Once you do this, you can easily copy over the music, photos, videos or documents you want to take with you everywhere.
    30. Select a lock screen – If you plan to bring your Nexus 10 outside of your house, you should go to Settings/Security and pick a pattern (recommended), PIN or password-based screen unlock.
    31. It’s easy to connect a Nexus 10 to your TV and watch HD videos on it.

    32. Connect your tablet to a television – The Nexus 10 has a standard micro HDMI jack, so you can purchase a high-quality cable which connects to your TV for as little as $3. This allows you to watch high-definition videos from YouTube, Netflix or any other site on your TV. Unlike other tablets, the Nexus will display a video on your tablet and television at the same time. It will also automatically scale 2550x1440p videos to 1080p, so your television can display them. As you can see from the screenshot above, the picture quality is great. Important: Make sure to power down your tablet and television before connecting or disconnecting an HDMI cable. If you don’t, it’s possible that you could damage your tablet.
    33. Hook up an external keyboard and mouse – You can easily connect your tablet to an external keyboard, mouse, or other input device and use these just as you would with a PC. This can be done using Bluetooth or direct USB connection. To connect via USB you will need an adapter like this. To connect more than one USB device at a time, use a powered USB hub to reduce drain on your battery. I’ve tried a wired keyboard and a standard wired mouse with the Nexus 10 tablet and both work pretty well. The mouse had no issues whatsoever. The keyboard seemed to miss keys or spaces occasionally when I typed too fast. However, I really like using the arrow keys on the keyboard to precisely move the cursor around text on the screen. I also like the fact the tablet can tell there is a keyboard attached and does not display the onscreen keyboard. This saves a lot of space on the screen.
    34. You can work faster when you connect your Nexus 10 to a traditional keyboard and mouse

    35. External keyboard tips – In addition to entering text, you can use your keyboard to navigate your tablet’s features: Use the arrow keys to select items on screen. Press Return after selecting an item is equivalent to touching that item. Press Escape to go Back. Press Tab or Shift-Tab to move forward on a screen with multiple text fields. For maximum typing speed, turn off auto-replace, auto-capitalization and auto-punctuate. To do this, swipe down on the top of the screen and ‘Select keyboard layout.’ To do this, swipe down on the top of the screen and ‘Select keyboard layout.’ Don’t forget you can use keyboard commands like Ctrl-V to paste text just like you would with a PC.
    36. Expand your memory – One of the biggest complaints about the Nexus 10 is the fact it doesn’t have a memory expansion slot, but that doesn’t mean you can’t add your own memory by buying a short micro USB to USB cable and connecting a low-cost memory stick. However, stock Android devices do not automatically “mount” mass storage devices like USB sticks, so one additional step is required. If you’re Nexus tablet is rooted, the best solution is an app called Stickmount (Note: I was recently told there may be problems with it and Android 4.2, which the developer are working on now). Once StickMount is installed you connect a USB stick to your Nexus using a USB OTG cable and the device will show you a popup and ask if you want to open StickMount. You’ll need a file viewer app like ES File Explorer to display your files. More details. If your Nexus 10 is not rooted, you have two options: The first is a $3 app called Nexus Media Importer, which allows you to import or stream music, video, photos and documents from a USB flash drive or SD card. More info. The second option is free. You can enable PTP on your Nexus 10 by following the instructions in Tip #13 above. Once PTP is enabled, when you plug in a supported device it should immediately bring up the Gallery app with a new folder containing all of your photos. When you open that folder, you can either import, or browse the photos. All of the above options require a USB OTG to mini USB adapter.
    37. Where to Find More Great Tips Like These

      If you’re looking for more great tips and tricks for the Nexus 10, checkout this article.

      The new Photo Gallery App is a powerful photo editing tool

    38. Edit your photos like a pro – The Android 4.2 Gallery app is more than just a photo viewer. It now has some serious editing capabilities. In addition to all of the standard Instagram-style filters, this app has some advanced photo editing features that are similar to the ones you’ll find in Adobe Photoshop Lightroom. The incredible screen on the Nexus 10 and fast processor, make it a serious photo editing station. For even better editing options, try Snapseed or Pixlr Express.
    39. More powerful photo editing options

    40. Learn how to take a screenshot – To take a screenshot on the Nexus 10, press the power button and the volume down button and continue to hold them until you hear a beep and see the screen zoom in. The volume down is on the top part of the volume slider when you are holding the tablet in portrait-mode.
    41. Use the new Google Voice search – It doesn’t make sense to type your searches any more. Just touch the microphone near the top of the screen and talk, or say “Google” when you are on the Google Now page.
    42. Set up a guest profile – You may want to setup a guest profile on your Nexus 10, so a friend can check their email, and install their own games, but can’t update your Facebook status. Their app settings, screen background, game-progress and high-scores remain separate. To add a new user, go to Settings/Device/Users. Touch ‘Add user’ and then touch OK. Touch ‘Not now,’ if your guest is not available. A generic new user should now appear in the list.
    43. Customize your home screen – Every one uses their tablet differently, so you should customize your home screen(s) to meet your needs. Here are some suggestions:

      a. Make shortcuts on your home screens for all of your favorite apps. To do this go to the App locker and then touch and hold an app and drag it to the desired screen.

      b. Create folders for different categories of apps (e.g. Games, Utilities, etc.) and move all of the related apps into those folders.To create a new folders drag on app on top of another similar app. After the new folder is created, make sure to name it.

      c. Uninstall any unnecessary apps or widgets from your existing homescreens. To do this, simply touch and drag them into the text ‘Remove’ near the top of the screen.

      Buy a case for your Nexus 10

    44. Buy a carrying case – It’s a good idea to purchase a leather case for your Nexus 10. This will protect your screen from scratches and give you additional protection if you drop it. Most cases also act as a stand for your tablet. Nexus 10 cases are just starting to appear on sites like Amazon.com. I just received this case and I’m happy with it.
    45. Don’t forget about the free music – Although you won’t see the free music that is included with your Nexus 10 in the “My Library” widget, if you go into ‘All Apps’ and open ‘Play Music,’ U.S. Nexus owners will find ten free songs from The Rolling Stones, Cat Power, M. Ward, The Lumineers, Bob Mould, Eskmo and more. Preloaded music in other countries varies.
    46. Install tracking software – You paid good money for your Nexus 10, so you don’t want to lose it. Make sure to install software like ‘Where’s My Droid‘ which allows you to track your tablet if lost or stolen. If you spend $4 to upgrade to the Pro version, you can also remotely lock your tablet, enable the camera to see the thief and as a last resort erase your tablet remotely. If you install this app, make sure to run the setup and connect the Commander screen to your Google account.
    47. Try gesture typing – The standard Android keyboard now allows you to slide your finger over the letters you want to type, and lift it after each word. You don’t need to worry about spaces, because they’re added automatically for you. This feature used to be only found in premium apps like Swype. Now you can use it whenever you like.
    48. Zoom two different ways – There are different ways to zoom in on the Nexus 10. The first is called double-tap. You can quickly tap two times on most webpages in Chrome to zoom in. Double-tap again to zoom out. This feature works on most webpages, maps, and other screens. Android 4.2 also has an interesting new feature called magnification gestures. When enabled, you can triple-tap the screen everywhere (except on the keyboard or notification bar) and zoom in. The nice thing is that you stay zoomed in, until you triple-tap a second time. To enable this feature, go to Settings > System > Accessibility and touch Magnification gestures. Then slide it from off to on and hit the back button. It’s worth mentioning that the way you zoom in works differently when you double or triple tap. Both have advantages, try each and see which is better for certain things. One user has reported that enabling triple-tap doesn’t work well when playing games like GTA3.
    49. Pin your content so you can access it without a Wi-Fi connection

    50. Access your Google Play media offline – Normally Google Play streams your content from the cloud when you access it. This is done so the content doesn’t take up any of your precious storage space. However, there are times where you may not have access to the Internet, but still want to read a book or watch a movie. To do that you’ll want to download or ‘pin’ the media on your device so you can access it offline. To ‘pin’ a book, open the Play Books app, go to the menu and select ‘Make available offline.’ A blue dot with a pin in it means the book is available for offline, but has not been downloaded yet. To download it, tap it once and the pin should turn white. Once the book is finished downloading, the pin icon should be upright, white and surrounded by a blue dot (like “The Time Machine” book above). Keep in mind that downloading a movie will consume a substantial amount of storage space (~1.7GB).
    51. Press and hold to quickly change camera settings

      Press and hold to quickly change camera settings

    52. Quickly change camera settings – You can now press and hold on the camera app screen and swipe to quickly change white balance, HDR and other camera settings. You can also go directly from the camera app to the Photo Gallery app by swiping to the right. Swipe left to return to the camera.
    53. Improve your Internet download speeds – If you have Wi-Fi range issues like I do, you may want to purchase an Ethernet adapter. The Nexus 10 supports USB-OTG, which makes this possible. Although micro USB to Ethernet adapters are available, they don’t get good reviews, so you’re probably better of with a USB to Ethernet adapter like this and a micro USB to USB adapter. More about the types of things you can connect with USB-OTG.
    54. Pinch-to-zoom Gmail – Gmail has a new setting called ‘Auto-fit messages’ which is not enabled by default. When you enable this setting, you can manually pinch to zoom in or out on an e-mail. This is really useful.
    55. Learn how to decipher the notification LED – You’ve probably noticed there’s an LED on the front of your Nexus 10 that flashes occasionally. It’s there to let you when you have one ore more notifications waiting. Its LED is capable of displaying multiple colors so you can tell what type of notification you have without unlocking your tablet. Since there is no mention of this feature in the Nexus 10 manual, there is some confusion over the colors used. It appears Google uses white for Gmail or SMS texts, blue is for Facebook notifications, green indicates your tablet is 100% charged, and also may show Google Voice notifications, yellow is for Google Talk and red is for Google+. It appears third-party apps can trigger the notification LED as well. One thing I’ve noticed about the notification LED is it sometimes continues to flash after you’ve cleared your notifications. If this blinking bothers you, you can turn off the notification LED by going to Settings > Display and unchecking ‘Pulse notification light.’
    56. Light Flow Lite allows you to take control of the colors of your notification LED

    57. Customize your LED notifications – A free app called Light Flow Lite allows you to take control of the colors of your notification LED. It also makes your Nexus 10 flash one color after another. This app allows you to set the notification color for the over 250 applications and system events including missed calls, low battery, no signal, voice mail, calendar reminders, Gmail messages, email messages, SMS messages, MMS messages, Twitter notifications and more.
    58. Quickly silence or restart your tablet – To quickly silence your Nexus 10, press and hold the power button for 1-2 seconds. To restart your tablet, press and hold the power button for 8 seconds.
    59. Backup everything on your tablet

    60. Make it easy for someone to return your tablet if lost – It’s a good idea to add a message to your lock-screen like the following: If found, please call [Enter your area code and phone number here]. To do this, go to Settings > Security > and touch ‘Owner info’ (or User Info, for other users). Then enter the text you want displayed on the lock screen.
    61. Backup everything on your tablet – Although it’s true Google backs up some of your data, it doesn’t back up everything. My Backup Pro backs-up your photos, SMS texts, contacts, call log, browser bookmarks, system settings, Home screens, music playlists and apps. Your entire backup is stored online.
    62. Use your tablet as a phone – You can turn your Android tablet into a phone with apps like Talkatone, GrooVe IP, Viber, Tablet Calling or others. A free Google Voice account is required by most of these programs. For best results, you’ll want to use a Bluetooth earpiece, since the mic used for this is located on the back of your tablet. For video calls try Skype or Tango. Video calls use the front camera on the Nexus, which works pretty well, however you still should use a Bluetooth earpiece for best results.
    63. Let Google know where you live and work – In order to get the most out of Google Now you must enter your home and work addresses. To do this go to maps.google.com using your browser, touch the Menu icon in the upper right hand corner, and open My Places. From there, you can enter your home and work addresses.
    64. Nexus 10 features to avoid – Because Android 4.2 and the Nexus 10 are still so new, there are several features you may want to avoid until the next update is available. Avoid using Lock-screen music widgets and Auto-brightness. If auto-brightness is important to you, please refer to Tip 40 here for a work-around.
    65. Enjoy your media without cables

    66. Get yourself some wireless headphones – The Nexus 10 is great for multimedia. After Google fixes the Bluetooth issues with Android 4.2.2 you may want to get yourself a wireless headset like this one. It’s stereo, sounds good and also has a mic, so you can make calls with it. If you have problems pairing your Bluetooth headset, try it several times. It took me at least three tries before it worked.
    67. Get help from Google – You can call (855) 836-3987 and ask Google questions about your Nexus 10 24/7. I know some people are bashing Google for their phone support, but my phone support experience was positive. Once I waited on hold for 15 minutes, but the person who answered my call was able to quickly solve a difficult problem.
    68. Visit the Nexus 10 support site online for more information.

      Where to Find More Great Tips Like These

      Hopefully you’ve learned something new after reading this. If you’re looking for more great tips and tricks for the Nexus 10, check out my next article.

      How to Install Flash on the Nexus 10

      1. Go to Settings > Security > and check “Unknown sources” under Device Administration.
      2. Go to Google Play and download Firefox (or another browser that you are sure has Flash support).
      3. Next, download Flash from the Adobe website by clicking here.
      4. Drag the downloaded file labeled ‘install_flash_player_ics.apk’ into the ‘Download’ folder on your Nexus 10.
      5. Now use an app like ES File Explorer to locate the APK in your Download folder and touch it.
      6. Next, touch ‘Install’ and ‘Agree’ to install the Flash plug-in.
      7. Note: Although I have not experienced any problems with Flash on the Nexus 10, I can not be responsible for the results of the actions you are about to take. You are installing software which is not officially supported, and could result in security or stability issues. I wouldn’t be too concerned however. I’ve been running this for more than four weeks now and have visited many sites. Content on most sites plays fine for me. Nothing bad has happened on the other sites.

        To test that Flash is working, go to this page (or any other page you know has Flash on it). If you don’t see a video, touch where it says ‘Tap here to activate plugin’. After you do this, you should see a red box jumping around on the screen. I’ve noticed that most, but not all Flash files play on the Nexus 10. This appears to be due to an incompatibility between Flash and Android 4.2. If Flash videos don’t play the first time, don’t try to activate Flash on that page again. Enjoy!

        Although it’s not essential, if you don’t plan to sideload more APK files, you should go back to Settings > Security > and uncheck “Unknown sources” under Device Administration.

        Can’t get Flash to work? Try some of these suggestions.

        If you have problems getting Firefox to work, try installing Boat Browser. After installing it, make sure to go to Settings > Page content settings and set ‘Enable flash/plug-ins to On. If you view a lot of Flash, you might want to make Boat your default browser. [Thanks to Karen for this tip]

        How to Force An Update to Android 4.2.2 on Your Nexus 10

        1. Go to Settings > Apps > and swipe the area which says “DOWNLOADED” to the right until you see “ALL” tab under Apps. The screens below were borrowed from a Cult of Android article for another device. Your screens may look slightly different.

          Steps 1

          Step 2b

          1. Now, scroll down to where it says “About tablet” and touch “System updates’ and touch the “Check now” button. If it does not find the 4.2.2. update, restart your tablet and try again. If the above steps do not work, repeat them rebooting your device after step 3. You may also need to repeat the steps twice for the update to show up on your device. This approach worked for me, but may not work in all regions.

            What to Do If You Have Problems After You Force An Update to Android 4.2.2

            After I forced an update to Android 4.2.2 I could not download or update apps without an error. You have have that problem, you may want to do what I did to fix it.

            1. Go to Settings > Apps > and swipe the area which says “DOWNLOADED” to the right until you see “ALL” tab under Apps. Select “Google Play Store”, and then tap “Clear cache” and “Clear data.” Please note: After clearing the Google Play Store app data, if you have set a PIN code and/or a content filter, you’ll need to re-apply these settings.
            2. Locate “Download Manager,” under “ALL” and then tap “Clear cache” and “Clear data”
            3. Locate “Google Services Framework,” under “ALL” and then tap “Clear cache” and “Clear data”
            4. Reboot your tablet
            5. Try it again. If you still cannot download apps, try removing and then re-adding your Google account on the Settings screen. This worked for me.
            6. – Rick

              Copyright 2013 Rick Schwartz. All rights reserved. Linking to this article is encouraged.


              Follow me on Twitter @mostlytech1

    What Samsung & Google Don’t Tell You About Beaming

    Last update: October 17, 2013

    This article has had almost 190,000 views! Thanks for reading it. Although this article refers to the Galaxy S III, S Beam also works with current Samsung mobile products.

    Beaming Is Not New

    By now you’ve probably seen the Samsung TV commercial where the wife sends a video to her husband by simply touching phones.

    Samsung promotes video sharing in their newest ads

    Samsung promotes video sharing in their newest ads

    Both Google and Samsung refer to this process as beaming. Beaming multimedia is very cool, but it’s not new. I helped create patent-pending software back in 2009 that sent music, photos or video from a web browser to a connected TV, stereo, game console or mobile phone. That was the first software that used the term “beam” to describe the wireless transmission of multimedia from a computer to a connected device, but readers have pointed out that Palm Pilots were beaming contacts, notes, to-do items and calendar entries more than a decade ago. Beaming of multimedia from one phone to another has been possible for over a year using this and other apps, but few knew this was possible before Samsung started running their commercials for the Galaxy S III. The technology which makes beaming possible is called NFC, which stands for Near Field Communication. NFC has been available on Android devices for almost two years. You can learn more about NFC and its many uses here. The technology used to beam the music playlist in Samsung’s TV commercial is called S Beam. It uses NFC and Wi-Fi Direct and has been available since May.

    Beaming Isn’t as Easy as It Looks

    The Samsung commercial makes beaming look easy. Google claims Android Beam lets users share with a single tap. Is it really this easy? No. Beaming only works after both mobile devices have been setup properly. Before I wrote this article, I couldn’t even get beaming to work between my Samsung Galaxy S III and a Nexus 7 tablet. But once I setup both devices properly and learned a few tricks, beaming now works almost 100% of the time. This article will teach you how to beam like a pro.

    You need to configure several settings before you can beam

    How to Beam Like a Pro

    The section will teach you how to setup your devices and use Android Beam.

    1. In order to beam items from one phone to another, you need two Android devices that have NFC support. Here’s a list of all of the phones with NFC support.
    • Before trying to beam you must go to Settings/More Settings and make sure NFC is checked and Android Beam is enabled on both devices.
    • Now you’re ready to beam, but before you can do so, you need to open the app you wish to beam from. A list of supported apps is displayed later in this article.
    • Next, you need to locate the item you want to beam. You can beam web pages, contacts, maps, YouTube videos and much more.
    • Finally, you need to hold the backs of your two mobile devices together until you hear a chiming sound. If this doesn’t happen in a few seconds, move your devices apart and then back together.

    Troubleshooting Tips: Beaming won’t work unless the screen on the destination device is unlocked. You do not need to tap the two devices together, but they do need to be very close. When beaming from a phone to a tablet, you may need to move your phone around on the back of the tablet to find the spot where the NFC module is located.

    1. After you hear the chime, you need to quickly touch the item you want to beam. If you do this correctly, you’ll see the screen shrink and hear a two-tone confirmation sound.
    • If you press too long, you’ll hear a fast four-part tone that goes from high to low and you’ll need to beam again.
    • If you wait to touch the screen until after the image grows back, you need to move the two devices apart and beam again.
    • If you touch outside of the shrunken item, it won’t beam.

    You may need to click OK to accept beamed media

    1. After performing all of the steps above, the beamed item should appear on the other devices’ screen. Although this may seem like a lot of steps to follow, once you get the hang of it, it’s pretty easy and you’ll want to beam all of the time.

    In order to accept a beamed You Tube video on devices like a Samsung Galaxy S III, you need to touch “OK” when you see this message:

    Good Luck Trying to Beam a Music Playlist

    Want to beam a music playlist like you see in the Samsung commercial? What about a photo or video that you took with the camera on your phone? You can’t do that with Android Beam (running on Android 4.0-powered devices). Fortunately, there are several solutions to these problems.

    1. Use S Beam on Two Galaxy S IIIs — NFC is great for transferring things like contacts or URLs that point to maps or YouTube videos, but it’s not ideal for large files like videos. That’s why S Beam uses NFC for device pairing and Wi-Fi Direct for high-speed data transfer. Wi-Fi Direct is capable of data speeds around 250 Mbps, but because the Galaxy S III supports Wi-Fi channel bonding, files can be transferred at speeds up to 300Mbps. Of course your mileage may vary, depending on the distance from your wireless access point and the amount of interference in your area.

    You can see S Beam in action here. Real world speeds are good, but not amazing. The actual transfer time for a photo is 1 to 2 seconds, but it takes an additional 4 to 6 seconds to establish a connection using S Beam.

    Another thing to be aware of: When you touch the back of a Galaxy S III to another S Beam-enabled device for the first time, it takes about 10 seconds to make the connection. For security, the connection times out after 10 minutes.

    1. Use Android Beam on Two Mobile Devices Running Jelly Bean — Android Beam now allows you to send photos and videos from one device running Android 4.1 (Jelly Bean) to another. Just select a photo or video in the Gallery app, and then hold any two NFC-enabled devices back to back. When prompted, tap the screen to send the file as described above. File are now send using Bluetooth, so transfer speeds are faster than earlier. However files transfers are not as fast as S Beam — because Bluetooth is only capable of data transfer speeds up to 24 Mbit/s. Performance isn’t too bad. It takes about 7 to 9 seconds to send a photo, and 15 seconds to send a short video.

    Beamed photos don’t automatically appear

    After you beam a photo from the Gallery app, you’ll see the photo downloading in the Notification bar. After the download is complete, you have to swipe down, and select the photo you wish to view. Beamed videos automatically appear after the download is complete however and are ready to play.

    Cool observation: Bluetooth does not need to be enabled before you beam a photo. Android Beam will automatically turn Bluetooth on and off as needed. This should reduce battery usage.

    Most people don’t know Android Beam can now send multiple files from one Android 4.1 device to another. To do this, long press on a photo or video in the Gallery, select the items you want to transfer, and then hold the devices back-to-back to start the beaming process. Because Bluetooth is being used, you should avoid trying to send too many files at once.

    Which Apps Work and Which Ones Don’t?

    Apps that work with Android Beam
    Here is a list of apps that work with Android Beam followed by any issues they may have.

    • aCalendar
    • Any.Do – This task management app lets you beam assignments to co-workers
    • Chrome
    • Clover Pay
    • Contacts (Android 4.0) – This app seems to be a little temperamental. Wait until the screen gets small before you tap it. This takes about four seconds. Then tap near the photo area.
    • Financial Times
    • Gmail
    • Gallery – only works when Android 4.1 is installed
    • Google Play – Android Beam pushes a link to the app’s details page in Google Play. On the other device, Google Play launches and loads the details page, for easy downloading of the app.
    • Google Earth
    • Google I/O 2012
    • Google Maps
    • Internet (stock Android 4.0 browser)
    • Just Player
    • Kingsoft Office
    • Local – Maps, but nothing else
    • MonTransit
    • Navigation
    • NFC Reader
    • Paper Camera
    • Pattrn
    • People (Android 4.1)
    • Shazam
    • Shazam Encore
    • Songkick Concerts
    • StumbleUpon
    • WiFiBeam – This app can pass WiFi setup info from one device to another
    • YouTube – Can’t beam ads, skip any ads before beaming.

    This is a partial list of the apps which work with Android Beam. As I find more apps that work, I’ll add them here.

    Apps that don’t work with Android Beam

    • Calculator
    • Currents – Loads app, but not selected article
    • Gallery
    • Google Now – Cards can’t be sent
    • Google+
    • Play Music (appears to work on Android 4.0, but music is not transferred immediately)
    • Samsung’s Calendar
    • Street View on Google Maps
    • Most other Android apps

    The Pros and Cons of Android Beam and Samsung’s S Beam

    Android Beam – Pros

    • Works with all NFC-enabled Android devices running Android 4.0 (or later)
    • Works on devices that do not have Wi-Fi Direct support
    • Requires less configuration than S Beam (because Wi-Fi Direct does not have to be enabled)
    • Very safe because NFC only works at distances of 4cm or less.
    • More power efficient than S Beam because it uses NFC and Bluetooth

    Android Beam – Cons

    • Only works with Android devices that have NFC support
    • Has data transfer rates up to 10x slower than S Beam
    • Can only send photos, videos and playlists if you’re running Android 4.1 (or later)
    • Beamed photos don’t automatically open
    • Doesn’t use Bluetooth for transfers unless you’re running Android 4.1 (or later)

    S Beam – Pros

    • Capable transfer speeds up to 10x faster than Android Beam
    • Supports music playlists, photos and videos on Android 4.0 devices
    • Once a transfer in started it’s capable of working at greater distances than NFC-only transfers
    • Safe when good Wi-Fi security practices are followed.
    • Can be used to transfer documents from one Galaxy Note 2 to another

    S Beam – Cons

    • Only works with a limited number of Samsung devices (like the Galaxy S III)
    • Only works on devices running Android 4.0 (and later)
    • Wi-Fi Direct draws so much power that it’s turned off after only a few minutes of inactivity
    • Only works on devices that have with NFC and Wi-Fi Direct support
    • S Beam works with fewer apps than Android Beam
    You can now beam files from Android to iOS devices

    You can now beam files from Android to iOS devices

    How to Beam Files to an iPhone or iPad

    S Beam isn’t the only game in town. I’ve been using an app called Bump for years. It started as a way to exchange contacts on iOS devices, but now can transfer any file you have on your device (videos, documents, spreadsheets, presentations, etc). First install the Bump app on both of your devices. Next, launch the app on both devices and select the type of file you want to exchange. Then touch your devices together lightly until you feel them vibrate. You need to press the blue Connect button on both devices, before your file can be transferred. Like Android Beam, Bump can be a little temperamental and often requires several tries before it works. Also be aware that all music metadata and album art is lost when you transfer music files.

    Cross-platform Beaming Issues

    In theory, you should be able to tap an NFC-enabled Windows Phone 8 to a Galaxy S III or Galaxy Nexus and share anything. However, I’m told that sharing of web pages and contacts work fine, but sharing of files and photos does not. Let’s hope Microsoft and Google get together to address this issue soon.

    The Final Word

    While it’s true that Samsung and Google may have oversold beaming, once you know how to use it, it’s a powerful feature. As more devices support these two features, I’d like to see both companies enable these by default so no setup is required. Also, Samsung should find a way to automatically toggle on and off Wi- Fi Direct (like Google does with Bluetooth beaming), so you don’t have to turn it on every time. I’m glad that Samsung has made this concept something that everyone now is aware of. We live in a wireless world, and you should never have to connect a cable to transfer files.

    Have fun beaming!

    – Rick

    Copyright 2013 Rick E. Schwartz. All rights reserved. Linking to this article is encouraged.

    Follow me on Twitter @mostlytech1

    Getting the Most Out of Your Samsung Galaxy S III – Part Two

    Last update: January 26, 2012

    30 Great Tips & Tricks for the Samsung Galaxy S III

    In part one of this article, we talked about what you need to get started with your new phone. This week were going to go much deeper and discuss more than twenty more tips that every Samsung Galaxy S III user should know.

      1. Learn how to access Google Now – There is some confusion how to access Google Now on a Samsung Galaxy S III. You don’t swipe up like you do on other Android smartphones. To access Google Now, long press the Home button and touch ‘Google.’ Now you’ll need to set things up by clicking ‘Next’ until you see ‘Yes, I’m in.’ Then choose which email account you want to use. Now you should start receiving cards with useful information on them. Say ‘Google’ to ask you phone questions without touching the screen.

      2. Try the new live camera filters – Android 4.1 has some cool new Instagram-style live filters that work on photos or video. To enable these, go to the Camera app and touch the magic wand icon. You’ll be able to choose from presets including warm vintage, cold vintage, black and white, sepia, solarize and many more.

      3. Edit video on-the-fly without editing software – Android 4.1 also lets you make your own movie by simply pressing the pause button in the Camera app and then starting to record again. When you’re finished press the stop button and you can watch your edited shots in sequence. This is simple, but really useful addition.

      4. See how widgets automatically resize – As you drop widgets onto the Android 4.1 home screens, everything else automatically moves to make room. When a widget is too big it, it resizes itself.

      5. Quickly speed up bogged down apps – I love the Zite app, but after you use it for a while it gets slower and slower until you can hardly scroll the page. This problem is easy to fix however. First, long press the Home button and touch ‘Remove all.’ Then, touch ‘Task manager’ and ‘Clear memory.’ Finally, hit the Back button and go back to the problem app. You’ll find the problem is gone.

      6. Capturing a screen – To capture anything on the screen press the home button and the power button together for 2 seconds OR use your palm to swipe from right to left. If you’ve done it correctly, you should hear a copy machine sound and see the screen flash white. Video instructions.

      7. Turn off 4G to increase your battery life – If you’re in an area without 4G LTE reception there is no reason to have your phone continually scanning for a 4G signal. This can take a toll of your battery life. Unfortunately carriers like Verizon do not let you disable 4G from the Settings pages. Fortunately there is a solution to this problem although it’s not as easy as it should be.

      1. Download the ‘Phone info‘ app from Google Play.
      2. Click on ‘Device info’
      3. Scroll down till you see ‘LTE/CDMA/EvDo’
      4. Touch ‘LTE/CDMA/EvDo’ and choose ‘GSM/CDMA auto (PRL)’

      You should be now be connected to Verizon's 3G network. Because the phone is no longer constantly searching for a 4G signal, this will conserve battery life.

      Here are some more great tips to preserve battery life on the Samsung Galaxy S III.


      8. Mute your phone by turning it over – Go to Motion and ‘Turn over to mute/pause’ to on. Now turning your phone over so it’s screen is down automatically mutes incoming call ringtones and alerts sounds. This feature also works with music and videos when you use the stock Samsung players.

      9. Make your graphics smoother – Normally your CPU handles rendering of 2D graphics. By going to Settings > Developer options and making sure ‘Force GPU rendering’ is checked, you can free up CPU clock cycles so your graphics are rendered faster and smoother. In the unlikely event that you encounter an app which doesn’t support this, you’ll want to disable this setting before running that app.

      10. Pick your favorite contacts – To do this launch the Phone app and touch ‘Contacts,’ then mark your best friends and family members with a star to identify them as Favorites. You’ll find the star in the upper right-hand corner of the screen after you select a contact. Favorites are displayed first in the Phone app so you can quickly call or message them.

      11. Toggle screen rotation – By now you’ve probably figured out you can enable and disable screen rotation from the Notification bar which is displayed when you swipe down from the top of the screen. I recommend that you disable this when you’re not viewing photos or video.

      12. Enable Driving mode – Another useful Notifications bar option is Driving mode. When this is enabled, all incoming caller ID and text messages will be read to you.

      Driving mode and Sync disable are useful settings


      13. Disable sync when you’re not working – You can save battery life by disabling account synchronization when you don’t need it. This is done by scrolling to the right and touching ‘Sync’ in the Notification bar.

      14. Display a world clock for notifications – Touch the time in the Notification area to display a world clock. Touch ‘Add city’ to display different zones around the world.

      15. Access your phone, mail, texts or camera from the lock screen – You can simply quickly swipe up from any of the four icons on the Lock screen to immediately launch the associated app. This is a real time saver.

      Notice Instagram has been added to the Lock screen


      16. Access any app from the Lock screen – You can replace any of the four icons on the lock screen. To do this, go to ‘Settings’ > ‘Security’ > ‘Lock screen options’ and make sure Shortcuts is on. Then touch the word ‘Shortcuts’ and four icons will appear. Touch the icon you wish to replace and choose a new app. The access the new app when your phone is locked, quickly swipe up to launch it.

      17. Quickly switch between all running apps – Press and hold the Home button to see all of the running apps. Touch the screenshot for any app to switch to it.

      It’s easy to free up lots of memory


      18. Free up memory to improve performance – To free up memory and make your phone run faster, press and hold the Home button and touch ‘Task manager.’ Then touch ‘RAM’ near the top of the screen and ‘Clear memory.’

      19. Close all running apps – To close all apps that are running in the background, press and hold the Home button and touch ‘Remove all.’

      20. Zoom in or out using hardware buttons– You can use the volume and volume down buttons on the left to zoom in or out which in the Camera app.

      21. Connect to your corporate mail – To access your work email click on the ‘Email’ app on the home screen shown to the right. Then click on the ‘Corporate’ icon and enter your name and password. If it doesn’t connect with you exchange server the first time, check your user name and try again. To save battery life, change from ‘Push’ to a time interval like 30 minutes or Manual for Off-Peak.

      22. Access all of your email from a single app– To add all of your different e-mail accounts (e.g. Gmail, Yahoo mail, Outlook mail, etc.) touch the icon for the red Email app and go to Settings. Then touch the ‘+’ sign and choose which account to setup.

      You can use any song as your ringtone


      23. Getting the pan image trick to work – The trick to getting the pan to browse feature to work (after you’ve enabled it under Motion settings) is to hold one of your fingers on the screen when you are zoomed in on an image. Then when you move the phone in wide sweeping motions from left to right and back you should see different parts of the photo.

      24. Use your favorite song as a ringtone – You can use any song as a ringtone for all calls, calls from an individual person, or as an alarm. Launch the stock ‘Music Player’ app and touch and hold on the song you wish to use. Then touch ‘Set as’ and choose from the available options.

      25. Upgrade your browser – The stock Browser is fine, but you should download and install Chrome and use it instead. It’s much faster and links with your computer and tablet.

      26. Buy a wireless charging doc – Most people don’t know it, but the Galaxy S III supports wireless charging. To take advantage of this feature, you’ll need to purchase a special doc from Samsung. These docs should go on sale any day now.

      27. Prevent your phone from switching to Wi-Fi – You may want to consider turning off Wi-Fi when you’re in an area with great 4G data speeds, because it will make your phone faster. The reason for this is because your phone will always use Wi-Fi when it’s available — even if it’s much slower than 4G. Since the Galaxy S III automatically turns Wi-Fi back on when you do certain things, you’ll have to go to Settings/Wi-Fi and uncheck the first option which says “Notify Me – When launching high data usage applications…” Important: You should only do this is you have a 4GB data plan, or are sure you’re under your monthly allowance.

      28. Download some great new apps – If this is your first Android phone, you should download some of the best Android apps. Here is a good list of the fifty best.

      29. Fix your auto-brightness – Your phone has an auto-brightness setting, but it doesn’t work that well. You should download Lux Auto Brightness to fix this problem. Lux automatically adjusts the brightness of your display based on your environment. When you go into a dark room and unlock your screen, Lux will automatically lower the brightness of your display to make reading more enjoyable.

      To setup Lux you need to go through their setup wizard. I suggest you leave the factory default settings as is. After you do that, you’ll need to go back and launch the app again and touch ‘Press to enable Lux.’ Lux will adjust every time you unlock your screen. If you sometimes use your tablet in a totally dark room, I suggest you go to the settings page and set ‘Night Mode’ alpha to 10.

      30. Share your screen with other devices – It’s possible to share the screen on your Samsung Galaxy S III with Samsung phones, tablets or TVs. Learn how to do this here.

      Connect your phone to any Apple speaker dock

      Connect your phone to any Apple speaker dock

      31. Connect your phone to a speaker dock – Now you can buy a cable which connects your Samsung Galaxy S III to any Apple-compatible speaker dock.

      In addition to the above tips, here are five little-known features for Your Samsung Galaxy S III that you’ll be able to appreciate after you upgrade to Android 4.1. If you’re wondering why I left out S Beam, I’ve devoted a whole post to that feature alone. Check it out.

    More Android 4.1 tips from Samsung.
    – Rick

    Copyright 2013 Rick Schwartz. All rights reserved. Linking to this article is encouraged.

    Follow me on Twitter @mostlytech1


    Getting the Most Out of Your Samsung Galaxy S III – Part One

    Last update: December 15, 2012

    This article has had over 10,000 views. Thanks for reading it.

    Things To Do First

    You’ll need to increase the brightness to make the S III’s screen look its best


    This is the first in a three part series which will help you to get the most out of your new Samsung Galaxy S III. Let’s start with some simple things to make an already good phone — even better:

    1. Increase the screen’s brightness – Some reviewers have complained that the Galaxy S III is not as bright as other top smartphones. This is easy to fix. Go to Settings > Display > Brightness and turn ‘Automatic brightness’ off. Then, move the brightness slider to the right and press OK. The screen should now be much easier to read. I run my brightness at about 70% and battery life is still fine.
    2. Change the screen timeout – Another easy to fix annoyance is the time before the screen goes to sleep. Go to Settings > Display and change the ‘Screen timeout’ to 2 minutes. This will keep your screen awake much longer, without having much of an affect on battery life.
    3. Here is an example of a customized home screen

    4. Clean up your home screens – Every one uses their phone differently, that’s why important that you customize your home screens to meet your needs. Here are some suggestions for new Samsung users:

      a. Make shortcuts on your home screens for all of your favorite apps. To do this touch ‘Apps’ and then touch and hold an app and then drag it until it appears on the desired home screen.

      b. Create folders for different categories of apps (e.g. Games, Utilities, etc.) and move all of the related apps into those folders. If you’re not sure how to create folders, there are details below in the section called ‘Cleaning Up Your Homescreens.’

      c. Uninstall any unnecessary apps and widgets. To do this, simply touch and drag them into the trash can in the lower right-hand corner of the screen.

      d. Remove any extra home screen panels after you’ve created shortcut for all of your most-used apps. The SIII comes with seven home screen panels, but you can speed up the time it takes to get to your apps if you delete all blank home screen panels. To do this pinch the home screen with two of your fingers. Then drag any blank panels into the trash can. You can add them back later if you want to.

    5. Clean up your app locker
      a. Start by hiding all of the carrier-installed apps you don’t plan to use. To do this touch Apps and press the Settings button. Then touch ‘Hide applications.’ Touch the black box next to any app you want to hide. When you’re finished, press ‘Done’ in the upper right-hand corner of the screen.
      b. Next, uninstall all of the apps you don’t plan to use. Details below.
    6. Improve your on-screen typing – If you have any problems typing on the Samsung keyboard you may need to do one of these three things:

      a. Go to ‘Language and input’ and enter words into your ‘Personal dictionary.’
      b. Customize your predictive text settings (details at the bottom on this post)
      c. If you’re still not satisfied after the above two steps, download SwiftKey 3 keyboard and use it instead of the stock Samsung keyboard.

    7. Download the drivers for your phone – If your phone doesn’t mount after you plug it into the USB port on your computer, you may need to download drivers. You can find the USB drivers for the Verizon version of the Galaxy S III here. Check the Samsung website to find the drivers for other carrier’s phones.
    8. Expand your memory – If you don’t have an extra 16 or 32GB microSD card laying around, you should purchase one, and copy all of your media to it. You can double the storage in your Galaxy S III for less than $10. This will free up valuable space on your internal memory.
    9. Replace some of your Samsung apps with stock ones – Samsung replaces many of the stock Android apps. In some cases, the replacements are better than the originals. In other cases, they are not. Here are 20 stock apps which you may want to consider.
    10. Read the manual – There is some valuable information in the Samsung Galaxy S III User’s Guide. You can view it here.
    11. Learn how to use the special features which are exclusive to this phone – The “Guided Tours” app has videos which will teach you how to use special features like one touch sharing, pop up play and more. Most of these appear in the “Additional videos” section. Even more videos can be found by searching for “Galaxy SIII” on YouTube. These tips and tricks videos are also worth watching.

    Where to Find More Great Tips?

    You can find 30 more great tips and tricks for the Samsung Galaxy S III here. If case you’re wondering why I left out S Beam, I’ve devoted a whole post to that feature.

    Cleaning Up Your Home Screens

    How to create folders

    You can no longer drag and drop and app on another to create a folder.

    1. To create a folder, click on the Menu button in the lower-left hand corner.
    2. Then touch ‘Create Folder’
    3. You should see a white folder appear on your homescreen.

    Note: Make sure you only try to do this on a homescreen that has room for the folder to appear. Otherwise it won’t work.

    How to uninstall unused apps like ‘Media Hub’

    1. Touch the Apps icon.
    2. Press the Menu button in the lower-left hand corner and touch ‘Uninstall’.
    3. Click on the red minus sign to delete an app.
    4. Confirm and press the Back button when you’re done uninstalling apps.

    Note: You can only delete certain apps. If there is no minus sign, you cannot delete them.

    This list view allows you to quickly find apps alphabetically


    How to fill in the spaces after hiding apps

    After you hide a lot of apps you’re going to see spaces where the old apps used to be. The easiest way to fix this is to follow these instructions:

    1. Touch the Settings button in the lower-left hand corner and touch ‘View Type’.
    2. Touch ‘Alphabetical grid’ or ‘Alphabetical list’ shown to the right.

    How to customize predictive text
    If you’re having problems with the keyboard inserting wrong words, you may want to disable or customize predictive text. To do this, follow these instructions:

    1. Go to Settings > Language and input > and click on the gears to the right of Samsung keyboard.
    2. Then touch the words ‘Predictive text’. next, scroll down and touch ‘My word list’ and press “+” to add non-standard words that you type often.
    3. Next, touch the trash can icon and delete any words from the list that appear to be gibberish.
    4. I found that changing the ‘Word completion point’ from 2 to 3 letters seemed to help as well.
    5. If you find ‘Word completion’ to be distracting, turn it off. If you leave it on, don’t fight it. Keep on typing even though it has picked a wrong word. Most of the time it will correct itself later.

    Tips for those upgrading from a Samsung Galaxy Nexus

    If you’re moving from an Android 4.0 phone like the Galaxy Nexus, there are some things you need to know to get the most out of your incredible new phone. Although the Galaxy SIII runs Android 4.0, there are some differences between Touchwiz and the stock Android 4.0 GUI. This isn’t intended to be a comprehensive list. I’m focusing on the features that I find to be the most useful.

    Dedicated Buttons are Back

    The first thing you’ll probably notice is that there are now three buttons below the massive 4.8” screen on the Galaxy S III.

    1. The left button is a menu button which lights up when you touch anywhere below the bottom of the screen. Instead of clicking on the three dots like you can see on the galaxy Nexus screenshot below, you’ll click on the S III’s dedicated menu button.
    2. The center button is a real physical home key which does three different things: Pressing it normally takes you to your Home screen. Pressing and holding it, displays a list of recent apps. Quickly pressing it twice launches Samsung’s S Voice, which is similar to Apple’s SIRI.
    3. The right button is the back button. This works the same as it did on stock Android 4.0 phones.

    Where to Find MyApps

    Instead of viewing your apps by touching the menu button in the upper right hand corner of the Google Play app, you’ll now touch the menu in the lower left-hand corner.

    There are other differences between the Samsung Galaxy S III and the Samsung Galaxy Nexus. Checkout my next article to learn how to turn off 4G or capture your screen. You’ll find answers to those questions, along with twenty five more tips. If case you’re wondering why I left out S Beam, I’ve devoted an entire article to that alone. You won’t want to miss that one.

    – Rick

    Copyright 2012 Rick Schwartz. All rights reserved. Linking to this article is encouraged.


    Follow me on Twitter @mostlytech1
     

    Optimizing Your Network for Multimedia Streaming

    Last updated: January 5, 2014

    This article has had almost 20,000 views. Thanks for reading it.

    How to Optimize Your Home Network for Multimedia Streaming

    Wireless devices can be found many places in a typical home


    Wireless networks can be found in almost every home and office. Setting up a Wi-Fi network for normal use is easy. But when you try to stream high-quality video, you’re likely to experience occasional stuttering or rebuffering. According to a study, almost one in five U.S. Internet users are unable to stream 720p HD video reliably. In some states, 40% of consumers cannot do this. When problems like this occur, you can do several things to improve the situation:

    1. Use an uncrowded channel – Make sure you’re not sharing the same Wi-Fi channel with others close to you. Many 2.4GHz wireless access-points default to the same channel when they are powered up. This can make congestion worse and lower your throughput. Download software like Farproc’s free Wifi Analyzer to get a visual picture of your network. It even tells you which are the best channels to use. Most routers will allow you to set the channel using your web browser.
    2. Utilities like this one tell you which wireless channels to use.

    3. Avoid overlapping channels – Use the channels 1, 6, or 11 when possible, because they are non-overlapping.
    4. Upgrade for more speed – If you have an 802.11b or 802.11g wireless router, consider upgrading to an 802.11n or 802.11ac router. Both are capable of faster data speeds and also support the less crowded 5GHz band. Some 802.11ac routers are capable of speeds over 1Gbps.
    5. The 2.4GHz band is much more crowded than the 5GHz band

    6. Use the 5GHz band if your devices support it – The 5GHz band is faster and not as susceptible to interference from cordless telephones, microwave ovens, baby monitors, Bluetooth devices and wireless keyboards as the 2.4GHz band. It’s also much less crowded and should be used as long as your devices support it, and you are not too far away from your wireless access point.
    7. A low-cost Wi-Fi Booster

      A low-cost Wi-Fi Booster

    8. Extend your range – If your problem is signal strength-related, consider using a Wi-Fi booster/repeater or wireless access point with better antennas like this one. By adding the $40 Wi-Fi booster shown on the right, I was able to increase my download speeds by almost 400%. An even better option for those who have a wired Ethernet network is to purchase a second router that supports 802.11ac. Make sure to set it up as an access point where you connect the first router to the port 1 and NOT the WAP port. Also make sure to disable the DHCP server. More details here.
    9. Consider wireless alternatives – When you’re having problems steaming HD video, you may want to consider wireless alternatives like HomePlug Powerline AV adapters. If you go this route, make sure your adapter is HomePlug AV-compatible so you can mix and match devices from other companies. According a recent article in Maximum PC, last-generation Homeplug AV 200 adapters were supposed to be capable of speeds of up to 200Mb/s. Even though they only got real world speeds were 60-70Mb/s, that’s enough for a single HD stream. Newer devices support the IEEE 1903 standard which is capable of theoretical speeds up to 500Mbps and real world speeds up to 100Mbps. These speeds are even faster than you can get over standard Ethernet wiring, so you should be able to stream multiple HD movies at once in your home using multiple adapters. Consider the TP-Link AV-500 TL-PA511KIT or eNetgear Nano 500 XAVB5101 adapters. Those are two of the best affordable adapters available today. Both should be capable of real world read speeds of over 62Mbps and real world write speeds over 54Mbps.

      Another good wireless alternative are MoCA adapters, which transmit multimedia data over coax cable. Both of these are capable of higher data rates and more reliable than most wireless routers.

    10. Test your download speed – If you stream media over the Internet, you should know what your download speed is. Even more important than the peak speed is the average speed. Watch whether the data rate is consistent, or fluctuates a lot. There are several good sites and apps which do this. More info.

    An Ethernet Over Coax MoCA Network Adapter

    Dual-Band Wi-Fi FAQ

    Do all 802.11g/n products support dual-band?
    No. 802.11ac was designed specifically for the 5GHz band, however, so it seems likely all ‘ac’ products will support 5GHz.

    Who makes dual-band routers?
    Most wireless routers sold over the past few years support dual-band. Examples include: Apple’s Airport Express, all ASUS routers (RT-AC66U, RT-N65U, RT-N66U and EA-N66) the Linksys N600, N750, N900 and AC1750 as well as routers from Netgear.

    Here are just a few of the smartphones with 5GHz Wi-Fi support

    Here are just a few of the smartphones with 5GHz Wi-Fi support

    Do you have a list of mobile devices that support 5GHz Wi-Fi?
    Here are a few of the devices which support dual-band Wi-Fi. Note: This list is not current. These days most mobile devices support 5GHz.

    • Amazon Kindle Fire HD
    • Amazon Kindle Fire HDX
    • Apple AirPort Extreme (2009 and later)
    • Apple computers with Wireless-N support
    • Apple iPad
    • Apple iPad 2
    • Apple iPad 3
    • Apple iPad 4
    • Apple iPhone 5 (and later)
    • Apple TV (2nd and 3rd gen.)
    • ASUS Nexus 7
    • BlackBerry PlayBook
    • Google Nexus 10
    • HTC Droid DNA
    • HTC Rezound
    • HTC Windows Phone 8x
    • LG Nexus 4
    • LG Nexus 5
    • Linksys EA-3500 wireless router
    • Linksys E-4200 wireless router
    • Linksys EA-4500 wireless router
    • Microsoft Surface RT
    • PCs with Wireless-N support (most, not all)
    • Samsung Galaxy Premier
    • Samsung Galaxy Nexus
    • Samsung Galaxy Note 10.1
    • Samsung Galaxy Note II
    • Samsung Galaxy Tab 3 8
    • Samsung Galaxy Note 3 (and later models)
    • Samsung Galaxy S II
    • Samsung Galaxy S II Skyrocket
    • Samsung Galaxy S III (and later models)
    • Samsung Galaxy S III mini
    • Samsung Galaxy S 4
    • Samsung Galaxy Tab 10.1 (possibly other sizes as well, but NOT the Galaxy Tab 2)
    • Samsung Nexus 10
    • Slingbox 500

    Where can I go to find out if my devices supports Dual-band Wi-Fi?
    Search for your device here. It’s dual-band if there is a “1” under 5.0 GHz transmit and receive.

    Is 5GHz Wi-Fi faster than 2.4GHz Wi-Fi?
    It you refer to the chart below, you’ll see some routers are capable of higher data rates when using the 5GHz band. More info.

    Chart courtesy of Maximum PC

    Is there a downside when using 5GHz Wi-Fi?
    Yes. Not all devices support 5GHz Wi-Fi. Also, the higher frequency signals of 5GHz networks do not penetrate walls as well as 2.4GHz signals. This limits their reach inside some homes.

    How can you force your devices to use 5GHz Wi-Fi?
    ‘Forget’ the 2.4GHz network and connect to the 5GHz one.

    What’s better than 802.11n?
    802.11ac is a new wireless-networking standard which is capable of speeds that are almost 3x faster than 802.11n. You can learn here about it here. In addition to higher throughput, 802.11ac has wider coverage and improved power efficiency. Although real-world speeds won’t always exceed 1Gbps, 802.11ac should be capable of speeds of 500Mbps at distances of 50 meters. Apple’s Macs now include support for 802.11ac. All premium routers now include 802.11ac support as well. Asus shipped a laptop with support for 802.11ac over a year ago.

    Is anything else being done to improve streaming of multimedia around the house?
    Yes, companies like Qualcomm are working on technology called StreamBoost. When combined with 802.11ac, this is supposed to improve performance by managing network traffic. StreamBoost-compatible products let users to see all the devices connected to their network and monitor the real-time bandwidth usage of every device.

    What comes after 802.11ac?
    According to this blog, “802.11ad improves upon the wireless capabilities introduced in 802.11n. Ideally, 802.11ad will allow devices to communicate over four, 2.16GHz-wide channels, delivering data rates of up to 7 Gigabits per second, even for mobile devices with limited power, a significant improvement over both 11n and 11ac.” More info about 802.11ad.

    There are also people who say G.hn is the next big thing in home networking. It uses existing home wiring including coaxial cables, phone lines and power lines. You can learn here about it here.

    More about what lies next in networking.

    Another good article related to this topic.

    If you follow the above guidelines, you should be able to stream high-definition videos without problems. Let me know if I missed any good Wi-Fi tips.

    – Rick

    Copyright 2013-2014 Rick Schwartz. All rights reserved. Linking to this article is encouraged. Network photo courtesy of Apple.


    Follow me on Twitter @mostlytech1