How to Power Profile A Mobile App Using Hardware
May 31, 2015 4 Comments
This article is the second in a series for mobile software developers. The first article can be found here. It is intended to help developers create apps with better battery life. This article will focus on Best Practices for hardware power measurement. This is something every developer should care about because reducing power consumption results in longer battery life and happier users.
Battery life is now the number one thing consumers care about. Developers need to take action to ensure their app doesn’t not consume too much power, but most of them have no idea how much power there app consumes. You could use software like GameBench or Trepn Profiler to measure power consumption, but those run on your device. Collecting large amounts of power data and storing it locally consumes CPU cycles, which can inflate power readings. Another problem is the fact that popular devices from Samsung don’t report accurate direct power readings. With these devices, you need to measure power using an off-target hardware-based solution. This article shows you how it’s done.
Good Power Meters Aren’t Cheap
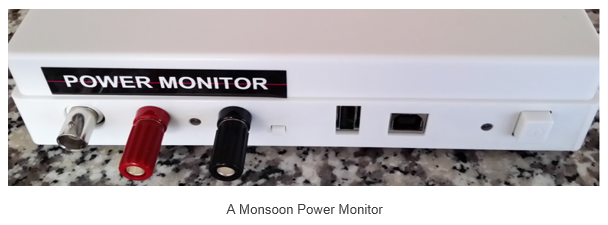
There are different ways to measure the power consumed by mobile devices, but the most popular off-target method is using a Monsoon Power Monitor. This $771 device effectively replaces the battery on your phone. It can measure the voltage, current and power and connects to special PC software which provides control over power data is collected and displayed. After your Monsoon arrives, you need to download this software and documentation from their website. You also need bypass the battery in your phone, so the Monsoon can power it. Although you could connect two banana to mini-grabber cables directly to your phone, the battery gauge and temperature monitoring won’t work unless you leave the battery in and use insulated copper tape as described in the Monsoon manual. Their user guide describes how to prepare your phone so it can be connected to a Monsoon Power Monitor. Once you’ve modified your battery, you’ll need to determine how you are going to charge it. In most cases you’ll just fold back the copper tape on the plus terminal so that battery charges normally. If you have a phone like a Nexus 6, which doesn’t have a removable battery, you got a challenge on your hands. Checkout the Appendix at the end of this article to see why.
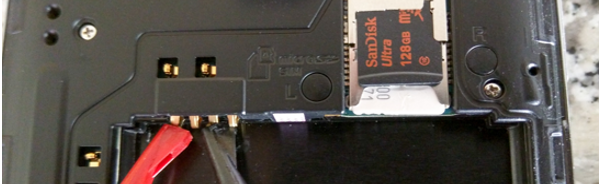
It easy to measure power on a phone with a removable battery
Connecting Your Device
Now that you’ve modified your battery, you’re ready to connect your phone to the Monsoon. If you haven’t done so already, download and install the Monsoon software and connect a USB cable to the of the power monitor, so you can install the drivers as described in the manual. Before connecting your phone to the Monsoon you need to perform one final test. Connect your modified battery to the red and black banana plugs on the front on the Monsoon. Make sure the Monsoon is off and press the power button on your phone. If the phone powers up, the connection to the battery has not been broken. Now launch the ‘Power Tool’ software on your PC and turn on the Monsoon. The LED on the front panel of the Monsoon should be green. Press the ‘Refresh’ button and highlight your device on the PC software and click on the Select button. If the software can’t communicate with the Monsoon, power cycle the Power Monitor.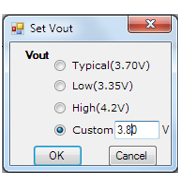 By default, the power supply on the Monsoon is turned off, so you’ll need to turn it on and set the proper voltage. Click on ‘Set Vout’ and enter the proper value for your device. Next, enable ‘Vout,’ and enter the size of your battery. Once you confirm VOUT is enabled on the software, you can power up your phone. Wait until the Android home screen is displayed until you proceed. Next, connect a cable from the USB out on the front of the Monsoon to your device. This will be used to control your device remotely. When USB passthrough mode is set to AUTO, once sampling is started, the direct USB connection is disabled, charging over USB is disabled and samples are measured without the interference of USB charging. As soon as sampling is stopped, the direct USB connection is re-enabled and data can once again be transferred to and from the device over USB
Sizing Up Your App
You should perform a series of tests with your app, and similar apps, so you know how your app compares to the competition. You should measure idle power consumption, average power consumption and peak power consumption. You’ll find step-by-step directions below how to do this.
Measuring Idle Power Consumption
Measuring the power consumed when an app is doing nothing and comparing it to the idle power consumption of your device can show if the app under test is keeping the screen or processor awake. It can also identify problems with analytics and ads. Start by measuring the baseline idle power consumption of your device without any apps running. Since the screen is such a large consumer of power, you should measure idle power with the screen off as well as on and carefully document the screen brightness level. The chart below shows how much power an idle Nexus 6 consumes at various screen brightness levels. Brightness levels are set via ADB script — not using the Android OS slider.
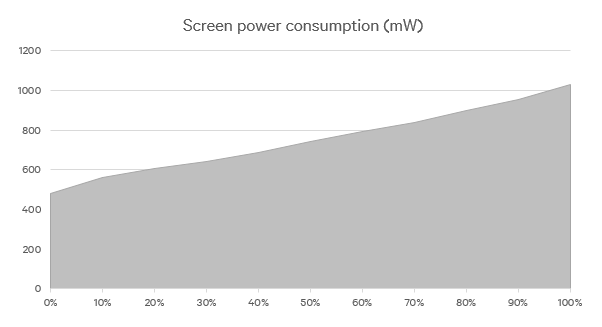
Power consumed by a Nexus 6 at various brightness levels
Preparing to measure power
- Connect your mobile device to the Monsoon Power Monitor.
- Launch the Monsoon PowerTool software on your PC and enable Vout as described above.
- Power up your smartphone or tablet and wait 5-6 minutes.
- Check ‘Power Avg’ on the Monsoon and set the units to mW (100 units/tick).
- Turn off all unneeded features like Wi-Fi and Sync and put your device in ‘Airplane Mode.’
- Go to Settings and launch the Application Manager. Stop all unneeded apps and services under the ‘Running’ heading.
A full list of Best Practices for the Monsoon is posted at the bottom of this article.
Measuring the idle power of your device and software
- Press the RUN button to start recording power consumption.
- Don’t touch your device for at least 60 seconds.
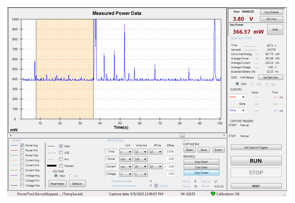
- Press the STOP button when you are finished recording and select the on-screen region you want to use for your average. It’s a good idea to record average power readings with and without spikes. To filter out spikes and get a more accurate average, select a region on the Monsoon software without any large spikes (as shown on the right). This should only be done for idle power measurements when you believe the spikes are caused by other apps or the operating system.
Here are some idle power measurements taken on a Samsung Galaxy Note 3 with no apps running in the foreground.
- Average idle power – screen off – 15.6 mW (without spikes)
- Average idle power – screen off – 27.8 mW (with spikes)
- Average idle power – screen brightness min. – 391 mW (without spikes)
- Average idle power – screen brightness min. – 410 mW (with spikes)
- Average idle power – screen 50% – 528 mW (without spikes)
- Average idle power – screen 50% – 557 mW (with spikes)
- Average idle power – screen 100% – 870 mW (without spikes)
- Average idle power – screen 100% – 882 mW (with spikes)
For comparison purposes, here are a few idle power readings for a Nexus 6 with no apps running in the foreground. The Nexus 6 has a larger screen with considerably more pixels (2560×1440 vs. 1920×1080). This probably accounts for most of the difference in power consumption between these two devices.
- Average idle power – screen off – 20 mW (without spikes)
- Average idle power – screen 50% to 100% – 660mW to 1200 mW (including spikes)
- After you finish measuring the idle power of your device, launch your app and measure the idle power when it is running. In theory this should be similar to the idle power of the device, but often it’s higher. By comparing the idle power of your app with similar apps, you can determine if your app has a problem.
Here are some idle power measurements taken on a Samsung Galaxy Note 3 before playing two different games:
- Average power No app running (idle) – 557 mW
- Average power Temple Run (idle) – 1575 mW (during the first minute while screen awake)
- Average power Temple Run (idle) – 720 mW (after the screen dims about 60 seconds into the test)
- Average power Asphalt 8: Airborne (idle) – 2139 mW
Test Details: Duration: 2:00 Screen brightness: 50%; Airplane Mode: On; Wi-Fi enabled (Asphalt 8 – Won’t run without Wi-Fi); All readings above include power spikes.
There are several reasons why Asphalt 8 consumes 36% more power than Temple Run during the first minute of testing. Asphalt 8 has nice visual effects and sound and Temple Run does not. However, when you let the test run for two minutes, Asphalt 8 consumes 197% more power. The biggest reason for the discrepancy is because Asphalt 8 holds a full wakelock, which never lets the screen go to sleep, while Temple Run lets the screen dim after the user defined interval. In my test, this was set to 60 seconds.
Measuring Average Power Consumption
Here are some average power measurements taken on a Samsung Galaxy Note 3 with the same games tested above:
- Average power Temple Run (in-use) – 1629 mW
- Average power Asphalt 8: Airborne – [TBD] mW
Test Details: Screen brightness: 50%; Airplane Mode: On; Wi-Fi enabled; All readings above include power spikes.
Measuring Peak Power Consumption
Before measuring the peak power that your software consumes you may want to measure the peak power of one or more popular benchmarks since that will establish a top limit of the power which can be consumed by your device.
Here are some peak power readings taken on the Samsung Galaxy Note 3 for some popular benchmarks:
- AnTuTu Benchmark v5.7 – Max. power – 9761 mW
- AnTuTu System Stability Test – Max. power – 9855 mW
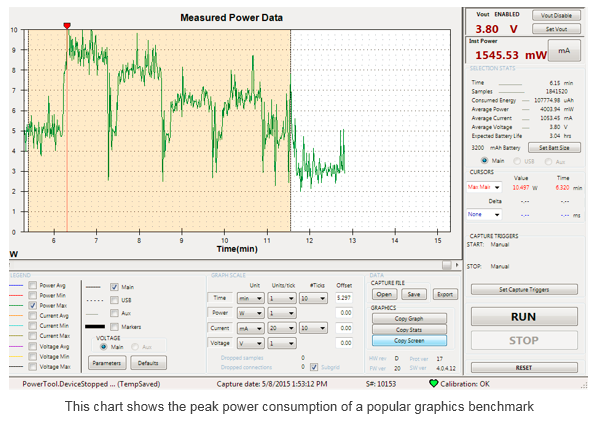
- GFXBench 3.0 – Max. power – 10497 mW (graph shown below)
Test Details: Device: Samsung Galaxy Note 3; Airplane mode: On (except for GFXBench); Wi-Fi: Off; Screen Brightness: 100%; Bluetooth: Off; Sync: Off
Power Measurement is Fun
Having a better understanding of mobile power consumption will help you to make more power efficient apps. 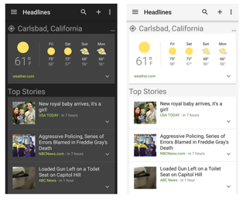 The thought is, if you can measure it, you can act on it. You can make changes to your code and see what the affect is. You can see how your app compares to the competition. You can also answer power-related questions like the following:
Q: Do dark themes really save power?
A: Yes. The average power consumed by the Google News & Weather app with a light theme selected is 893 mW. With a dark theme selected, only 410 mW of power is consumed. That’s a savings of 54%!
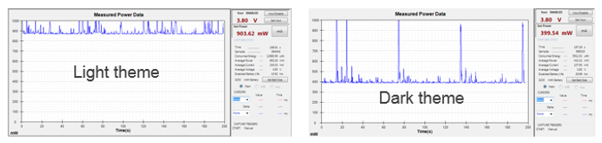
Test Details: Device: Samsung Galaxy Note 3 with AMOLED display; Airplane mode – On; Wi-Fi: Off; Brightness level – 50% according to slider; Screen mode – Standard; Auto-adjust screen tone – Disabled
Q: Should my app wait to perform certain tasks until a user is on a Wi-Fi network?
A: The answer to this question depends in part on the type of app and the signal strength of your networks. If your app transfers large amounts of data, you should wait until the user connects to Wi-Fi when possible. In the test below I download a 100MB file from a website. Over Wi-Fi the average power consumption was 997 mW and the download took about 65 seconds. Over 4G, the average power consumption was 2291 mW and the download took about 195 seconds. Bottom line: Transmitting large amounts of data over a 4G cellular radio can use over twice as much power. One reason for the high cellular power consumption in my test may be related to signal strength, which only showed 2-bars. Under conditions like that, the phone has to amplify the signal more.
Well-designed apps only download files when the user is connected to Wi-Fi, but give the user the ability override this setting if desired. This is a good approach to follow. Google has code snippets online that show how this can be done.

Monsoon Tips & Tricks
The Monsoon User Guide is very long, but doesn’t include any tips how to get the most out of it. As a result, I’ve included some suggestions here:
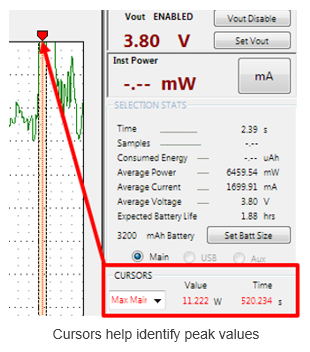
- To quickly identify minimum and maximum power readings, use cursors as shown on the right. You can also export the results of a profiling session as a CSV file. However, this isn’t ideal, because it takes a long time to export this data and Excel often fails to import all of it. If you do go this route for shorter profiling sessions, use the Statistical MIN and MAX formulas under the Formulas tab/More Functions.
- If you get a message saying the Monsoon isn’t communicating with your computer, or you can’t start or stop profiling, try power cycling the Monsoon hardware first. If that doesn’t work, reboot your computer.
- Immediately after starting the Monsoon software, sometimes accurate readings aren’t displayed. Pressing the ‘Run’ button seems to help fix this problem.

- It’s a good idea to use your mouse to set the range of data you wish used to compute the average (as shown on the on the right). This allows you to disregard data at the beginning or end of a profiling session for more accurate readings.
- You may see the calibration status indicator on the Monsoon software go yellow or red for a few seconds. According to Monsoon support, this doesn’t necessarily mean anything is wrong. If it stays in this state for longer periods, you should investigate.
- If your power peaks are off-screen, change the units from mW to W.
- You can turn on any of the available graphs at any time – even if they weren’t enabled when you captured your power data. This is helpful if you want to see the relationship of average power to peak power, or compare maximum power and current readings.
- Under very heavy loads, you might notice the voltage on the Monsoon hardware drops slightly.
- The Monsoon software drivers appear to have some stability issues and can cause blue screen crashes. As a result, I recommend you don’t leave it connected to your PC’s USB jack when you are not using it.
- Make sure to use the offset feature to on power and current values to make your results more clear.
Hardware Power Measurement Best Practices
Here are some best practices you should follow if you want the most accurate power measurements:

- Your screen is the single biggest consumer of power and can skew your readings if you don’t consider the following: Make sure the screen brightness does not change between tests. Do not enable ‘Auto’ brightness. Also, turn down your screen brightness to the lowest possible level when taking power measurements. When possible, turn off the screen entirely.
- Go to Settings and select the Application manager. Swipe to the left until you can see the list of running apps. Close all unneeded apps and stop all unneeded services.
- Turn off all unneeded features including Wi-Fi, Mobile data, Bluetooth, Location, NFC, Sync, Download booster, etc. Most phones let you do this by swiping down to access a Quick Settings screen like the one shown on the right. Notice how almost everything is turned off. You may want to also turn off all syncing options under Settings > Accounts > Google.
- Most popular apps have analytics that send data to the cloud periodically. To prevent this for occurring, turn on ‘Airplane Mode,’ and turn off Wi-Fi if your app doesn’t need to communicate with the cloud. This will also prevent apps from automatically downloading updates in the background.
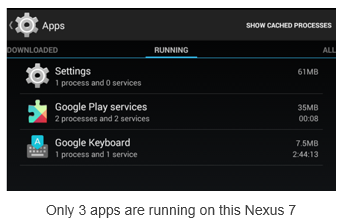
- If you’re serious about power profiling, consider purchasing a Nexus phone or tablet and only install a minimal number of apps on it. Having lots of apps running in the background affects the accuracy of power measurements. My LTE-enabled Nexus 7 only has 3 apps running on it, while my Verizon Galaxy Note 3, still has 22 or more apps running in the background — after I’ve closed all apps and stopped all unneeded processes.
- If you are purchasing a new device for power modelling, choose a device with a removable battery that you can easily access with and contacts that you can clip on to.
- Time your tests. Make sure each test is at least a minute. Longer runs minimize the impact of power spikes on averages.
- Run each test at least two or three times and average the results. Throw out any values that are noticeably higher than the rest and retest. Even with Airplane mode on and Wi-Fi off, the OS and apps on your device still work in the background. This causes power spikes that can affect the accuracy of your readings. If you have a rooted device, consider using software like RepetiTouch to record your keystrokes. This will ensure your test runs are the same each time.
- Consider uninstalling apps that relaunch after you close them like Microsoft’s ‘One Drive’ or Nokia’s ‘Here.’
- Do not setup your device for use with multiple users because that makes it harder to close all of the background apps.
- Turn off ‘Google Now’ as follows: Turn off “Ok Google” Detection by going to Settings > Accounts > Google > Search > Voice. Select “Ok Google” detection and turn off ‘From the Google app’ and ‘From any screen.’ Turn off ‘Show cards’ under Settings > Accounts > Google > Search > ‘Now cards.’
- Pause or disable step counters like ‘S Health’ or ‘Google Fit.’ These apps can consume significant CPU cycles while your device is idle.
- Avoid using your power measurement device with a wearable. Wearables require that Bluetooth is active and have cause multiple apps to run in the background.
- Make sure your computer doesn’t go to sleep when you are capturing data. If it does, you could lose data. To do so, make sure your PC is charging via AC adapter and not running on battery. Set your power profile so your hard disk goes to sleep after 30 minutes. Set your processor and screen so it never goes to sleep when connected to a power source. Turn off your screen saver. Move your mouse from time to time to let the computer know you are still using it.
- It’s normal for your phone to do housekeeping after it start up. Wait 5 or 6 minutes after powering up your mobile device before profiling it. I’ve seen power spikes over 8 watts after the Android home screen is visible and the boot up process appears to be complete. Power consumption over 6 watts for 30 seconds or longer isn’t unusual. Sometimes these high power readings are related to app updates, but I’ve also seen this occur in ‘Airplane Mode,’ with Wi-Fi off. These spikes will inflate your power measurements and often have no relation to the activity you are attempting to measure.

Appendix – Preparing a Nexus 6 for Power Monitoring
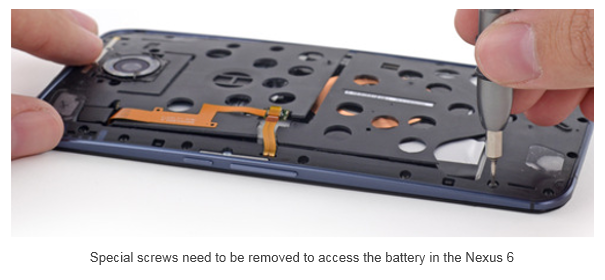
Phones like the Nexus 6 do not have a replaceable batteries. This makes it very challenging to connect power measurement tools like a Monsoon to them. First, you’ll have to get special tools to remove the back of your phone. The iFixit website shows you how to remove the back cover and get access to its battery. You’ll need a special Torx screwdriver to get access the battery of the Nexus 6. Before you order that screwdriver and remove the 22 screws, you should read the next two sections. It could save you some time.
Sadly after almost completely disassembling my phone, I learned that the battery in the Nexus 6 does not have metal pads like a most cell phones. 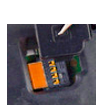 It has a flex cable that connects to a small 4-pin jack that can be seen under a hidden door (shown on the right). After learning about the special power connector in the Nexus 6, I contacted Monsoon support thinking they must sell a cable assembly for this popular developer device. The Monsoon support rep said they didn’t know how to connect a Monsoon to the Nexus 6, so I referred to their manual, which shows how to create a battery bypass, using flat copper foil and special insulating tape. It’s important that you bypass the battery in your phone, so the Monsoon can power the device. However, the battery needs to remain in place for thermal monitoring and use by the battery fuel gauge. Now that the battery has been bypassed, you’ll need to determine how you are going to charge it. More about that later. I first tried to connect insulated copper tape to the same pads that are used for wireless charging on the Nexus 6, but for some reason that didn’t take the battery out of the circuit. Out of frustration, I took the device to my company’s proto lab for assistance.
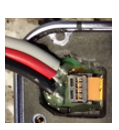
 They determined which of the wires on the 4-pin connector were the + and – and broke the connection to the positive wire, so the battery would no longer be in the circuit. You can see their mod on the left. The black wire is attached to a small pad on the Nexus circuit board that is connected to the minus terminal of the battery. The red wire is connected to the + power input on the circuit board. The red wire is connected to a trace that was previously connected to the + side of the battery, but that trace was cut to break the connection, so the Monsoon can power the phone. The gray wire is attached to a pad that connects to the + battery terminal. By mating the red and white banana plugs (as shown on the right), the connection to battery is restored, so it can be charged normally over USB.
Before You Begin
This section isn’t intended to be a how-to. It’s intended to discourage most developers from attempting a mod like this. Before you disassemble your expensive Nexus 6, you need to make sure that you are willing to take the risks described here. If you haven’t done circuit board modifications before, or don’t have all of the proper equipment, don’t attempt this. Your chances of success are poor. I think you’d be better off using a phone with a removable battery like a Samsung Galaxy Note 3 or Galaxy Note 4 for power measurement. You should be able to purchase those for $99 to $299, and they are much easier to connect to a Monsoon Power Monitor. In fact, in a pinch you can connect two banana to mini-grabber cables to a Note 3 without any modifying your phone or battery. It works fine, but the battery gauge won’t work unless you leave the battery in and use insulated copper tape as described in the Monsoon User Guide. If you want a to power model a Nexus phone, keep in mind that the Nexus 4, Nexus 5 and Nexus 6 report accurate battery power using Trepn Profiler, or other software, so you don’t even need a Monsoon. If you decide to try this mod despite my warnings, you are on your own. I cannot answer any questions about this, nor can I be responsible if you damage your device.
– Rick
Copyright 2015 Rick Schwartz. All rights reserved. Linking to this article is encouraged. All of the comments in this blog are Rick’s alone, and do not reflect the views of his employer.
Follow me on Twitter @mostlytech1
Useful Links
Monsoon Tips
Hardware Power Measurement Best Practices

Helpful info. Lucky me I discovered your web site by accident, and I am stunned why this coincidence didn’t came about earlier! I bookmarked it.
Pingback: How to Power Profile Any Mobile App Using Hardware - CodeMobile
Pingback: How to Measure Power Consumption Using Free Software | Mostly-Tech
This is awwesome