How to Upload Photos Directly from Your Camera to Facebook or Instagram
December 26, 2012 7 Comments
Last updated: January 5, 2013
This article has had over 20,000 views. Thanks for reading it.

The Canon EOS 6D is one of several new Wi-Fi enabled cameras
Most Instagram photos are poor quality because they were taken with a smartphone. You can now take great-looking photos from a Wi-Fi-enabled camera and upload them directly to the Internet without using a laptop. I’ll describe how this is done using a Canon EOS 6D, but the process is similar with other Wi-Fi cameras. The Canon EOS 6D is pricey, but you don’t have to spend a lot of money on a camera to do the things I’m describing. Wi-Fi enabled cameras like this Samsung model start around $150. Canon has affordable Wi-Fi cameras as well.
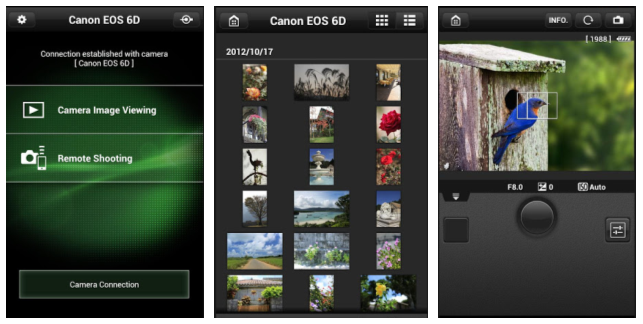
Canon’s EOS Remote running on a smartphone
Getting the Right Software
Start by downloading the free EOS Remote app from Google Play. After you’ve installed EOS Remote on your smartphone or tablet, you need to activate Wi-Fi on your camera and connect it to your mobile device. The next section describes how this is done.
Making Your Camera a Wi-Fi Hotspot

The first time you setup your Canon EOS 6D camera as a Wi-Fi hotspot you’ll need to follow these steps:
- Press the Menu button on the EOS 6D and use the main dial to select the wrench icon with three dots next to it.
- Set Wi-Fi to ‘Enable’ and then move down to ‘Wi-Fi function’ and set a nickname for your camera (e.g. Canon 6D). Press the ‘Q’ button to tab down to the letters and the main dial to select them.
- Enter the desired name and press the ‘Menu’ button when you are finished. Press ‘Set/OK’ to proceed.
- Now move the main dial to the second position labeled ‘Connect to smartphone’ and press Set. Then press ‘Set’ again to make the camera an access point and press ‘Set’ for OK.
- Press ‘Set’ again for ‘Easy connection.’ Then press ‘Set’ for OK.
- Now go to Settings > Wi-Fi on your tablet and select the nickname you entered for your camera.
- You’ll need to enter the encryption key that appears on the camera display into your tablet and touch ‘Connect.’
- Now launch the EOS Remote software on your tablet and touch the name of your camera on the tablet display. Then press ‘Set’ on the camera twice to save your settings.

This might seem like a lot of steps, but most of these only need to be performed once. After you’ve setup Wi-Fi, all you need to do is press the ‘Menu’ button and use the main dial to select ‘Wi-Fi function.’ Then you select ‘Connect to smartphone’ and ‘Connect.’ That’s it. If that choice isn’t available, first select ‘Exit’ and ‘OK’ and ‘Connect to smartphone’ will appear.
Once your camera is connected to your mobile device, you can use your smartphone or tablet as a remote control and viewfinder. You can also view all of the photos on your camera on your tablet at full resolution.

You can view, save or delete photos on your camera using your tablet
Viewing Photos from the Camera on Your Tablet and More
Now that you are connected to your camera, there are many things you can do. Here are several examples:

We’re now ready to upload our photo to Instagram
Uploading Your Photo to Instagram

After you’ve completed the preceding steps, you are now ready to upload a photo to Instagram (or another social media site). You’ll probably only need to read this section if you haven’t used Instagram before.
- After you’ve saved the photo you wish to upload, you need to go to Settings > Wi-Fi on your tablet and select the wireless access point you use to access the Internet. Then touch ‘Connect.’ Note: This step is not required if you’re using a smartphone.
- Now touch the Home button and go to All Apps > Gallery
- Open the folder with the same name as your camera (e.g. Canon EOS 6D)
- Touch the photo you wish to upload. Then touch the share icon near the top of the screen.
- If you don’t see Instagram, touch ‘See all’ and select Instagram from the list.
- Now crop your photo, add a filter and touch the icon in the upper right to save your changes.
- Now enter a description and hashtags for your photo and touch the green checkmark to upload it to Instagram.
Follow me on Instagram @rickschwar . You can see higher-resolution pictures taken by the Canon 6D on Google+ as well.
More Fun With Wi-Fi
This is just one of many things you can do with a Wi-Fi-enabled camera. You can use similar steps to upload a photo to Facebook or other sites. You can also do the following:
Please refer to the documentation that came with your camera to learn how to do these things.

Here are some other cool things you can do with a Wi-Fi-enabled camera
Closing Thoughts
If you don’t already have a Wi-Fi-enabled camera, you should make sure your next camera has this feature. It’s nice to be able to upload great looking photos without using a computer.
– Rick
Copyright 2013 Rick Schwartz. All rights reserved. Linking to this article is encouraged.
Follow me on Twitter @mostlytech1
