The Best Android Mobile Benchmarks

Although there is strong evidence that higher benchmark scores do not always translate into real-world performance gains, the best benchmarks do serve a purpose.  They are not subjective and can expose differences in hardware performance. Unfortunately, there are over fifty different mobile benchmarks to choose from, and picking the best ones is not easy. There are several reasons for this. Some benchmarks have serious problems and do not produce meaningful results. Other benchmarks haven’t been updated in years and should be taken down. A few benchmarks are bankrolled by companies with a long history of cheating. In the end, my research showed there are 4 or 5 benchmarks that really stand out and deserve a “Best” rating. A few others are very good, but not quite as good as the those with a “Best” rating. I found quite a few benchmarks that are good for certain things, so I placed them in their own category. Lastly, I found more than a few apps that have serious flaws and shouldn’t be used. Here are rankings of mobile benchmarks that will help you determine which to use, and which to avoid. This article is focused on Android benchmarks, but quite a few of these are available for iOS as well.

Capture1

Best

  • 3DMark (Sling Shot) One of the best GPU benchmarks. It incorporates volumetric lighting and particle illumination, as well as depth of field and bloom post-processing effects. Expect really low frame rates on the graphic tests. Although Sling Shot includes several good tests where physics including simulated worlds and particle systems are computed on the CPU, it isn’t the best benchmark for overall CPU performance. A useful graph is displayed after the test is complete, which plots the CPU frequency, temperature, frame rate for each of the tests. Scores vary depending on which of the modules you run. Even though the tests appear similar, scores from ES 3.1 mode should not be compared to scores from ES 3.0 mode. Requires Android 5.0 (or later).
  • GFXBench (formerly GL Benchmark) – This suite of 14 different tests is one of the best GPU benchmarks. Its “Car Chase” test was the first to test devices with hardware tessellation support. It also includes HDR tone mapping bloom, lens flares, particles, motion blur and more. Issue: Temperature and clock speed are not reported on devices like the Nexus 6.
  • PCMark for Android – This benchmark measures the performance and battery life of an Android device browsing the web, editing photos, watching videos and working with documents. Real applications are used, so the results are supposed to reflect real-world performance. The “Work battery life” test measures the time required to drain the battery in a device from full charge to 20%. This benchmark is useful, but isn’t a true test of processor efficiency, because the end result has a lot to do with the capacity of the battery in the device. Still, it’s one of the best battery tests.
  • Vellamo – One of the best mobile web benchmarks. Although it’s known for its HTML5 and Javascript browser performance tests, the Browser Chapter also includes SunSpider and Google’s Octane benchmark, as well as page load, text reflo, scrolling and crypto tests. Vellamo also has a good collection of multi-core benchmarks (Multicore chapter) which include Linpack, Sysbench and Threadbench. Lastly, Vellamo’s Metal chapter includes the Dhrystone and Linpack benchmarks, as well as storage and RAM memory tests. It should be mentioned that the person who created and maintains Vellamo is an employee of Qualcomm, although I’ve never seen any evidence Vellamo’s browser tests favor Snapdragon processors.

 Capture3

Very Good

  • Androbench – A good way to measure the storage performance on an Android device. Measures sequential reads/writes and random reads/writes.
  • Geekbench 4 – One of the better single-core CPU benchmarks. Geekbench also tests memory and multi-core performance. Geekbench 4 also includes new GPU compute tests, although it’s too soon to say how good these tests are. Requires Android 5.0 or later.
  • JetStream A relatively new JavaScript benchmark that is similar to Vellamo and PCMark’s Web Browsing test. Effectively replaces SunSpider and Octane because it includes SunSpider 1. 0.2 and Octane 2. Its makers claim it is better because “each benchmark measures a distinct workload, and no single optimization technique is sufficient to speed up all benchmarks.” Latency tests confirm that a web application can start quickly, ramp up to peak performance, and run smoothly without interruptions. Throughput tests measure the sustained peak performance of a web application. It’s supposed to be less easy to game because aggressive optimizations for one benchmark could make another benchmark slower.

Useful in Some Cases

  • 4GMark – A speed and quality of service benchmark for 2G/3G/4G cellular and Wi-Fi networks. After testing, you can compare your results against other users in your country, area, or the same device.
  • AndEBench-Pro 2015 – A suite of tests measuring CPU, GPU, memory and storage performance. It also gauges XML parsing, GUI rendering, image manipulation, data compression and cryptography tasks embedded in actual workloads. This benchmark is a product of EEMBC, which is led by Intel. This apps is based on AndEBench, which gets only 3 stars in Google Play. It was last updated in 2015 for Lollipop and is overdue for an update.
  • AnTuTu 6.0 – Better as a CPU test than a GPU test. AnTuTu is also not a good indicator of performance changes over time because its scores sometimes change dramatically as new versions are released. For example, bloggers benchmarking the Snapdragon 820 with AnTuTu 6.0 saw scores over 130,000. At the same event, on the same hardware, AnTuTu 5.7 reported scores around 70,000. That’s almost a 2x increase, which makes this benchmark very misleading. Although some of the best tech bloggers (e.g. AnandTech, Engadget and Ars Technica) no longer use AnTuTu, it’s still one the most popular Android benchmarks and the one that handset manufacturers like Samsung value the most. It also has more users than any other benchmark. For these reasons, I’m not moving it to the ‘Not Recommended’ section of this article – even though it probably deserves to be there.
  • Basemark ES 3.1 – Measures the OpenGL ES 3.1 graphics performance of your device. Also provides four results: Lighting, Compute, Instancing and Post-Processing. It’s part of their Basemark GPU Mobile test suite , which has a Pro version that reports FPS and other stats. I considered moving this to the “Good” section of this article, but after reading its mixed reviews and seeing that it doesn’t run on most mobile devices, I’m leaving it here for now.
  • DiscoMark – This little-known benchmark measures the launch-times of applications that you select. On the plus side, this test reflects the real-world performance of your phone. On the negative side, comparisons are meaningless, unless the same apps are selected.
  • Basemark GUI Free – Performs vertex streaming and blending performance measurements. Its vertex test is good, although the blend test is not great. It also hasn’t been updated since 2014.
  • Basemark X – A decent cross-platform graphics benchmark based on the Unity 4.2 game engine. This used to be one of the more demanding graphic benchmarks, but it hasn’t been updated since 2014, so it’s showing signs of age. Its off-screen test is also not completely resolution independent.
  • CF-Bench – A CPU and memory benchmark designed for multi-core devices. Although it produces a “final” score, its creators say you should take those with a grain of salt. Hasn’t been updated since 2013.
  • CompuBench RS – A RenderScript benchmark that tests compute performance of Android mobile devices. Still being updated, but not very popular.
  • Dhrystone– An older synthetic computing benchmark program which provides an indication of CPU “integer” performance. This benchmark isn’t a good indicator of performance but is still used by some chip manufacturers as a load to determine peak power consumption. Dhystone 2.1 is part of Vellamo’s Metal Chapter.
  • Epic Citadel isn’t a traditional benchmark, but it does have a “benchmark mode,” which reports an average frame rate after a game loop runs. I feel this app is useful because its graphics are representative of the real world games.
  • GameBench – GameBench is one of the more popular FPS testing apps. However it must run for for 10-15 minutes in order to get a frame rate reading, and there is evidence the results are not always accurate. I wrote an article that compares GameBench with others apps that report frame rates. GameBench is “App 2” in these tests. Note: This app also has privacy issues. It sends your email address, test scores and other personal data to the cloud where paid users can access it.
  • Google Octane– A good test of JavaScript performance in browsers.  This test is part of JetStream and the Vellamo Browser Chapter, so most users won’t need to run it.
  • Kraken– Yet another Java script benchmark. Still used by Ars Technica and some other bloggers.
  • SPECint 2006 – This benchmark is used by chip manufacturers and OEMs to measure CPU performance. It contains 12 different benchmark tests that stress a system’s processor and memory subsystem. The reason this benchmark doesn’t appear in the above sections is because it’s not available in Google Play and costs $800.
  • TabletMark – An automated tool that evaluates system performance on a range of activities, which include Web browsing, email, photo, video sharing and playback. Also includes a day-in-a-life battery test which includes idle time. While this benchmark sounds interesting, it’s worth mentioning that this app has less than 1000 downloads and a 3.6 star rating.
  • Trepn Profiler – This app isn’t a benchmark, but it reports accurate power readings and displays the processor frequencies as an overlay on any app. This is a good way to see whether your processor is throttling under a heavy load. When a processor is overworked and gets too hot, its frequency is reduced, which causes a drop in performance. The only reason this app is not in the “good” category is because newer mobile processors (including the Snapdragon 808, 810, 820 and 821) have a PMIC that only reports power readings every 30 seconds and this can affect the accuracy of average power readings. [Disclosure: I was involved in the creation of this product]

Not Recommended

  • 3DMark (Ice Storm) – Not the best test of advanced GPU performance. 3DMark Sling Shot has effectively replaced this test.
  • AnTuTu 4.0 – This app has heavy vertex shader complexity that is unlike real-world games. It also has no consideration for tiled rendering architectures.
  • AnTuTu 5.0 – This app’s 2D tests are not representative of the real-world games. This version was replaced by AnTuTu 6.0, which is better.
  • Basemark OS II – A system-level benchmark designed to measuring overall performance. In addition to its overall score, four different areas are also evaluated including system, memory, graphics, and web browsing. Not recommended because the rankings on this Powerboard web site aren’t credible and their free version is missing several features promoted on their product page. Battery Test and External Memory Tests are available in their Full version, but I can’t find a camera test anywhere. Also, this benchmark hasn’t been updated since 2014 and it is one of the lower-ranked popular benchmarks on Google Play (3.9 stars).
  • BenchmarkPi – One of several benchmarks that measures performance by calculating Pi. This benchmark isn’t recommended because it only tests the CPU and is no longer used by most bloggers. It also hasn’t been updated since 2009.
  • BenchmarkXPRT – A collection of different benchmarks. You won’t find the word “Intel” on the BenchmarkXPRT website, but if you check the small print on some Intel websites you’ll find they admit “Intel is a sponsor and member of the BenchmarkXPRT Development Community, and was the major developer of the XPRT family of benchmarks.” Intel also says “Software and workloads used in performance tests may have been optimized for performance only on Intel microprocessors.” Bottom line: Intel made these benchmarks to make Intel processors look good and other processors look bad. This benchmark should not be used.
  • BrowserMark – A cross-platform browser benchmark with issues that make cross-platform comparisons questionable.
  • CaffeineMark – A series of online tests that measure the speed of Java programs. CaffeineMark scores roughly correlate with the number of Java instructions executed per second, and are not supposed to depend on the amount of memory available or the speed of the Internet connection. Not recommended, because this test was created in 1997 for PCs and their Android app hasn’t been updated since 2011. Much better JavaScript benchmarks now exist.
  • CompuBench CL Mobile – Tests the compute performance of Android mobile devices supporting OpenCL. Tests include face detection, particle simulation, fractal rendering, ambient occlusion, raycast, gaussian blur and histogram normalization. Crashes on many devices. As a result it has a poor rating and cannot be installed on most devices.
  • Google V8 – Another browser benchmark focused on JavaScript performance. Was effectively replaced by Google Octane because it adds five tests on top of the ones already in V8.
  • Linpack – Measures the floating point performance of the CPU. Linpack is part of the Vellamo’s Multicore and Metal tests, so it’s not really needed. It’s also no longer used by most bloggers who benchmark and hasn’t been updated since 2011.
  • MobileXPRT – You won’t find the word “Intel” on the BenchmarkXPRT website, but if you check the small print on some Intel websites you’ll find they admit “Intel is a sponsor and member of the BenchmarkXPRT Development Community, and was the major developer of the XPRT family of benchmarks.” Intel also says “Software and workloads used in performance tests may have been optimized for performance only on Intel microprocessors.” Bottom line: Intel made these benchmarks to make Intel processors look good and other processors look bad. MobileXPRT should not be used.
  • Nenamark 1 – An OpenGL ES 2.0 graphic benchmark that is meaningless, because all modern devices hit its 60fps framerate limit. Hasn’t been updated since 2011.
  • Nenamark 2 – An OpenGL ES 2.0 graphic benchmark that is supposed to have more advanced effects and higher resolution graphics than NenaMark1. Hasn’t been updated since 2012.
  • Nenamark 3 – Another OpenGL ES benchmark that is supposed to continuously grow more complex until the system cannot handle it any more. However, it doesn’t allow you to change the resolution, so a phone with a very high-resolution screen is likely to perform worse than a budget phone with a low-resolution screen. This is also why it favors iPhone over Android flagships like the Nexus 6P.
  • Passmark – Tests CPU, storage, 2D graphics, 3D graphics, storage and memory performance. Hasn’t been updated since 2013.
  • Pi – Calculates how long it takes to calculate Pi up to 10 million digits. Not a useful benchmark because it only measures one thing.
  • Quadrant Standard Edition – Mostly a CPU benchmark, although it also claims to test CPU, memory, I/O and graphics. Hasn’t been updated since 2012.
  • Smartbench – A multi-core-friendly benchmark that measures overall performance. Tests productivity and gaming. Last updated in 2012. Poorly rated on Google Play (3.8 stars).
  • SunSpider – The JavaScript benchmark SunSpider is no longer being updated. Its creators recommend JetStream. Even when it was still popular, the data that SunSpider used was so small that it was more of a cache test than a JavaScript benchmark.
  • WebXPRT– You won’t find the word “Intel” on the BenchmarkXPRT website, but if you check the small print on some Intel websites you’ll find they admit “Intel is a sponsor and member of the BenchmarkXPRT Development Community, and was the major developer of the XPRT family of benchmarks.” Intel also says “Software and workloads used in performance tests may have been optimized for performance only on Intel microprocessors.” Bottom line: Intel made these benchmarks to make Intel processors look good and others look bad. WebXPRT should not be used.

I hope you find this article to be of use. If you have any comments please enter them below.

– Rick

Copyright 2016 Rick Schwartz. All rights reserved. Linking to this article is encouraged. All of the comments in this blog are Rick’s alone, and do not reflect the views of his employer.

How to use less than 100MB of mobile data each month

I recently switched carriers from Verizon to Google’s Project Fi. Google only charges you for the data you use, so it is in your best interest to use as little as possible. I used to use 3GB or 4GB of data each month. Now I use less than 100MB of data every month. You read that right. I reduced my data usage by 40x. Read on to learn how to do it and still use your phone every time you need it.

  1. 1Turn off cellular data when you don’t need it– Some apps use cellular data when Wi-Fi is available. Almost all apps use data in the background when you are not using them. I found that I had apps that I never used that wasted large amounts of data. Over an entire month, this really adds up and eats into your monthly data plan. Even with cellular data off, you’ll still be able to make calls and send or receive texts over the cellular network.
  2. Monitor your data usage and uninstall problem apps– It’s essential that you go to Settings and review your cellular data usage. Be aware which apps use the most amount of mobile data. Social media, news and weather apps are notorious for syncing often – even if you rarely use them. If you uninstall Facebook, Snapchat and popular news and weather apps, you’ll be surprised how much data and battery life you save. You can still access Facebook using your mobile browser whenever you want to. News and weather sites can be accessed via browser as well. You can even bookmark them so they appear on your home screen like an app. Try to only use apps like Instagram and web browsers over Wi-Fi, because they use lots of data.
  1. Restrict background data usage– It’s highly recommended that you go to Settings > Data usage and view the app background data for your apps. I’ve enabled ‘Restrict app background data’ on all apps and haven’t had any problems. When you do this, a warning will appear, but you can ignore it. I’ve been doing this for almost a year without any problems whatsoever. I was surprised to find that apps I never use consumed a lot of background data. There is a global setting to restrict background data, but I recommend you do this on a per app basis, so you can enable any apps that have a problem in the future.

Restrict2

  1. Only update apps on Wi-Fi – Make sure you go to Settings in the Play Store app and go to ‘Auto-update apps’ and set it to ‘Do no auto-update apps’ or to ‘Auto-update apps over Wi-Fi only.’ This will save you large amounts of data.
  1. Avoid streaming over mobile – Streaming audio or video uses much more data than text. Download your favorite songs and playlists so you can listen to them offline. Avoid streaming video from sites like YouTube or Netflix over mobile because this can consume extremely large amounts of data. Consider switching to a carrier like T-Mobile with their binge-onplan, which lets you stream endless amounts of music or video without eating into your data plan.
  1. Never use maps with cellular enabled – Google Maps consumes huge amounts of data when you use it for driving directions. Most people don’t know that you can use turn-by-turn driving directions without using any mobile data if you load your directions while you are connected to Wi-Fi. If it ever says “Lost data connection” turn on cellular data for a few seconds and it will fix the problem. Then turn it back off. You can do this with the quick settings menu, so it doesn’t distract you from driving. Better yet, do this when you are waiting for a stop light to change. You can also cache maps before you leave or select a region on a map and have it work offline, but I find that to be unnecessary.
  1. Use Wi-Fi whenever it’s available– Almost everyone has Wi-Fi access at home and work so the only time you should turn on mobile data is when you are on-the-go and out of range of Wi-Fi. Free public hotspots are common and there are apps that will help you find them. Most broadband providers provide access to free Wi-Fi hotspots as well. Another tip is to go to your favorite sites before you leave home in the morning. I sync my email, news app, Twitter and RSS feed apps before I leave the house. This saves me over 100MB a day.

2

  1. Change your sync settings – You might want to try disabling ‘Auto-sync data’ by going to Settings > Accounts > Google and touching the 3 dots in the upper right. When you are connected to Wi-Fi, you can manually sync all of your Google accounts at any time by going to Settings > Accounts > Google and touching the 3 dots in the upper right and selecting ‘Sync now.’ You can also reduce data consumption by adjusting your Inbox to check for mail less often. I have mine set to ‘Never’ and I still receive notifications when new mail comes in. This change is made in the mail app and not on the Settings pages.
  1. Know your daily data budget – If you want to consume less than 1GB of data a month, you need to keep your average data usage under 33MB a day. If you consume 60MB in a single day, don’t worry. It won’t be a problem as long as consume less than 32MB on a few other days. I try to use an average of 3.33MB a day, so I stay under 100MB. It’s not hard to do because I often go days without using any mobile data. If you suspect an app is using too much data, download software like App Tune-up Kitand use it to select the app you want to test. It will run for one minute and measure the amount of mobile data used by the app. [Disclosure: I was on the team that created this app.] Most popular games use large amounts of mobile data. You should only play these apps when you are connected to Wi-Fi.
  1. Avoid apps with ads – Apps with ads consume more mobile data than apps without ads. If the apps you use have ad-free versions available, purchase them. Spending a few bucks will save you money in the long run.

data with title 2

  1. Use other people’s data – If you have a friend or family member with unlimited data, ask if you can tether and share their data. If you’re phone doesn’t support this feature free of charge, there are apps in Google Play like FoxFi that do this very well. Make sure they work with your phone and carrier before buying them. They generally have a trail version.

Using mobile data consumes over twice as much power as Wi-Fi data, so following the above steps won’t just save money, you’ll also extend your battery life. I ended up reducing my monthly phone bill from over $70 to about $23 a month. That’s a savings of around 60%.  Check to see if your carrier offers discounts if you change your plan to one that uses less data. If they don’t consider switching to a carrier who does. The savings add up quickly. In five years, I’ll save $2400.

You don’t have to follow all of the above steps to save data. Even if you only try a few of these suggestions, you could cut your mobile data usage in half. The more steps you follow, the more you’ll save.

– Rick

Copyright 2016 Rick Schwartz. All rights reserved. Linking to this article is encouraged. All of the comments in this blog are mine alone, and do not necessarily reflect the views of my employer.

Follow me on Twitter @mostlytech1

How to Power Profile A Mobile App Using Hardware

This article is the second in a series for mobile software developers. The first article can be found here. It is intended to help developers create apps with better battery life. This article will focus on Best Practices for hardware power measurement. This is something every developer should care about because reducing power consumption results in longer battery life and happier users.

Battery life is now the number one thing consumers care about. Developers need to take action to ensure their app doesn’t not consume too much power, but most of them have no idea how much power there app consumes. You could use software like GameBench or Trepn Profiler to measure power consumption, but those run on your device. Collecting large amounts of power data and storing it locally consumes CPU cycles, which can inflate power readings. Another problem is the fact that popular devices from Samsung don’t report accurate direct power readings. With these devices, you need to measure power using an off-target hardware-based solution. This article shows you how it’s done.

Monsoon

Good Power Meters Aren’t Cheap

There are different ways to measure the power consumed by mobile devices, but the most popular off-target method is using a Monsoon Power Monitor. This $771 device effectively replaces the battery on your phone. It can measure the voltage, current and power and connects to special PC software which provides control over power data is collected and displayed. After your Monsoon arrives, you need to download this software and documentation from their website. You also need bypass the battery in your phone, so the Monsoon can power it. Although you could connect two banana to mini-grabber cables directly to your phone, the battery gauge and temperature monitoring won’t work unless you leave the battery in and use insulated copper tape as described in the Monsoon manual. Their user guide describes how to prepare your phone so it can be connected to a Monsoon Power Monitor. Once you’ve modified your battery, you’ll need to determine how you are going to charge it. In most cases you’ll just fold back the copper tape on the plus terminal so that battery charges normally. If you have a phone like a Nexus 6, which doesn’t have a removable battery, you got a challenge on your hands. Checkout the Appendix at the end of this article to see why.

It easy to measure power on a phone with a removable battery

It easy to measure power on a phone with a removable battery

Connecting Your Device

Now that you’ve modified your battery, you’re ready to connect your phone to the Monsoon. If you haven’t done so already, download and install the Monsoon software and connect a USB cable to the of the power monitor, so you can install the drivers as described in the manual. Before connecting your phone to the Monsoon you need to perform one final test. Connect your modified battery to the red and black banana plugs on the front on the Monsoon. Make sure the Monsoon is off and press the power button on your phone. If the phone powers up, the connection to the battery has not been broken. Now launch the ‘Power Tool’ software on your PC and turn on the Monsoon. The LED on the front panel of the Monsoon should be green. Press the ‘Refresh’ button and highlight your device on the PC software and click on the Select button. If the software can’t communicate with the Monsoon, power cycle the Power Monitor.Capture3By default, the power supply on the Monsoon is turned off, so you’ll need to turn it on and set the proper voltage. Click on ‘Set Vout’ and enter the proper value for your device. Next, enable ‘Vout,’ and enter the size of your battery. Once you confirm VOUT is enabled on the software, you can power up your phone. Wait until the Android home screen is displayed until you proceed. Next, connect a cable from the USB out on the front of the Monsoon to your device. This will be used to control your device remotely. When USB passthrough mode is set to AUTO, once sampling is started, the direct USB connection is disabled, charging over USB is disabled and samples are measured without the interference of USB charging. As soon as sampling is stopped, the direct USB connection is re-enabled and data can once again be transferred to and from the device over USB

Sizing Up Your App

You should perform a series of tests with your app, and similar apps, so you know how your app compares to the competition. You should measure idle power consumption, average power consumption and peak power consumption. You’ll find step-by-step directions below how to do this.

Measuring Idle Power Consumption

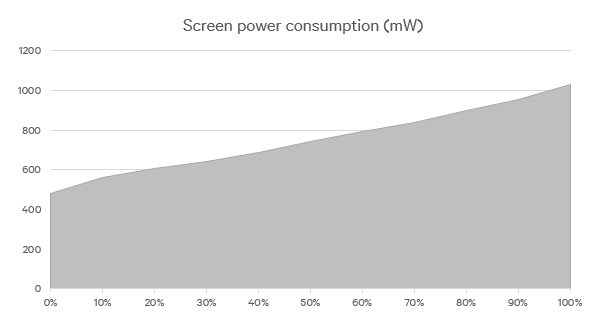
Measuring the power consumed when an app is doing nothing and comparing it to the idle power consumption of your device can show if the app under test is keeping the screen or processor awake. It can also identify problems with analytics and ads. Start by measuring the baseline idle power consumption of your device without any apps running. Since the screen is such a large consumer of power, you should measure idle power with the screen off as well as on and carefully document the screen brightness level. The chart below shows how much power an idle Nexus 6 consumes at various screen brightness levels. Brightness levels are set via ADB script — not using the Android OS slider.

Power consumed by a Nexus 6 at various brightness levels

Power consumed by a Nexus 6 at various brightness levels

Preparing to measure power

    1. Connect your mobile device to the Monsoon Power Monitor.
    2. Launch the Monsoon PowerTool software on your PC and enable Vout as described above.
    3. Power up your smartphone or tablet and wait 5-6 minutes.
    4. Check ‘Power Avg’ on the Monsoon and set the units to mW (100 units/tick).
    5. Turn off all unneeded features like Wi-Fi and Sync and put your device in ‘Airplane Mode.’
    6. Go to Settings and launch the Application Manager. Stop all unneeded apps and services under the ‘Running’ heading.

A full list of Best Practices for the Monsoon is posted at the bottom of this article.

Measuring the idle power of your device and software
Monsoon1

  1. Press the RUN button to start recording power consumption.
  2. Don’t touch your device for at least 60 seconds.
  3. Press the STOP button when you are finished recording and select the on-screen region you want to use for your average. It’s a good idea to record average power readings with and without spikes. To filter out spikes and get a more accurate average, select a region on the Monsoon software without any large spikes (as shown on the right). This should only be done for idle power measurements when you believe the spikes are caused by other apps or the operating system.

Here are some idle power measurements taken on a Samsung Galaxy Note 3 with no apps running in the foreground.

    • Average idle power – screen off – 15.6 mW (without spikes)
    • Average idle power – screen off – 27.8 mW (with spikes)
    • Average idle power – screen brightness min. – 391 mW (without spikes)
    • Average idle power – screen brightness min. – 410 mW (with spikes)
    • Average idle power – screen 50% – 528 mW (without spikes)
    • Average idle power – screen 50% – 557 mW (with spikes)
    • Average idle power – screen 100% – 870 mW (without spikes)
    • Average idle power – screen 100% – 882 mW (with spikes)

For comparison purposes, here are a few idle power readings for a Nexus 6 with no apps running in the foreground. The Nexus 6 has a larger screen with considerably more pixels (2560×1440 vs. 1920×1080). This probably accounts for most of the difference in power consumption between these two devices.

  • Average idle power – screen off – 20 mW (without spikes)
  • Average idle power – screen 50% to 100% – 660mW to 1200 mW (including spikes)
  1. After you finish measuring the idle power of your device, launch your app and measure the idle power when it is running. In theory this should be similar to the idle power of the device, but often it’s higher. By comparing the idle power of your app with similar apps, you can determine if your app has a problem.

Here are some idle power measurements taken on a Samsung Galaxy Note 3 before playing two different games:

  • Average power No app running (idle) – 557 mW
  • Average power Temple Run (idle) – 1575 mW (during the first minute while screen awake)
  • Average power Temple Run (idle) – 720 mW (after the screen dims about 60 seconds into the test)
  • Average power Asphalt 8: Airborne (idle) – 2139 mW

Test Details: Duration: 2:00 Screen brightness: 50%; Airplane Mode: On; Wi-Fi enabled (Asphalt 8 – Won’t run without Wi-Fi); All readings above include power spikes.

There are several reasons why Asphalt 8 consumes 36% more power than Temple Run during the first minute of testing. Asphalt 8 has nice visual effects and sound and Temple Run does not. However, when you let the test run for two minutes, Asphalt 8 consumes 197% more power. The biggest reason for the discrepancy is because Asphalt 8 holds a full wakelock, which never lets the screen go to sleep, while Temple Run lets the screen dim after the user defined interval. In my test, this was set to 60 seconds.

Measuring Average Power Consumption

Here are some average power measurements taken on a Samsung Galaxy Note 3 with the same games tested above:

  • Average power Temple Run (in-use) – 1629 mW
  • Average power Asphalt 8: Airborne – [TBD] mW

Test Details: Screen brightness: 50%; Airplane Mode: On; Wi-Fi enabled; All readings above include power spikes.

Measuring Peak Power Consumption

Before measuring the peak power that your software consumes you may want to measure the peak power of one or more popular benchmarks since that will establish a top limit of the power which can be consumed by your device.

Here are some peak power readings taken on the Samsung Galaxy Note 3 for some popular benchmarks:

  • AnTuTu Benchmark v5.7 – Max. power – 9761 mW
  • AnTuTu System Stability Test – Max. power – 9855 mW
  • GFXBench 3.0 – Max. power – 10497 mW (graph shown below)

Test Details: Device: Samsung Galaxy Note 3; Airplane mode: On (except for GFXBench); Wi-Fi: Off; Screen Brightness: 100%; Bluetooth: Off; Sync: Off

benchmark

Power Measurement is Fun

Having a better understanding of mobile power consumption will help you to make more power efficient apps. ThemesThe thought is, if you can measure it, you can act on it. You can make changes to your code and see what the affect is. You can see how your app compares to the competition. You can also answer power-related questions like the following:

Q: Do dark themes really save power?
A: Yes. The average power consumed by the Google News & Weather app with a light theme selected is 893 mW. With a dark theme selected, only 410 mW of power is consumed. That’s a savings of 54%!
theme charts
Test Details: Device: Samsung Galaxy Note 3 with AMOLED display; Airplane mode – On; Wi-Fi: Off; Brightness level – 50% according to slider; Screen mode – Standard; Auto-adjust screen tone – Disabled

Q: Should my app wait to perform certain tasks until a user is on a Wi-Fi network?

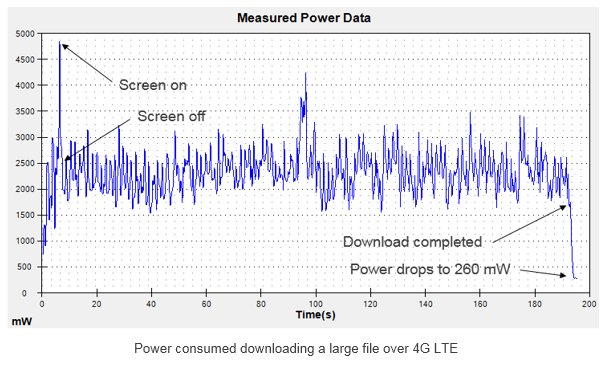
A: The answer to this question depends in part on the type of app and the signal strength of your networks. If your app transfers large amounts of data, you should wait until the user connects to Wi-Fi when possible. In the test below I download a 100MB file from a website. Over Wi-Fi the average power consumption was 997 mW and the download took about 65 seconds. Over 4G, the average power consumption was 2291 mW and the download took about 195 seconds. Bottom line: Transmitting large amounts of data over a 4G cellular radio can use over twice as much power. One reason for the high cellular power consumption in my test may be related to signal strength, which only showed 2-bars. Under conditions like that, the phone has to amplify the signal more.

Well-designed apps only download files when the user is connected to Wi-Fi, but give the user the ability override this setting if desired. This is a good approach to follow. Google has code snippets online that show how this can be done.

LTE2

Monsoon Tips & Tricks

The Monsoon User Guide is very long, but doesn’t include any tips how to get the most out of it. As a result, I’ve included some suggestions here:
Cursors

    • To quickly identify minimum and maximum power readings, use cursors as shown on the right. You can also export the results of a profiling session as a CSV file. However, this isn’t ideal, because it takes a long time to export this data and Excel often fails to import all of it. If you do go this route for shorter profiling sessions, use the Statistical MIN and MAX formulas under the Formulas tab/More Functions.


  • If you get a message saying the Monsoon isn’t communicating with your computer, or you can’t start or stop profiling, try power cycling the Monsoon hardware first. If that doesn’t work, reboot your computer.


  • Immediately after starting the Monsoon software, sometimes accurate readings aren’t displayed. Pressing the ‘Run’ button seems to help fix this problem.


Range


  • It’s a good idea to use your mouse to set the range of data you wish used to compute the average (as shown on the on the right). This allows you to disregard data at the beginning or end of a profiling session for more accurate readings.


  • You may see the calibration status indicator on the Monsoon software go yellow or red for a few seconds. According to Monsoon support, this doesn’t necessarily mean anything is wrong. If it stays in this state for longer periods, you should investigate.


  • If your power peaks are off-screen, change the units from mW to W.


  • You can turn on any of the available graphs at any time – even if they weren’t enabled when you captured your power data. This is helpful if you want to see the relationship of average power to peak power, or compare maximum power and current readings.


  • Under very heavy loads, you might notice the voltage on the Monsoon hardware drops slightly.


  • The Monsoon software drivers appear to have some stability issues and can cause blue screen crashes. As a result, I recommend you don’t leave it connected to your PC’s USB jack when you are not using it.


  • Make sure to use the offset feature to on power and current values to make your results more clear.


Hardware Power Measurement Best Practices

Here are some best practices you should follow if you want the most accurate power measurements:
QuickSettings

    • Your screen is the single biggest consumer of power and can skew your readings if you don’t consider the following: Make sure the screen brightness does not change between tests. Do not enable ‘Auto’ brightness. Also, turn down your screen brightness to the lowest possible level when taking power measurements. When possible, turn off the screen entirely.


  • Go to Settings and select the Application manager. Swipe to the left until you can see the list of running apps. Close all unneeded apps and stop all unneeded services.


  • Turn off all unneeded features including Wi-Fi, Mobile data, Bluetooth, Location, NFC, Sync, Download booster, etc. Most phones let you do this by swiping down to access a Quick Settings screen like the one shown on the right. Notice how almost everything is turned off. You may want to also turn off all syncing options under Settings > Accounts > Google.


  • Most popular apps have analytics that send data to the cloud periodically. To prevent this for occurring, turn on ‘Airplane Mode,’ and turn off Wi-Fi if your app doesn’t need to communicate with the cloud. This will also prevent apps from automatically downloading updates in the background.


AppsRunning


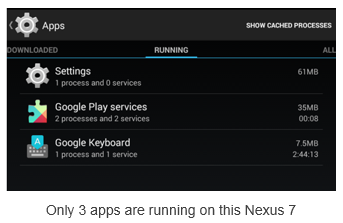
  • If you’re serious about power profiling, consider purchasing a Nexus phone or tablet and only install a minimal number of apps on it. Having lots of apps running in the background affects the accuracy of power measurements. My LTE-enabled Nexus 7 only has 3 apps running on it, while my Verizon Galaxy Note 3, still has 22 or more apps running in the background — after I’ve closed all apps and stopped all unneeded processes.


  • If you are purchasing a new device for power modelling, choose a device with a removable battery that you can easily access with and contacts that you can clip on to.


  • Time your tests. Make sure each test is at least a minute. Longer runs minimize the impact of power spikes on averages.


  • Run each test at least two or three times and average the results. Throw out any values that are noticeably higher than the rest and retest. Even with Airplane mode on and Wi-Fi off, the OS and apps on your device still work in the background. This causes power spikes that can affect the accuracy of your readings. If you have a rooted device, consider using software like RepetiTouch to record your keystrokes. This will ensure your test runs are the same each time.


  • Consider uninstalling apps that relaunch after you close them like Microsoft’s ‘One Drive’ or Nokia’s ‘Here.’


  • Do not setup your device for use with multiple users because that makes it harder to close all of the background apps.


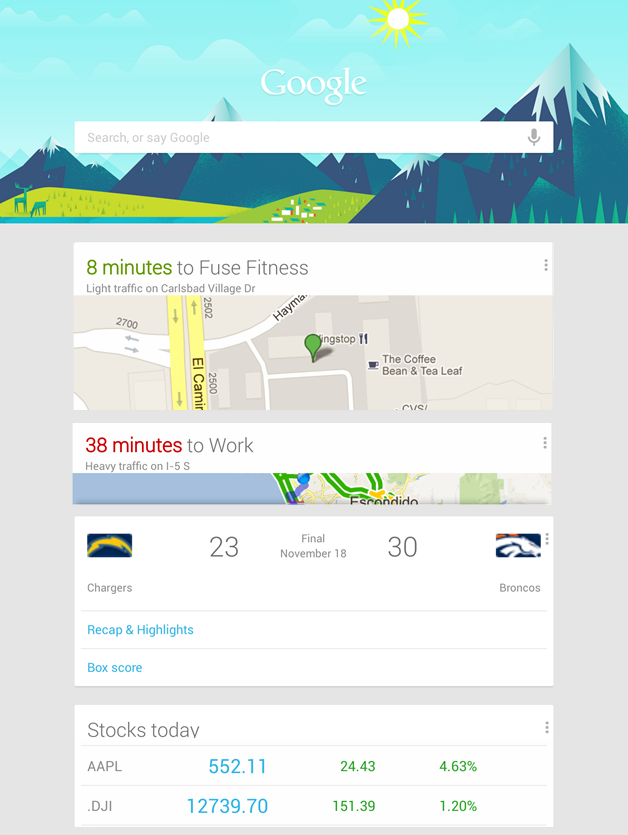
  • Turn off ‘Google Now’ as follows: Turn off “Ok Google” Detection by going to Settings > Accounts > Google > Search > Voice. Select “Ok Google” detection and turn off ‘From the Google app’ and ‘From any screen.’ Turn off ‘Show cards’ under Settings > Accounts > Google > Search > ‘Now cards.’


  • Pause or disable step counters like ‘S Health’ or ‘Google Fit.’ These apps can consume significant CPU cycles while your device is idle.


  • Avoid using your power measurement device with a wearable. Wearables require that Bluetooth is active and have cause multiple apps to run in the background.


  • Make sure your computer doesn’t go to sleep when you are capturing data. If it does, you could lose data. To do so, make sure your PC is charging via AC adapter and not running on battery. Set your power profile so your hard disk goes to sleep after 30 minutes. Set your processor and screen so it never goes to sleep when connected to a power source. Turn off your screen saver. Move your mouse from time to time to let the computer know you are still using it.


  • It’s normal for your phone to do housekeeping after it start up. Wait 5 or 6 minutes after powering up your mobile device before profiling it. I’ve seen power spikes over 8 watts after the Android home screen is visible and the boot up process appears to be complete. Power consumption over 6 watts for 30 seconds or longer isn’t unusual. Sometimes these high power readings are related to app updates, but I’ve also seen this occur in ‘Airplane Mode,’ with Wi-Fi off. These spikes will inflate your power measurements and often have no relation to the activity you are attempting to measure.


Spikes

Appendix – Preparing a Nexus 6 for Power Monitoring

Phones like the Nexus 6 do not have a replaceable batteries. This makes it very challenging to connect power measurement tools like a Monsoon to them. First, you’ll have to get special tools to remove the back of your phone. The iFixit website shows you how to remove the back cover and get access to its battery. You’ll need a special Torx screwdriver to get access the battery of the Nexus 6. Before you order that screwdriver and remove the 22 screws, you should read the next two sections. It could save you some time.

Nexus 6 screws
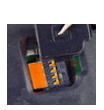
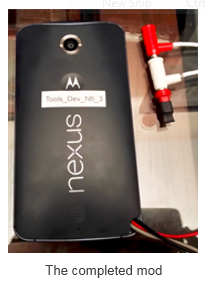
Sadly after almost completely disassembling my phone, I learned that the battery in the Nexus 6 does not have metal pads like a most cell phones. doorIt has a flex cable that connects to a small 4-pin jack that can be seen under a hidden door (shown on the right). After learning about the special power connector in the Nexus 6, I contacted Monsoon support thinking they must sell a cable assembly for this popular developer device. The Monsoon support rep said they didn’t know how to connect a Monsoon to the Nexus 6, so I referred to their manual, which shows how to create a battery bypass, using flat copper foil and special insulating tape. It’s important that you bypass the battery in your phone, so the Monsoon can power the device. However, the battery needs to remain in place for thermal monitoring and use by the battery fuel gauge. Now that the battery has been bypassed, you’ll need to determine how you are going to charge it. More about that later. I first tried to connect insulated copper tape to the same pads that are used for wireless charging on the Nexus 6, but for some reason that didn’t take the battery out of the circuit. Out of frustration, I took the device to my company’s proto lab for assistance.Wires modThey determined which of the wires on the 4-pin connector were the + and – and broke the connection to the positive wire, so the battery would no longer be in the circuit. You can see their mod on the left. The black wire is attached to a small pad on the Nexus circuit board that is connected to the minus terminal of the battery. The red wire is connected to the + power input on the circuit board. The red wire is connected to a trace that was previously connected to the + side of the battery, but that trace was cut to break the connection, so the Monsoon can power the phone. The gray wire is attached to a pad that connects to the + battery terminal. By mating the red and white banana plugs (as shown on the right), the connection to battery is restored, so it can be charged normally over USB.

Before You Begin

This section isn’t intended to be a how-to. It’s intended to discourage most developers from attempting a mod like this. Before you disassemble your expensive Nexus 6, you need to make sure that you are willing to take the risks described here. If you haven’t done circuit board modifications before, or don’t have all of the proper equipment, don’t attempt this. Your chances of success are poor. I think you’d be better off using a phone with a removable battery like a Samsung Galaxy Note 3 or Galaxy Note 4 for power measurement. You should be able to purchase those for $99 to $299, and they are much easier to connect to a Monsoon Power Monitor. In fact, in a pinch you can connect two banana to mini-grabber cables to a Note 3 without any modifying your phone or battery. It works fine, but the battery gauge won’t work unless you leave the battery in and use insulated copper tape as described in the Monsoon User Guide. If you want a to power model a Nexus phone, keep in mind that the Nexus 4, Nexus 5 and Nexus 6 report accurate battery power using Trepn Profiler, or other software, so you don’t even need a Monsoon. If you decide to try this mod despite my warnings, you are on your own. I cannot answer any questions about this, nor can I be responsible if you damage your device.

– Rick

Copyright 2015 Rick Schwartz. All rights reserved. Linking to this article is encouraged. All of the comments in this blog are Rick’s alone, and do not reflect the views of his employer.
Follow me on Twitter @mostlytech1

Useful Links
Monsoon Tips
Hardware Power Measurement Best Practices

How to Measure Power Consumption Using Free Software

This article is the first in a series for mobile software developers. It is intended to help developers create apps with better battery life. Most developers don’t know if their app has a problem with excessive power consumption, because they don’t have an effective way to measure the amount of power their app consumes. If you can measure it, you can act on it. This article will focus on Best Practices for software power measurement. A subsequent article will show you how to measure power consumption using specialized hardware. Reducing power consumption results in longer battery life and happier users.

It's easy to measure the power consumption of a mobile device

It’s easy to measure the power consumption of a mobile device

There are two different ways to measure power on a mobile device. You can do it using hardware or software. I’ll cover the hardware-based method in a separate article. This post will focus on software-based power measurement. Trepn Profiler is an Android application that can display the real-time power consumption on a smartphone or tablet. I happen to work on the team who created it, but I that’s not why I include it in this article. I include it because it’s the only app I’ve found that reports accurate real-time power consumption. GameBench is a great app, but the current version has to run a few minutes before power data is reported. If you are aware of other app that report accurate real-time power, please mention them in the comments section below and I will include them in this article. Because Trepn runs on-target, your mobile device doesn’t have to be connected to a computer or special hardware in order to capture power data. You can use your phone on-the-go, and profile in the foreground or background. If you want to give it a try, Trepn is available as a free download from Google Play.

Here are just a few of the questions you can answer with software like Trepn Profiler:

  • Which Android video conferencing app uses less power: Google Hangouts, ooVoo, Skype, Tango or Viber?
  • Should I wait to download updates over Wi-Fi if my battery is low and I’m only getting two bars?
  • How much more power does a free app with ads consume over a paid app without ads?
  • Does a dark background really consume less power than a light one?
  • How much power do I save when I use hardware decoding on a high-resolution video file?
  • Does that new phone you’re considering buying consume more or less power than your current one?
  • What is the impact of settings on power consumption (e.g. do you save noticeable amounts of power when you turn off Bluetooth, Wi-Fi or 4G?)
  • Which activity consumes more power? Gaming or 4K video recording?


Before you start profiling, there are several things you should do to increase your chances of getting the most accurate power measurements possible.

Software Power Measurement Best Practices

Here are some best practices for measuring power with Trepn Profiler:

  1. Remove your USB cable – Trepn cannot display accurate power readings when your mobile device is charging or connected to a computer.

Tip: If you need a USB connection for device control and data transfer, use ADB over Wi-Fi as described here, but be aware it can cause power spikes that slightly increase your power readings.

  1. Make sure your device reports accurate battery power – How do you know if your device reports accurate battery power?  Battery power should appear in the list of data points in Trepn Profiler. After you check the “Battery Power” data point, touch the Back button and “Profile System.” Then go to “Stats” view.” You should see a value in the average power column when your device is idle between 400mW to 1000mW for smartphones with 4” to 5” screens, 700 mW to 2500mW for 6” smartphones or 7” tablets, and 2000mW to 4000mW for 10” or larger tablets. Devices that are known to report accurate battery power are listed here. If you see values like 0 or 1.80mW, your device cannot display accurate battery power.

awake

  1. Make sure your processor stays awake– To do this, check “Acquire Wakelock while Profiling” on the Trepn General Settings page. To illustrate the importance of this, I did two power tests Without forcing the processor to stay awake, the average power reading was 456mW. With a processor wakelock set, the power was 249mW. That’s an 83% error, which shows how important this setting can be. When the processor goes to sleep, data collection in Trepn may temporarily stop, or power readings can jump to levels that are lower or higher than they should be. When data collection stops for long periods, your average power readings will be higher than they should be, because Trepn will average any power spikes over a shorter time period. The only time you should not check “Acquire wakelocks…” is when you are using Trepn to test whether an app is keeping the processor awake by holding a partial wakelock.

asleep

  1. Minimize background processes/reduce system overhead – It’s not enough to close everything in Recent Apps. Open the Apps manager, go to Running and close all unneeded apps and stop all unneeded services.  How much power can background apps consume? I measured 1043mW power on my idle tablet before I closed all unused apps. After closing unused apps the power consumed dropped to 726mW. That’s a 30% reduction in power. Here are some recommendations how to minimize background activity:
    Minimize the number of apps you have running

    Minimize the number of apps you have running

      • Pure Android devices like the Nexus 5 or Nexus 7 are better for testing, because they have fewer preinstalled apps and less things running in the background.
      • Don’t check more data points than you need. This increases system resource consumption.
      • Make sure “Show Per-Application Statistics” is unchecked — unless you need to see the mobile and Wi-Fi data transmitted.
      • Profile in the background with no visible graphs or on-screen overlays. This results in almost half the power consumption, and more accurate power readings. After profiling, data can be viewed or saved so it can be analyzed later. Step-by-step instructions are listed here.
      • Pause or disable step counters like “S Health” or “Google Fit.” These apps can consume significant amounts of CPU cycles while your mobile device is idle.
    Turn off step-counters and always-listening apps like Google Now

    Turn off step-counters and always-listening apps like Google Now

      • Turn off ‘Google Now’ as follows: Turn off “Ok Google” Detection by going to Settings > Accounts > Google > Search > Voice. Select “Ok Google” detection and turn off ‘From the Google app’ and ‘From any screen.’ Turn off ‘Show cards’ under Settings > Accounts > Google > Search > ‘Now cards.’
      • Consider uninstalling apps like Microsoft’s “One Drive” or Nokia’s “Here” that relaunch themselves after you close them.
    Use  Quick Settings to turn off things like sync

    Use Quick Settings to turn off things like sync

    • Do not setup your device for use with multiple users.
    • Avoid using your device with a wearable, because they require that multiple apps are running at once and Bluetooth is always active.
    • Most popular apps have analytics that send data to the cloud periodically. To prevent this, turn on Airplane mode if your app doesn’t need to communicate with the cloud.
  2. Focus on what you’re measuring – Turn off everything that is not related to what you want to measure. If network connectivity is not needed, put your device in Airplane Mode. This will prevent your device from doing software updates in the background. Make sure Wi-Fi is off too. Some devices turn it off automatically when Airplane mode is enabled, others do not. Other things you may wish to turn off: Display (when possible), Ambient screen, Bluetooth, Location (GPS), Wi-Fi and Mobile networks (if not already in Airplane Mode).You may want to also turn off all syncing options under Settings > Accounts > Google. When performing screen power tests, set to processor to its lowest possible frequency to reduce effect of CPU on power.
  1. Be precise and test several times – It’s important that you are consistent and confirm your test results by retesting. Here are some suggestions how to do this:
    Dark backgrounds use much less power

    Dark backgrounds use much less power

    • Be very aware of your screen background. Light backgrounds use more power than dark backgrounds. How much more? The average power consumed by the Google News & Weather app with a light theme selected is 893 mW. With a dark theme selected, only 410 mW of power is consumed. That’s a power reduction of 54%.
    • Use a stopwatch to make sure your tests run the same duration every time.
    • When measuring average power consumption, profile for at least two minutes in Trepn Profiler’s Advanced Mode. Then save your results as a Trepn .db file. Touch the “Analyze Run” button and select the saved file. This will provide more accurate average values than the ones displayed while profiling.
    • Run each test at least two or three times and average the results. Throw out any values that are noticeably higher than the rest and retest. If you have a rooted device, consider using software like RepetiTouch to record your keystrokes. This will ensure your test runs are the same each time.
    • Keep everything as close to the same as possible on your tests, including background apps and services. After you finish a test, go back and check the running apps, if the list of apps is different, close the newly opened apps and test again.
  1. Minimize the impact of the screen – The display and its backlight are often the biggest consumers of power in a mobile device. 
  2. Always document screen brightness levels to make sure you are consistent.
  3. Turn screen brightness to the lowest possible level on your tests. Avoid using the Android Settings page to set screen brightness levels because the slider calibration varies from device to device. Also slider settings are not easily reproducible.
  4.  

    For rooted commercial devices (set brightness to 10):

    adb shell “su -c ‘echo 10 > /sys/class/leds/lcd-backlight/brightness'”


    For rooted MDPs:

    adb root
    adb wait-for-device
    adb remount
    adb shell “echo 10 > /sys/class/leds/lcd-backlight/brightness”

    1. Compare apples to apples – Don’t compare on-target measurements with off-target (e.g. Monsoon Power Monitor) measurements. On-target measurements and always going to be higher – sometimes significantly higher, so you cannot compare them with off-target measurements using hardware. However, when you run Trepn on a device connected to a Monsoon, you’ll find it’s very accurate (as shown in the chart below).
    Trepn is surprisingly  accurate -- even when compared to expensive hardware like the Monsoon Power Monitor

    Trepn is surprisingly accurate — even when compared to expensive hardware like a Monsoon Power Monitor

    After using Trepn, you should know exactly how much power your app consumes. Measure the power your app uses when idle and in-use and compare this with apps of the same type. A follow-up article will tell you how to reduce the power consumption of your app.

– Rick

Copyright 2015 Rick Schwartz. All rights reserved. Linking to this article is encouraged. All of the comments in this blog are Rick’s alone, and do not reflect the views of his employer.
Follow me on Twitter @mostlytech1

Software Power Measurement Best Practices

The True Cost of Owning An iPhone 5

The Huffington Post recently did a story on the true cost of purchasing a smartphone from your carrier. Although that article was based on the iPhone 5, other carrier-offered smartphones cost similar amounts.

original

You can save thousands a year, by purchasing an unlocked phone and using it with a prepaid phone plan. You will be surprised just how much these plans have changed. They now allow the best smartphones and use the major carrier networks. More info.

– Rick

How to Save Almost $1000 a Year on Your Mobile Bill

Last updated: July 12, 2013

Verizon's Share Everything Plan costs a typical family of four $230 to $250 a month

Verizon’s Share Everything Plan costs a typical family of four $230 to $250 a month

Cell phone service seems to get more expensive each year in the U.S. Verizon charges $40 a month for each phone — plus another $50 to $100 per month for data for their Share Everything family plan. That means a family of four who uses 2GB of data each will pay $3000 a year for their mobile phone service. Even a modest plan with only two smartphones, one basic phone and 4GB of shared data costs $180 a month. This doesn’t include the upfront cost of the phones and all of the taxes and surcharges which carriers add each month. The true cost of owning an iPhone 5 has been calculated to be at least $1800 a year! By switching to a prepaid plan, you can save almost $1000 a year — and end up with unlimited data. Families can save even more. Even if you live in Europe and don’t pay as much for cell phone service, there are some compelling reasons to purchase an unlocked phone and go prepaid. Read on to learn why.

It's now possible to use smartphones like the Nexus 4 with prepaid plans

It’s now possible to use the most advanced smartphones with prepaid plans

Which Phone Should You Buy?

Carriers like Verizon offer prepaid plans that cost $50 to $80 a month, but they come with really bad phones. If you think this doesn’t sound like a great deal, you’re right. There are other companies who offer prepaid plans that cost a fraction of what Verizon charges, but they also include bad or outdated phones. You don’t have to compromise on the quality of your phone in order to go prepaid. You can buy any smartphone you want and use it with prepaid plans from AT&T, T-Mobile and others. You just need to make sure your phone works on the type of network your carrier has. The phone I’ll be using as an example in this article is much better than your current phone and costs less.

A typical prepaid phone

Prepaid phones like this should be avoided


You should purchase an unlocked phone if you want the most flexibility. Even though they cost more upfront, you’ll save money in the long run. With an unlocked phone, you don’t have to sign a two-year contract and can switch carriers at any time. Previously, you had to pay around $600 for an unlocked phone, but now you can get an unlocked Nexus 4 for only $299. The Nexus 4 has the fastest mobile processor on the planet, along with a 4.7” 1280×768 display, 8MP camera and 2GB of RAM. It’s also the first smartphone which runs Android 4.2. If you’re an iPhone person don’t worry, we’ll talk about a prepaid plan for unlocked iPhones below.

Update: Since the Nexus 4 has been sold out much of the time in the online Google Play store, it’s good to know that all T-Mobile locations are now stocking it.

Update (7/12): Sprint launches new guaranteed for life unlimited data plan. More info

What is an Unlocked Phone?

  • An unlocked phone is a phone that’s not locked to a single carrier
  • Choose your carrier and phone independently, as long as those carriers work on a GSM network
  • Unlocked GSM phones include a SIM card which is programmed with your information
  • Insert your SIM card into another unlocked phone without losing your contacts
  • Unlocked phones like the Nexus 4 run on any GSM Network. That means you can jump between AT&T, T-Mobile and other pre-paid providers. Phones like the Nexus 4 and iPhone 5 can also be used with international SIM cards while traveling. Cricket Wireless offers the iPhone 5 and MetroPCS offers the Galaxy S III, but these phones will cost you more than the Nexus 4. If you’re looking for a more affordable phone, get a Nexus 4 or a Samsung Galaxy II.

    Other unlocked phones include the LG Optimus 4X HD, Huawei Ascend P1, Samsung Galaxy Beam, Nokia 808 PureView and Sony Xperia P.

    Why Choose an Unlocked Phone Over a Prepaid Phone?

  • Better selection of available phones
  • Change GSM carriers without changing phones
  • More of the best new phones are available
  • Better for overseas use
  • More customization options
  • Which Plan Should You Choose?

    Being off-contract lets you choose from a wide range of different prepaid plans from AT&T, T-Mobile and Verizon, as well as companies like MetroPCS, Straight Talk and TracFone. Although there are many different prepaid plans available, it seems most people prefer one of the following two plans:

    Recommended Option 1 – T-Mobile Prepaid 4G
    One of the best is T-Mobile’s $30 pre-paid plan. It’s perfect for people who don’t make a lot of voice calls, but use lots of data. It has unlimited data, unlimited messaging and 100 voice minutes a month. Although they say this plan has unlimited data, they start throttling after you use 5GB of data. Most current unlimited data plans throttle data as well, you just probably don’t realize it.

    Why 100 minutes won’t be a problem for most people
    The T-Mobile plan is perfect for my kids, because they don’t talk much on their phones, but send over 1000 texts a month each and use lots of data. Although the T-Mobile plan only has 100 minutes, that’s per person, so it’s 400 minutes for a family of four. Extra minutes cost 10 cents each, so it’s not a big deal if you go over a little. 10 cents a minute is much less than carriers typically charge for overages (it’s more like $0.45 a min). If you are a sales person the $30 a month T-Mobile plan is probably not right for you, however T-Mobile has a $50 plan with unlimited talk.

    T-Mobile has one of the best pre-paid plans because it's inexpensive and works with premium phones

    T-Mobile has one of the best values in pre-paid phone plans


    Recommended Option 2 – Straight Talk
    Consumer Reports recommends Straight Talk’s prepaid plans, which are available from Walmart. Consumer Reports says surveys show people are happier with Straight Talk, than with normal contract mobile service from any of the major carriers. Straight Talk has several plans, including $45 a month for unlimited talk, text and data. That’s half the price of Verizon’s cheapest unlimited plan. I’m told that Straight Talk uses AT&T network.

    You can even get a prepaid plan for the new iPhone 5

    You can even get a prepaid plan for the new iPhone 5

    Big News: Walmart’s now offers the iPhone 5 and iPhone 4 with unlimited Straight Talk plans for $45 a month.

    Recommended Option 3 – Cricket prepaid for the iPhone
    There are prepaid wireless plans from Cricket Wireless and others, however Virgin’s $30 unlimited prepaid plan looks good to me. Virgin has three different plans, which all come with unlimited data and text messages. For $35 you get 300 minutes of talk time. For $45 you get 1200 minutes, and for $55, you get unlimited minutes. More details why your next iPhone should be prepaid.

    How to Activate Your Phone on a Prepaid Plan

    Before activating your phone, you need to determine what size SIM your phone uses. The new Nexus 4 and iPhone 5 both have microSIMs. If you’re not sure about your phone, check the manufacturers website, or check Google. Next, you need to decide which plan you wish to use. I’ll detail the activation process for T-Mobile, but all plans are similar. You should order a SIM when you order your phone. T-Mobile charges $1 for their SIM Card Activation Kit.

    After your phone and SIM arrive you’re ready to activate your phone. Everything you need to know is listed here. I suggest you watch their video and make sure to have the account number from your current mobile provider ready before you start. Activation should take you 10-15 minutes or less.

    The true cost of a smartphone is much higher than your think

    The true cost of getting a smartphone from a carrier is much higher than your think

    How Much Money Will You Save?

    Although the freedom to switch carriers without a penalty, or buy a new phone whenever you want is great, the main reason to go prepaid is to save money. Just exactly how much will you save? AT&T’s cheapest Nexus 4/iPhone 5-compatible plan with similar features to the T-Mobile plan described above (450 minutes, 5GB of 4G data and unlimited messaging), costs $109.99 per month per person.

    The annual cost for a smartphone running on T-Mobile’s pre-paid plan is only $361. That’s a fraction of what you’re paying your carrier today.

    How Much You’ll Save Over a Several Traditional AT&T Plans
    Annual cost of a smartphone running on the least expensive AT&T plan with 3GB of data: $828
    Total yearly savings per person with a T-Mobile’s prepaid plan: $467
    Total yearly savings for a family of four: $1868

    Annual cost of a smartphone on a AT&T plan with 5GB of data: $1320
    Total yearly savings for a single person with a T-Mobile’s prepaid plan: $959
    Total yearly savings for a family of four: $3836

    How Much You’ll Save Over a Traditional Verizon Plan
    Annual cost for a family of four on Verizon’s Share Everything plan with 2GB of data per person: $3000
    Total yearly savings for a family of four using T-Mobile’s prepaid plan: $1556
    Savings for a family of four over an older Verizon Family Plan: $1316

    What are the Downsides?

    As far as I can tell, the risks of switching to a prepaid mobile plan are small, as long as you buy a good unlocked phone like the Nexus 4. The Nexus 4 does not officially support LTE, but I don’t see that as a deal breaker. Read why below. A Consumer Reports survey says prepaid phone users are actually happier than non-prepaid phone users. T-Mobile might not be the best carrier, but I’ve come to the conclusion that all U.S. carriers are bad for one reason or another. Verizon may have better 4G coverage in some areas, but is that really worth almost $1000 for each member of your family? I don’t think so.

    Reasons why the lack of LTE on the Nexus 4 may not be a problem for you
    LTE support isn’t offered in all cities and countries yet. Even if it is available in your city, you still won’t get it a lot of the time. If the lack of LTE bothers you, you should buy another unlocked phone with LTE support or switch to AT&T, which supports HSPA+, which is capable of speeds that are almost as fast as LTE (up to 21 Mbps). Another factor you should consider is the percentage of time your phone will be out of range of a broadband Wi-Fi connection. I spend the majority of my time either in the office or a home where there is access to fast Wi-Fi.

    An Unconventional Way to Save Even More

    I recently read an article about someone who used a 7″ tablet instead of a smartphone for an entire month. At first this sounds crazy, but you can buy a cellular-enabled Nexus 7 for only $299 and add it to an existing carrier plan for only $10 to $20 a month. You can make calls with a Bluetooth earpiece just like a normal phone. You would be using this device on Verizon’s, AT&T’s or Sprint’s network, so your coverage would be no different than a normal smartphone. Obviously this wouldn’t work for someone who didn’t carry a backpack or briefcase where they could store the device, but it’s not as crazy as it sounds. If I was someone who didn’t make many voice calls, I would seriously consider this option.

    If This Is So Great, Why Haven’t I Switched Yet?

    Once my wife’s contract is up, we may switch to T-Mobile’s $30 prepaid plan. If she likes it, I’ll switch the rest of my family members over. I have several friends who have already switched and they are happy. Besides, if we don’t like T-Mobile, we can switch to AT&T (or another prepaid carrier) after 30 days without a penalty. If a better phone comes out in three months, we can use it without paying a penalty. We’ll pay more up front for an unlocked phone, but we’ll quickly make up the difference in 3 to 5 months (depending on the phone). You should look into switching too. Even if you have a less expensive Family plan, you’ll still save over a thousand a year if you switch. Imagine what you could to with all of that money.

    Where to Read More

    Prepaid or postpaid?: The fight for your cell phone dollars
    One-third of U.S. smartphone sales in Q1 were prepaid

    – Rick

    Copyright 2013 Rick Schwartz. All rights reserved. Linking to this article is encouraged.

    Follow me on Twitter @mostlytech1

    Seven Mistakes That Could Jeopardize Google’s Mobile Future

    Last update: May 26, 2013

    Five years ago few thought Google could ever challenge Apple when it came to mobile technology. Now Android is leading the way in many areas. Google got where they are today thanks to a well-executed strategy and lots of help from Apple, but mistakes they are making now could jeopardize the future of Android.

    The top three U.S. Big Box retailers produce almost 600 billion dollars in revenue

    Traditional retailers are still important. The top three big-box retailers produce almost $600 billion in revenue a year

    1. Largely Ignoring the Traditional Retail Channel

    E-commerce sites like Amazon.com might be the future, but big-box retailers like Walmart, Best Buy and Costco produce 12 times more revenue than Amazon does today. Apple understands the importance of retail and sells huge quantities of smartphones and tablets through this channel. Google has met with companies like Best Buy before, but most retailers don’t like them because they sell devices direct to consumers for less money than the retailers need to make a good profit. Google also doesn’t spend millions of dollars on retail end-caps, marketing and product training like Apple and Samsung do. I believe Google needs to hire someone who understands how to work with traditional retailers and expand their presence in brick and mortar stores.

    One explanation why Google has been ignoring traditional retailers could be they are planning to open their own stores. Although Google originally denied this, there is now evidence they may be going ahead with this. I suspect we’ll see them start with only a few stores however. It would take years and lots of money to expand their reach into most major U.S. cities.

    2. Having One of the Worst e-Commerce Sites

    Many Google products are not available from major retailers. If you want to buy a product like a 16GB Nexus 10, there is only one place to get it today: the Google Play website. Although Google Play works well for app sales, it gets failing grades in the area of physical fulfillment of products. Their first launch of of Nexus One was understandably a disaster, but the company has had years to fix these problems and they have not done so. All three of their recent Nexus launches were horrible in every way. Even the e-commerce areas of their Google Play website were unable to support the traffic. That’s really surprising. I haven’t seen a site fail so badly since the early days of the Internet. I believe Google needs to fire the people in charge of their current e-commerce and fulfillment operations and start over, or farm out the business to someone like Amazon, who understands how to do e-commerce right.

    3. Making Better Apps for Competitive Platforms

    Some of Google’s apps are now longer better on iOS than Android. Examples include Google Mail, Google Maps and YouTube, which all have advantages on iOS currently. While this could be temporary, it makes no sense to favor a competitor’s platform over your own. More details.

    Update: Since this article was first written, Google has improved their Maps and YouTube apps, so I believe their Android apps now have advantages in some areas.

    Over-dependence on the cloud can be a bad thing

    Overdependence on the cloud can be a bad thing

    4. Forcing Consumers to Use the Cloud

    It’s clear Google wants everyone to use the cloud, but shipping one of your flagship smartphones with only 8-gigabytes of local storage was a poor decision. Especially in light of the fact the Nexus 4 doesn’t have a memory expansion slot, like the Samsung Galaxy S III, and many other Android phones. An 8GB Nexus 4 has less than 6GB of free space available out of the box. Since my apps alone occupy over 3GB of space, that leaves only enough room for a single movie download. Even if you don’t download movies, you might still have problems. Popular games like Modern Warfare 3 and 9MM use almost 2 GB of storage space. Sure you could delete a few large apps to free up space, but you shouldn’t have to.

    Google expects us to store our movies, music, photos and documents in the cloud, but what if we want watch a movie on a plane, or we need to access an important file at a location with no cellular or Wi-Fi access? This could be a big problem. Apple downloads its media and doesn’t stream it like Google does. Google does allow you to download (or pin) media from Google Play, but you need free space on your device to do so.

    Storing all of you media the cloud can also be problematic because Google Drive and all other cloud-based systems occasionally go down. Google claims 99.948% uptime, but that corresponds to 7 minutes of downtime a month, which is a big deal if a Google service is down when you’re trying to access data from it. That’s why you should always try to carry essential files on your device (or ‘pin’ them so they are accessible).

    Less than 1% of all Android users were running the newest version of Android on 12/3.

    Only 1.2% of all Android users were running the newest version of the OS on January 3rd

    5. Allowing Others to Seriously Weaken Your Platform

    Carriers and handset manufacturers unintentionally hurt the Android platform by insisting on customizing the software on their mobile devices. This causes OS fragmentation, support issues and customer frustration, because users have to wait so long to get bug fixes and new features. Apple has a “take it or leave it” attitude with carriers, and forces them to limit customization, so users can download updates on the first day they are available. This is one of the strongest advantages iOS has over Android today. Google has made progress on this issue with their line of Nexus phones, but even those devices have carrier bloatware and don’t always receive OS updates when they are first available. Just how bad is OS fragmentation on the Android platform? As of January 3rd, only 1.2% of all Android users were running the newest version of Android, while over 60% of Apple users were running the newest version of iOS. 59% of Android users are stuck using an OS that is now over two years old. Google decided to call Android 4.2 Jelly Bean so they could say that 10% of all Android users run that version, but that’s far from a solution. Google must address this issue in 2013.

    Android 4.2′s calendar bug is evidence that Google is rushing products to market before they are ready

    Android 4.2′s calendar bug was evidence that Google was rushing products to market before they were ready

    6. Releasing New Products Before They Are Ready

    Lately it seems Google is trying to do too much at once, and is releasing new technologies before they are ready. For example, proper testing would have exposed the December bug in Android 4.2. That issue was fixed in a software update, but there are other Android 4.2 bugs like the Auto-brightness bug, which should have been caught. In addition, key Android 4.2 features like Miracast steaming don’t work on the Nexus 10 and other devices. Google’s haste has also broken some of the biggest advantages of Android 4.1 on some devices and has some saying Android is becoming too complex for its own good. Not all of Android’s issues are software-related. Some of Google’s newest Nexus devices were released without a single accessory (e.g. dock, case, etc.) This caused frustration among some users. There is simply no excuse for this type of poor planning. Google needs to slow down and take the time needed to do things right.

    7. Eliminating Some of Android’s Biggest Advantages

    Hardware choices are good, but Google should strongly encourage manufacturers to make Android devices with Android’s signature features like slots for removable memory, removable batteries, standard micro USB and micro HDMI ports. Expandable storage, standard ports and removable batteries are some of the key selling points of the Android platform and the reason why many people are switching from iPhone to Android devices. Removing these advantages from Nexus devices and allowing manufacturers to remove them from their devices seriously weakens the Android platform.

    Final Thoughts

    Google has come a long way in the past five years, but it seems like their phenomenal success is going to their heads. Apple may be down right now, but stupid mistakes like these are what allowed Google to steal so much market share in such a short time period. I hope Google can address some these issues before it’s too late.

    Do you agree Google is making some big mistakes, or am I just overreacting? Let me know in the comments section. Thanks.

    – Rick

    Copyright 2013 Rick Schwartz. All rights reserved. Linking to this article is encouraged.

    Follow me on Twitter @mostlytech1

    50 Great Tips & Tricks for the Nexus 10

    Last updated: November 24, 2013

    This article has received over 500,000 views! Although it was written for the Nexus 10, many of these tips apply to other Android tablets as well.

    Welcome to the most comprehensive list of tips and tricks for the Nexus 10 you’ll find anywhere on the Internet. This started off as part of a Nexus first impressions article, but quickly grew into a list of 50 tips, so I’ve broken it out on its own. Because this article is intended for everyone from beginners to experts, there will be some things here you already know here, but you’ll also find tips you won’t find anywhere else.

    1. Upgrade to the latest version of Android – There have been several updates to Android since the first Nexus 10 tablets left the factory. Make sure to install the newest Android system update. If your tablet isn’t already running Android 4.2.2, and it doesn’t appear under Settings > About tablet > System Updates, scroll to the bottom of this article to learn how to force an update to Android 4.2.2. What’s new in Android 4.2.2? You can see a list of all changes here.
    2. Choose your screen orientation – The startup screen, volume control and speaker placement seem to indicate Google intended the Nexus 10 to be used horizontally in landscape mode. However I prefer the vertical portrait mode for the following reasons: First, it’s better suited for most web pages. Second, apps like Instagram and Spotify can’t be used in landscape mode. Third, it’s easier to hold the Nexus 10 vertically with one hand. Of course you’ll want to use landscape when watching most movies. In the end the choice is yours, just keep in mind if you use it in portrait mode the volume control will be reversed (e.g. pushing the lower button turns the volume up.)
    3. Google Now delivers information without you needing to ask

      The Nexus 10 Guidebook is massive

    4. Activate Google Now – Swipe up from the bottom of your tablet screen near the center to access Google Now. Before using Google Now you must go through a tutorial and then activate it. Then make sure location services are on. To do this you need to check the box next to ‘Wi-Fi & mobile network location’ and agree with the prompt. Then go through the settings for Google Now and enter your favorites sports teams and adjust a few other settings. When you’re finished Google Now will start presenting you with information tailored to your needs like the local weather. You can see what my first Google Now page looked like in the screenshot above. It’s worth mentioning I’ve never taken my tablet to the gym, or asked Google for my drive time to work. It provided that info based on my previous behavior. I know some people have privacy concerns, but I think this feature is great.
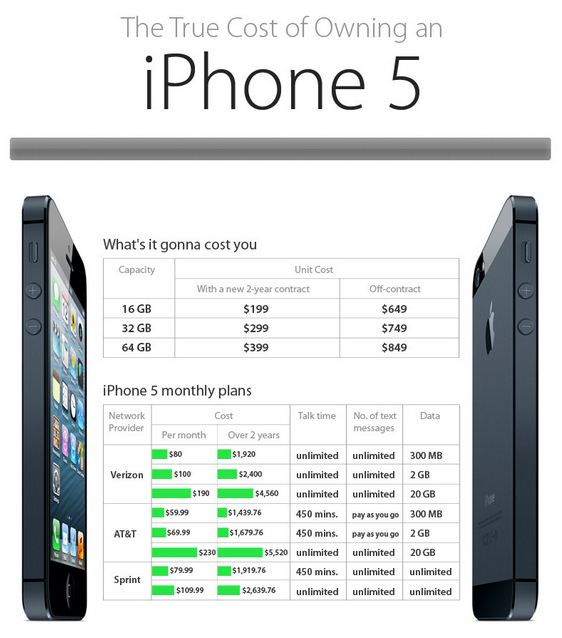
    5. Download the official Nexus 10 Guidebook – Google just made available a new 159 page Nexus 10 Guidebook. You can download this excellent guide here. Once downloaded, I recommend you copy it to your tablet, so you can refer to it anywhere you go. Make sure you have a PDF reader on your Nexus 10 however. You can download Adobe Reader here.
    6. Download some tablet-optimized apps – You’ll quickly discover not all of your Android smartphone apps adapt well to the extremely high pixel density of the Nexus 10. For this reason, Google recommends you download some of the following apps: Autodesk Sketchbook Pro for Tablets, Cat in the Hat, Cut the Rope Experiments HD, Evernote, Expedia, Fandango Movies for Tablets, Friendcaster, Google Currents, Fancy, Heros Call HD Widgets, Hipmunk, Hulu Plus, Magic Piano, Mint.com, Netflix, News Republic for Tablets, Ocean HD, Office Suite Pro, OpenTable, Picsay Pro, Plume, Pinterest, Pulse News, SplashTop Remote Desktop HD, Strikefleet Omega, Sprinkle, SwiftyKey3 Tablet, Pocket, SeriesGuide, Taptu, TED, Trulio, Zappos and Zoomingo. In addition to the above apps, I would add the following apps which have all been optimized to run on tablets like the Nexus 10: 500px, AccuWeather for Android, AirCalc, Amazon Mobile (Tablet), BaconReader for Reddit, Business Calendar, Calendar, Ebay, Engadget, FIFA 2014, Flipboard, Google+, Google Pinin Input, Hotel Tonight, Kingsoft Office, NYTimes for Android, Pandora, PicsArt, Pinterest, Sing! Karaoke, Smart Tools, SkyDrive, Solid Explorer, Songza, SoundHound, Tasks, Temple Run 2, The Weather Channel, Twitter (tablet-optimized version), USA Today, Wunderlist 2 and Yahoo! Weather.

      Here’s a list of the top 150 Android apps. Many, but not all are tablet-optimized. Also, check out the Tablified Market app. It highlights apps that are designed and optimized for tablets.

    7. Install the Adobe Flash plug-in – Flash may be a dying format, but there are still millions of Flash videos around and the Nexus 10 should be able play some of them. To install Flash from the official Adobe website, follow the instructions at the bottom of this page.
    8. The Nexus 10 has several different keyboard layouts like this one with number keys

    9. Expand your keyboard – Since the Nexus 10 has such a large screen you may want to expand to a full-sized PC-style keyboard that includes number keys and extras like the screenshot above has. It’s tricky to set up, but worth it if you like to type in landscape mode. Go to Settings/Language & input and then touch the settings Sliders next to ‘Android keyboard.’ Next, touch ‘Advanced settings’ and touch ‘Custom input styles.’ It will say Deutsch and Francais, but you can ignore that. Touch ‘Add Style’ near the upper right. Then select your language and change the layout from QWERTY to ‘PC’ or one of the other styles. Now touch ‘Add’ and you’ll see your new style appear in the list. Touch ‘Enable’ and use the back key to go back to the Language & input screen. Now touch ‘Input languages’ near the top and uncheck ‘Use system language.’ Lastly, touch ‘English (US) (PC)’ and you’re done. Source: AndroidPIT

      Note: Mostly-tech reader Craig has reported the above tip changed his default input language and broke voice and image responses via GoogleNow. If you experience either of those problems, switch back to the (US English) keyboard input setting.

    10. Control your tablet using your voice – Most people don’t know you can have your tablet open an app, create a calendar event, display a map, navigate to a place, send an email, set an alarm, define a word, show movie times, take a note, display a weather forecast, identify a zip code or area code, provide flight info, find a restaurant, run a calculator or provide a translation by simply speaking. Start by touching the microphone next to the search box. For more info, go to pages 58-64 in the Nexus 10 Guidebook (See Tip 3 to find out where to get this). There’s also a list of all 53 types of voice requests here.
    11. Watch “Timescapes” if you want to see what the amazing display on the Nexus 10 is capable of

    12. Download a high-quality video – If you really want to see what the Nexus 10 display is capable of when it comes to video, download Timescapes. It it the first 4K movie that you can purchase for $29.95. It has almost twice as many pixels as a normal high-definition video. If you’re not ready to shell out $30 bucks, but want to watch a free 1080p preview of the movie click here. If you decide to buy the movie, make sure to download the 2560×1440 version and not the others. The movie is over 6GB, so you should back it up to your computer, so you can free up space on your tablet if you need to later. In order to play this video, you may have to download free MoboPlayer software (or equivalent).
    13. Turn off haptic feedback if you don’t like it – When touch the screen on the Nexus 10 to navigate, you get a little vibration. If you don’t like this, go to Settings > Sound and uncheck ‘Vibrate on touch.’ Making this change will not turn off the vibration you get when you type on the onscreen keyboard. To turn that off, go to Settings > ‘Language and input.’ Then touch the Setting icon for the ‘Android keyboard’ and uncheck ‘Sound on keypress.’ Make sure ‘Vibrate on keypress’ is unchecked as well. If you’re using SwiftKey 3 Tablet, go to its settings page, touch Advanced. Touch ‘Audio and haptic feedback’ and uncheck Haptic feedback.
    14. Shoot and edit your own home movies on your Nexus 10

    15. Shoot and edit video on your tablet – If this is your first Android tablet, you probably haven’t used ‘Movie Studio’ yet. Movie Studio lets you edit video clips together in a timeline with transitions, music, effects and titles. Movie studio has been around since Android 3.0, but the tablets back then didn’t have enough power to run it well. Here are some good instructions how to use Movie Studio.
    16. Unhide Developer Options – Earlier versions of Android had a ‘Developer options’ area in Settings but that’s no longer present in Android 4.2. However, you can still put your tablet into Developer Mode by going to Settings and touching ‘About tablet.’ Then click the build number seven times. After you do that you will see ‘Developers options’ appear in the Settings menu! This great tip came from Wai Ho Cheung.
    17. SwiftKey 3 is Tablet a great tablet-optimized keyboard app

    18. Try a tablet-optimized keyboard – If I had to pick one single app that softened my transition from the iPad 3 to the Nexus 10 the most it would be the SwiftKey 3 Tablet Keyboard. The reason for this is because I type a lot and I like to work in portrait mode. That squeezes the keys closer together and makes typing harder on the stock keyboard. I can’t say enough good things about this app. It takes a while for you to learn it, and for it to learn you, but when that happens, you’ll never go back.
    19. Toggle between MTP and PTP – Here’s another tip you won’t see anywhere else: You can put the Nexus 10 into Camera (PTP) mode by going to Settings > Storage and then selecting the menu in the upper right-hand corner. From there, you can select ‘USB computer connection,’ which allows you to toggle between MTP (which is the default) and PTP which lets you transfer photos using camera software. PTP also works on computers that don’t support MTP.
    20. Learn how to use Quick Settings – You can use the Quick Settings menu to turn on/off Wi-Fi, change screen brightness, turn off auto-rotate and more. To open Quick Settings, swipe down from the top right corner of any screen. You can even access the full settings menu from Quick Settings.
    21. An Actionable Notification

    22. Try the new Notification Shade – To open the Notification Shade, swipe down from the top left corner of any screen. You can do this even when your Nexus 10 is locked. Certain notifications like emails or calendar events can be expanded to show more information. Some notifications let you take action by touching icons. For example, Calendar notifications allow you to Snooze or send email to other guests. To collapse a notification, pinch it. To expand a notification, glide using two fingers. When you’re finished with a notification, just swipe it to the right to make it go away. To dismiss all notifications, touch the icon at the top right of the notification shade. If you long-press on an open task, you’ll be taken straight to the settings page for that app.

    23. Uninstall unneeded apps – After you’ve been using your tablet for a while you’ll probably have apps that you never use. You may want to remove any unused apps to free up space. The easiest way to uninstall an app is to press and hold the app icon in the app drawer and drag it to the top of the screen where it says ‘Uninstall.’ If it only shows App Info, it is a system app and cannot be uninstalled. However, if you drag the app to where it says App Info you’ll have the option to disable the app, which frees up memory.
    24. Games like “Asphalt 7” look great on the Nexus 10

    25. Download a new game – Playing games on your Nexus 10 tablet is very different than playing games on your smartphone. The large screen, killer graphics, faster processor and great sounding stereo speakers take gaming to a whole new level. Make sure to download a game with great graphics like Asphalt 7, Dead Trigger, or Shadow Gun. All of these will cost you, but there are many great free games as well, including Temple Run 2.
    26. Improve your gaming graphics – If you’re a hard-core gamer, you probably already know what 4x anti-aliasing is. You can enable this on the Nexus 10 if you know a secret trick. First, enable Developer Options as described above in Tip #11. Then go to Settings and click on Developer Options. You will now see an option on the right to enable Force 4x MSAA. Multisample anti-aliasing (MSAA) is a technique used to improve image quality. Since the Nexus 10 has a GPU capable of supporting MSAA, this setting should make your graphics look more detailed when you’re playing advanced games. Keep in mind this will also cause your GPU to work harder and your tablet may get hotter and consume more power than normal. It’s also possible that all games may not support this, but this seems to work great with games like Asphalt 7. Source: Wai Ho Cheung.
    27. This wireless gaming controller was designed for the Nexus 10

    28. Use a gaming controller with your Nexus 10 – If you game a lot, you might try using a gaming controller with your Nexus 10. You have three options: If you own a Sony PS3, you can use up to four PS3 controllers with your Nexus 10 at the same time. Instructions here. You can also plug an Xbox gaming controller into the Nexus 10, as long as you have a micro USB to USB adapter. Lastly, you can purchase a wireless gaming controller like the Nyko Playpad.
    29. Copy your media to your tablet – One of Android’s best features is the ability to plug your charging cable into the USB jack on your computer and have your tablet appear as a hard drive. Once you do this, you can easily copy over the music, photos, videos or documents you want to take with you everywhere.
    30. Select a lock screen – If you plan to bring your Nexus 10 outside of your house, you should go to Settings/Security and pick a pattern (recommended), PIN or password-based screen unlock.
    31. It’s easy to connect a Nexus 10 to your TV and watch HD videos on it.

    32. Connect your tablet to a television – The Nexus 10 has a standard micro HDMI jack, so you can purchase a high-quality cable which connects to your TV for as little as $3. This allows you to watch high-definition videos from YouTube, Netflix or any other site on your TV. Unlike other tablets, the Nexus will display a video on your tablet and television at the same time. It will also automatically scale 2550x1440p videos to 1080p, so your television can display them. As you can see from the screenshot above, the picture quality is great. Important: Make sure to power down your tablet and television before connecting or disconnecting an HDMI cable. If you don’t, it’s possible that you could damage your tablet.
    33. Hook up an external keyboard and mouse – You can easily connect your tablet to an external keyboard, mouse, or other input device and use these just as you would with a PC. This can be done using Bluetooth or direct USB connection. To connect via USB you will need an adapter like this. To connect more than one USB device at a time, use a powered USB hub to reduce drain on your battery. I’ve tried a wired keyboard and a standard wired mouse with the Nexus 10 tablet and both work pretty well. The mouse had no issues whatsoever. The keyboard seemed to miss keys or spaces occasionally when I typed too fast. However, I really like using the arrow keys on the keyboard to precisely move the cursor around text on the screen. I also like the fact the tablet can tell there is a keyboard attached and does not display the onscreen keyboard. This saves a lot of space on the screen.
    34. You can work faster when you connect your Nexus 10 to a traditional keyboard and mouse

    35. External keyboard tips – In addition to entering text, you can use your keyboard to navigate your tablet’s features: Use the arrow keys to select items on screen. Press Return after selecting an item is equivalent to touching that item. Press Escape to go Back. Press Tab or Shift-Tab to move forward on a screen with multiple text fields. For maximum typing speed, turn off auto-replace, auto-capitalization and auto-punctuate. To do this, swipe down on the top of the screen and ‘Select keyboard layout.’ To do this, swipe down on the top of the screen and ‘Select keyboard layout.’ Don’t forget you can use keyboard commands like Ctrl-V to paste text just like you would with a PC.
    36. Expand your memory – One of the biggest complaints about the Nexus 10 is the fact it doesn’t have a memory expansion slot, but that doesn’t mean you can’t add your own memory by buying a short micro USB to USB cable and connecting a low-cost memory stick. However, stock Android devices do not automatically “mount” mass storage devices like USB sticks, so one additional step is required. If you’re Nexus tablet is rooted, the best solution is an app called Stickmount (Note: I was recently told there may be problems with it and Android 4.2, which the developer are working on now). Once StickMount is installed you connect a USB stick to your Nexus using a USB OTG cable and the device will show you a popup and ask if you want to open StickMount. You’ll need a file viewer app like ES File Explorer to display your files. More details. If your Nexus 10 is not rooted, you have two options: The first is a $3 app called Nexus Media Importer, which allows you to import or stream music, video, photos and documents from a USB flash drive or SD card. More info. The second option is free. You can enable PTP on your Nexus 10 by following the instructions in Tip #13 above. Once PTP is enabled, when you plug in a supported device it should immediately bring up the Gallery app with a new folder containing all of your photos. When you open that folder, you can either import, or browse the photos. All of the above options require a USB OTG to mini USB adapter.
    37. Where to Find More Great Tips Like These

      If you’re looking for more great tips and tricks for the Nexus 10, checkout this article.

      The new Photo Gallery App is a powerful photo editing tool

    38. Edit your photos like a pro – The Android 4.2 Gallery app is more than just a photo viewer. It now has some serious editing capabilities. In addition to all of the standard Instagram-style filters, this app has some advanced photo editing features that are similar to the ones you’ll find in Adobe Photoshop Lightroom. The incredible screen on the Nexus 10 and fast processor, make it a serious photo editing station. For even better editing options, try Snapseed or Pixlr Express.
    39. More powerful photo editing options

    40. Learn how to take a screenshot – To take a screenshot on the Nexus 10, press the power button and the volume down button and continue to hold them until you hear a beep and see the screen zoom in. The volume down is on the top part of the volume slider when you are holding the tablet in portrait-mode.
    41. Use the new Google Voice search – It doesn’t make sense to type your searches any more. Just touch the microphone near the top of the screen and talk, or say “Google” when you are on the Google Now page.
    42. Set up a guest profile – You may want to setup a guest profile on your Nexus 10, so a friend can check their email, and install their own games, but can’t update your Facebook status. Their app settings, screen background, game-progress and high-scores remain separate. To add a new user, go to Settings/Device/Users. Touch ‘Add user’ and then touch OK. Touch ‘Not now,’ if your guest is not available. A generic new user should now appear in the list.
    43. Customize your home screen – Every one uses their tablet differently, so you should customize your home screen(s) to meet your needs. Here are some suggestions:

      a. Make shortcuts on your home screens for all of your favorite apps. To do this go to the App locker and then touch and hold an app and drag it to the desired screen.

      b. Create folders for different categories of apps (e.g. Games, Utilities, etc.) and move all of the related apps into those folders.To create a new folders drag on app on top of another similar app. After the new folder is created, make sure to name it.

      c. Uninstall any unnecessary apps or widgets from your existing homescreens. To do this, simply touch and drag them into the text ‘Remove’ near the top of the screen.

      Buy a case for your Nexus 10

    44. Buy a carrying case – It’s a good idea to purchase a leather case for your Nexus 10. This will protect your screen from scratches and give you additional protection if you drop it. Most cases also act as a stand for your tablet. Nexus 10 cases are just starting to appear on sites like Amazon.com. I just received this case and I’m happy with it.
    45. Don’t forget about the free music – Although you won’t see the free music that is included with your Nexus 10 in the “My Library” widget, if you go into ‘All Apps’ and open ‘Play Music,’ U.S. Nexus owners will find ten free songs from The Rolling Stones, Cat Power, M. Ward, The Lumineers, Bob Mould, Eskmo and more. Preloaded music in other countries varies.
    46. Install tracking software – You paid good money for your Nexus 10, so you don’t want to lose it. Make sure to install software like ‘Where’s My Droid‘ which allows you to track your tablet if lost or stolen. If you spend $4 to upgrade to the Pro version, you can also remotely lock your tablet, enable the camera to see the thief and as a last resort erase your tablet remotely. If you install this app, make sure to run the setup and connect the Commander screen to your Google account.
    47. Try gesture typing – The standard Android keyboard now allows you to slide your finger over the letters you want to type, and lift it after each word. You don’t need to worry about spaces, because they’re added automatically for you. This feature used to be only found in premium apps like Swype. Now you can use it whenever you like.
    48. Zoom two different ways – There are different ways to zoom in on the Nexus 10. The first is called double-tap. You can quickly tap two times on most webpages in Chrome to zoom in. Double-tap again to zoom out. This feature works on most webpages, maps, and other screens. Android 4.2 also has an interesting new feature called magnification gestures. When enabled, you can triple-tap the screen everywhere (except on the keyboard or notification bar) and zoom in. The nice thing is that you stay zoomed in, until you triple-tap a second time. To enable this feature, go to Settings > System > Accessibility and touch Magnification gestures. Then slide it from off to on and hit the back button. It’s worth mentioning that the way you zoom in works differently when you double or triple tap. Both have advantages, try each and see which is better for certain things. One user has reported that enabling triple-tap doesn’t work well when playing games like GTA3.
    49. Pin your content so you can access it without a Wi-Fi connection

    50. Access your Google Play media offline – Normally Google Play streams your content from the cloud when you access it. This is done so the content doesn’t take up any of your precious storage space. However, there are times where you may not have access to the Internet, but still want to read a book or watch a movie. To do that you’ll want to download or ‘pin’ the media on your device so you can access it offline. To ‘pin’ a book, open the Play Books app, go to the menu and select ‘Make available offline.’ A blue dot with a pin in it means the book is available for offline, but has not been downloaded yet. To download it, tap it once and the pin should turn white. Once the book is finished downloading, the pin icon should be upright, white and surrounded by a blue dot (like “The Time Machine” book above). Keep in mind that downloading a movie will consume a substantial amount of storage space (~1.7GB).
    51. Press and hold to quickly change camera settings

      Press and hold to quickly change camera settings

    52. Quickly change camera settings – You can now press and hold on the camera app screen and swipe to quickly change white balance, HDR and other camera settings. You can also go directly from the camera app to the Photo Gallery app by swiping to the right. Swipe left to return to the camera.
    53. Improve your Internet download speeds – If you have Wi-Fi range issues like I do, you may want to purchase an Ethernet adapter. The Nexus 10 supports USB-OTG, which makes this possible. Although micro USB to Ethernet adapters are available, they don’t get good reviews, so you’re probably better of with a USB to Ethernet adapter like this and a micro USB to USB adapter. More about the types of things you can connect with USB-OTG.
    54. Pinch-to-zoom Gmail – Gmail has a new setting called ‘Auto-fit messages’ which is not enabled by default. When you enable this setting, you can manually pinch to zoom in or out on an e-mail. This is really useful.
    55. Learn how to decipher the notification LED – You’ve probably noticed there’s an LED on the front of your Nexus 10 that flashes occasionally. It’s there to let you when you have one ore more notifications waiting. Its LED is capable of displaying multiple colors so you can tell what type of notification you have without unlocking your tablet. Since there is no mention of this feature in the Nexus 10 manual, there is some confusion over the colors used. It appears Google uses white for Gmail or SMS texts, blue is for Facebook notifications, green indicates your tablet is 100% charged, and also may show Google Voice notifications, yellow is for Google Talk and red is for Google+. It appears third-party apps can trigger the notification LED as well. One thing I’ve noticed about the notification LED is it sometimes continues to flash after you’ve cleared your notifications. If this blinking bothers you, you can turn off the notification LED by going to Settings > Display and unchecking ‘Pulse notification light.’
    56. Light Flow Lite allows you to take control of the colors of your notification LED

    57. Customize your LED notifications – A free app called Light Flow Lite allows you to take control of the colors of your notification LED. It also makes your Nexus 10 flash one color after another. This app allows you to set the notification color for the over 250 applications and system events including missed calls, low battery, no signal, voice mail, calendar reminders, Gmail messages, email messages, SMS messages, MMS messages, Twitter notifications and more.
    58. Quickly silence or restart your tablet – To quickly silence your Nexus 10, press and hold the power button for 1-2 seconds. To restart your tablet, press and hold the power button for 8 seconds.
    59. Backup everything on your tablet

    60. Make it easy for someone to return your tablet if lost – It’s a good idea to add a message to your lock-screen like the following: If found, please call [Enter your area code and phone number here]. To do this, go to Settings > Security > and touch ‘Owner info’ (or User Info, for other users). Then enter the text you want displayed on the lock screen.
    61. Backup everything on your tablet – Although it’s true Google backs up some of your data, it doesn’t back up everything. My Backup Pro backs-up your photos, SMS texts, contacts, call log, browser bookmarks, system settings, Home screens, music playlists and apps. Your entire backup is stored online.
    62. Use your tablet as a phone – You can turn your Android tablet into a phone with apps like Talkatone, GrooVe IP, Viber, Tablet Calling or others. A free Google Voice account is required by most of these programs. For best results, you’ll want to use a Bluetooth earpiece, since the mic used for this is located on the back of your tablet. For video calls try Skype or Tango. Video calls use the front camera on the Nexus, which works pretty well, however you still should use a Bluetooth earpiece for best results.
    63. Let Google know where you live and work – In order to get the most out of Google Now you must enter your home and work addresses. To do this go to maps.google.com using your browser, touch the Menu icon in the upper right hand corner, and open My Places. From there, you can enter your home and work addresses.
    64. Nexus 10 features to avoid – Because Android 4.2 and the Nexus 10 are still so new, there are several features you may want to avoid until the next update is available. Avoid using Lock-screen music widgets and Auto-brightness. If auto-brightness is important to you, please refer to Tip 40 here for a work-around.
    65. Enjoy your media without cables

    66. Get yourself some wireless headphones – The Nexus 10 is great for multimedia. After Google fixes the Bluetooth issues with Android 4.2.2 you may want to get yourself a wireless headset like this one. It’s stereo, sounds good and also has a mic, so you can make calls with it. If you have problems pairing your Bluetooth headset, try it several times. It took me at least three tries before it worked.
    67. Get help from Google – You can call (855) 836-3987 and ask Google questions about your Nexus 10 24/7. I know some people are bashing Google for their phone support, but my phone support experience was positive. Once I waited on hold for 15 minutes, but the person who answered my call was able to quickly solve a difficult problem.
    68. Visit the Nexus 10 support site online for more information.

      Where to Find More Great Tips Like These

      Hopefully you’ve learned something new after reading this. If you’re looking for more great tips and tricks for the Nexus 10, check out my next article.

      How to Install Flash on the Nexus 10

      1. Go to Settings > Security > and check “Unknown sources” under Device Administration.
      2. Go to Google Play and download Firefox (or another browser that you are sure has Flash support).
      3. Next, download Flash from the Adobe website by clicking here.
      4. Drag the downloaded file labeled ‘install_flash_player_ics.apk’ into the ‘Download’ folder on your Nexus 10.
      5. Now use an app like ES File Explorer to locate the APK in your Download folder and touch it.
      6. Next, touch ‘Install’ and ‘Agree’ to install the Flash plug-in.
      7. Note: Although I have not experienced any problems with Flash on the Nexus 10, I can not be responsible for the results of the actions you are about to take. You are installing software which is not officially supported, and could result in security or stability issues. I wouldn’t be too concerned however. I’ve been running this for more than four weeks now and have visited many sites. Content on most sites plays fine for me. Nothing bad has happened on the other sites.

        To test that Flash is working, go to this page (or any other page you know has Flash on it). If you don’t see a video, touch where it says ‘Tap here to activate plugin’. After you do this, you should see a red box jumping around on the screen. I’ve noticed that most, but not all Flash files play on the Nexus 10. This appears to be due to an incompatibility between Flash and Android 4.2. If Flash videos don’t play the first time, don’t try to activate Flash on that page again. Enjoy!

        Although it’s not essential, if you don’t plan to sideload more APK files, you should go back to Settings > Security > and uncheck “Unknown sources” under Device Administration.

        Can’t get Flash to work? Try some of these suggestions.

        If you have problems getting Firefox to work, try installing Boat Browser. After installing it, make sure to go to Settings > Page content settings and set ‘Enable flash/plug-ins to On. If you view a lot of Flash, you might want to make Boat your default browser. [Thanks to Karen for this tip]

        How to Force An Update to Android 4.2.2 on Your Nexus 10

        1. Go to Settings > Apps > and swipe the area which says “DOWNLOADED” to the right until you see “ALL” tab under Apps. The screens below were borrowed from a Cult of Android article for another device. Your screens may look slightly different.

          Steps 1

          Step 2b

          1. Now, scroll down to where it says “About tablet” and touch “System updates’ and touch the “Check now” button. If it does not find the 4.2.2. update, restart your tablet and try again. If the above steps do not work, repeat them rebooting your device after step 3. You may also need to repeat the steps twice for the update to show up on your device. This approach worked for me, but may not work in all regions.

            What to Do If You Have Problems After You Force An Update to Android 4.2.2

            After I forced an update to Android 4.2.2 I could not download or update apps without an error. You have have that problem, you may want to do what I did to fix it.

            1. Go to Settings > Apps > and swipe the area which says “DOWNLOADED” to the right until you see “ALL” tab under Apps. Select “Google Play Store”, and then tap “Clear cache” and “Clear data.” Please note: After clearing the Google Play Store app data, if you have set a PIN code and/or a content filter, you’ll need to re-apply these settings.
            2. Locate “Download Manager,” under “ALL” and then tap “Clear cache” and “Clear data”
            3. Locate “Google Services Framework,” under “ALL” and then tap “Clear cache” and “Clear data”
            4. Reboot your tablet
            5. Try it again. If you still cannot download apps, try removing and then re-adding your Google account on the Settings screen. This worked for me.
            6. – Rick

              Copyright 2013 Rick Schwartz. All rights reserved. Linking to this article is encouraged.


              Follow me on Twitter @mostlytech1

    What Samsung & Google Don’t Tell You About Beaming

    Last update: October 17, 2013

    This article has had almost 190,000 views! Thanks for reading it. Although this article refers to the Galaxy S III, S Beam also works with current Samsung mobile products.

    Beaming Is Not New

    By now you’ve probably seen the Samsung TV commercial where the wife sends a video to her husband by simply touching phones.

    Samsung promotes video sharing in their newest ads

    Samsung promotes video sharing in their newest ads

    Both Google and Samsung refer to this process as beaming. Beaming multimedia is very cool, but it’s not new. I helped create patent-pending software back in 2009 that sent music, photos or video from a web browser to a connected TV, stereo, game console or mobile phone. That was the first software that used the term “beam” to describe the wireless transmission of multimedia from a computer to a connected device, but readers have pointed out that Palm Pilots were beaming contacts, notes, to-do items and calendar entries more than a decade ago. Beaming of multimedia from one phone to another has been possible for over a year using this and other apps, but few knew this was possible before Samsung started running their commercials for the Galaxy S III. The technology which makes beaming possible is called NFC, which stands for Near Field Communication. NFC has been available on Android devices for almost two years. You can learn more about NFC and its many uses here. The technology used to beam the music playlist in Samsung’s TV commercial is called S Beam. It uses NFC and Wi-Fi Direct and has been available since May.

    Beaming Isn’t as Easy as It Looks

    The Samsung commercial makes beaming look easy. Google claims Android Beam lets users share with a single tap. Is it really this easy? No. Beaming only works after both mobile devices have been setup properly. Before I wrote this article, I couldn’t even get beaming to work between my Samsung Galaxy S III and a Nexus 7 tablet. But once I setup both devices properly and learned a few tricks, beaming now works almost 100% of the time. This article will teach you how to beam like a pro.

    You need to configure several settings before you can beam

    How to Beam Like a Pro

    The section will teach you how to setup your devices and use Android Beam.

    1. In order to beam items from one phone to another, you need two Android devices that have NFC support. Here’s a list of all of the phones with NFC support.
    • Before trying to beam you must go to Settings/More Settings and make sure NFC is checked and Android Beam is enabled on both devices.
    • Now you’re ready to beam, but before you can do so, you need to open the app you wish to beam from. A list of supported apps is displayed later in this article.
    • Next, you need to locate the item you want to beam. You can beam web pages, contacts, maps, YouTube videos and much more.
    • Finally, you need to hold the backs of your two mobile devices together until you hear a chiming sound. If this doesn’t happen in a few seconds, move your devices apart and then back together.

    Troubleshooting Tips: Beaming won’t work unless the screen on the destination device is unlocked. You do not need to tap the two devices together, but they do need to be very close. When beaming from a phone to a tablet, you may need to move your phone around on the back of the tablet to find the spot where the NFC module is located.

    1. After you hear the chime, you need to quickly touch the item you want to beam. If you do this correctly, you’ll see the screen shrink and hear a two-tone confirmation sound.
    • If you press too long, you’ll hear a fast four-part tone that goes from high to low and you’ll need to beam again.
    • If you wait to touch the screen until after the image grows back, you need to move the two devices apart and beam again.
    • If you touch outside of the shrunken item, it won’t beam.

    You may need to click OK to accept beamed media

    1. After performing all of the steps above, the beamed item should appear on the other devices’ screen. Although this may seem like a lot of steps to follow, once you get the hang of it, it’s pretty easy and you’ll want to beam all of the time.

    In order to accept a beamed You Tube video on devices like a Samsung Galaxy S III, you need to touch “OK” when you see this message:

    Good Luck Trying to Beam a Music Playlist

    Want to beam a music playlist like you see in the Samsung commercial? What about a photo or video that you took with the camera on your phone? You can’t do that with Android Beam (running on Android 4.0-powered devices). Fortunately, there are several solutions to these problems.

    1. Use S Beam on Two Galaxy S IIIs — NFC is great for transferring things like contacts or URLs that point to maps or YouTube videos, but it’s not ideal for large files like videos. That’s why S Beam uses NFC for device pairing and Wi-Fi Direct for high-speed data transfer. Wi-Fi Direct is capable of data speeds around 250 Mbps, but because the Galaxy S III supports Wi-Fi channel bonding, files can be transferred at speeds up to 300Mbps. Of course your mileage may vary, depending on the distance from your wireless access point and the amount of interference in your area.

    You can see S Beam in action here. Real world speeds are good, but not amazing. The actual transfer time for a photo is 1 to 2 seconds, but it takes an additional 4 to 6 seconds to establish a connection using S Beam.

    Another thing to be aware of: When you touch the back of a Galaxy S III to another S Beam-enabled device for the first time, it takes about 10 seconds to make the connection. For security, the connection times out after 10 minutes.

    1. Use Android Beam on Two Mobile Devices Running Jelly Bean — Android Beam now allows you to send photos and videos from one device running Android 4.1 (Jelly Bean) to another. Just select a photo or video in the Gallery app, and then hold any two NFC-enabled devices back to back. When prompted, tap the screen to send the file as described above. File are now send using Bluetooth, so transfer speeds are faster than earlier. However files transfers are not as fast as S Beam — because Bluetooth is only capable of data transfer speeds up to 24 Mbit/s. Performance isn’t too bad. It takes about 7 to 9 seconds to send a photo, and 15 seconds to send a short video.

    Beamed photos don’t automatically appear

    After you beam a photo from the Gallery app, you’ll see the photo downloading in the Notification bar. After the download is complete, you have to swipe down, and select the photo you wish to view. Beamed videos automatically appear after the download is complete however and are ready to play.

    Cool observation: Bluetooth does not need to be enabled before you beam a photo. Android Beam will automatically turn Bluetooth on and off as needed. This should reduce battery usage.

    Most people don’t know Android Beam can now send multiple files from one Android 4.1 device to another. To do this, long press on a photo or video in the Gallery, select the items you want to transfer, and then hold the devices back-to-back to start the beaming process. Because Bluetooth is being used, you should avoid trying to send too many files at once.

    Which Apps Work and Which Ones Don’t?

    Apps that work with Android Beam
    Here is a list of apps that work with Android Beam followed by any issues they may have.

    • aCalendar
    • Any.Do – This task management app lets you beam assignments to co-workers
    • Chrome
    • Clover Pay
    • Contacts (Android 4.0) – This app seems to be a little temperamental. Wait until the screen gets small before you tap it. This takes about four seconds. Then tap near the photo area.
    • Financial Times
    • Gmail
    • Gallery – only works when Android 4.1 is installed
    • Google Play – Android Beam pushes a link to the app’s details page in Google Play. On the other device, Google Play launches and loads the details page, for easy downloading of the app.
    • Google Earth
    • Google I/O 2012
    • Google Maps
    • Internet (stock Android 4.0 browser)
    • Just Player
    • Kingsoft Office
    • Local – Maps, but nothing else
    • MonTransit
    • Navigation
    • NFC Reader
    • Paper Camera
    • Pattrn
    • People (Android 4.1)
    • Shazam
    • Shazam Encore
    • Songkick Concerts
    • StumbleUpon
    • WiFiBeam – This app can pass WiFi setup info from one device to another
    • YouTube – Can’t beam ads, skip any ads before beaming.

    This is a partial list of the apps which work with Android Beam. As I find more apps that work, I’ll add them here.

    Apps that don’t work with Android Beam

    • Calculator
    • Currents – Loads app, but not selected article
    • Gallery
    • Google Now – Cards can’t be sent
    • Google+
    • Play Music (appears to work on Android 4.0, but music is not transferred immediately)
    • Samsung’s Calendar
    • Street View on Google Maps
    • Most other Android apps

    The Pros and Cons of Android Beam and Samsung’s S Beam

    Android Beam – Pros

    • Works with all NFC-enabled Android devices running Android 4.0 (or later)
    • Works on devices that do not have Wi-Fi Direct support
    • Requires less configuration than S Beam (because Wi-Fi Direct does not have to be enabled)
    • Very safe because NFC only works at distances of 4cm or less.
    • More power efficient than S Beam because it uses NFC and Bluetooth

    Android Beam – Cons

    • Only works with Android devices that have NFC support
    • Has data transfer rates up to 10x slower than S Beam
    • Can only send photos, videos and playlists if you’re running Android 4.1 (or later)
    • Beamed photos don’t automatically open
    • Doesn’t use Bluetooth for transfers unless you’re running Android 4.1 (or later)

    S Beam – Pros

    • Capable transfer speeds up to 10x faster than Android Beam
    • Supports music playlists, photos and videos on Android 4.0 devices
    • Once a transfer in started it’s capable of working at greater distances than NFC-only transfers
    • Safe when good Wi-Fi security practices are followed.
    • Can be used to transfer documents from one Galaxy Note 2 to another

    S Beam – Cons

    • Only works with a limited number of Samsung devices (like the Galaxy S III)
    • Only works on devices running Android 4.0 (and later)
    • Wi-Fi Direct draws so much power that it’s turned off after only a few minutes of inactivity
    • Only works on devices that have with NFC and Wi-Fi Direct support
    • S Beam works with fewer apps than Android Beam
    You can now beam files from Android to iOS devices

    You can now beam files from Android to iOS devices

    How to Beam Files to an iPhone or iPad

    S Beam isn’t the only game in town. I’ve been using an app called Bump for years. It started as a way to exchange contacts on iOS devices, but now can transfer any file you have on your device (videos, documents, spreadsheets, presentations, etc). First install the Bump app on both of your devices. Next, launch the app on both devices and select the type of file you want to exchange. Then touch your devices together lightly until you feel them vibrate. You need to press the blue Connect button on both devices, before your file can be transferred. Like Android Beam, Bump can be a little temperamental and often requires several tries before it works. Also be aware that all music metadata and album art is lost when you transfer music files.

    Cross-platform Beaming Issues

    In theory, you should be able to tap an NFC-enabled Windows Phone 8 to a Galaxy S III or Galaxy Nexus and share anything. However, I’m told that sharing of web pages and contacts work fine, but sharing of files and photos does not. Let’s hope Microsoft and Google get together to address this issue soon.

    The Final Word

    While it’s true that Samsung and Google may have oversold beaming, once you know how to use it, it’s a powerful feature. As more devices support these two features, I’d like to see both companies enable these by default so no setup is required. Also, Samsung should find a way to automatically toggle on and off Wi- Fi Direct (like Google does with Bluetooth beaming), so you don’t have to turn it on every time. I’m glad that Samsung has made this concept something that everyone now is aware of. We live in a wireless world, and you should never have to connect a cable to transfer files.

    Have fun beaming!

    – Rick

    Copyright 2013 Rick E. Schwartz. All rights reserved. Linking to this article is encouraged.

    Follow me on Twitter @mostlytech1

    Android 4.4′s Advantages Over iOS 7.1

    Last update: October 30, 2013

    This article has had almost 20,000 views. Thanks for reading it.

    Last year I wrote two articles that compared Android to iOS. One stressed Apple’s advantages, and the other stressed Google’s advantages. Both turned out to be extremely popular. Since each operating system has had at least one major update since then, I’ve decided to update both articles — starting with the one about Android. Can Android 4.4 hold its own against iOS 7.1?

    Google Now learns about you and delivers information without you needing to ask.

    The Top Ten Most Important Android Advantages

    Although iOS is a great operating system, Android has many advantages over it. Let’s start with the most important ones:

    1. Google Answers Your Questions Before You Ask ThemGoogle Now goes beyond Siri because it learns about you through your searches, and automatically provides useful info to you. For example, Google Now knows when you need to leave for work and from which gate your flight is departing. It also automatically displays things like sports scores, traffic and weather. It will even alert you if there’s a traffic jam and automatically recommends places around you like restaurants. Google Now can now can give you movie start times, help you track packages and help you find great spots to take photos based on your current location.

      boardingpass
      Google Now goes far beyond Passbook by looking for flight confirmations in your email so it can automatically notify you of upcoming flights and changes to your itinerary. Unlike Passbook, you’ll don’t need to install a separate mobile app for each airline you travel with. When you get to the airport Google Now pulls up a digital boarding pass for you which includes a QR code to scan at the gate along with information on the terminal, gate number, seat number and boarding group. Google Now looks at where you’re going, and tells you how the weather will be when you get there. The service can also remind you of hotel, event and restaurant reservations.

      Update (4/29): While it’s true that Google Now can finally be run on iOS there are significant limitations: It cannot be run on the iOS lock screen like it can on the Galaxy S4 and other Android 4.2 phones. It also can’t run in the background as a widget. Google Now is also missing quite a few options on iOS and doesn’t run automatically upon startup. Some of the best Google Now cards are not currently available on Google Now for iOS. This includes Airline boarding pass, Activity summary, Events, Zillow, Fandango, Concerts, Research topic and Nearby events. Another important difference is the fact that Google Now can only be activated from within the Search app, and it must be turned on by a user, who will be prompted on launch of the updated app and must sign in to a Google account. Once you’ve given permission to turn it on, it can be accessed inside the Search app only.

    2. A Digital Wallet That Can Buy Things Today – Apple’s Passbook shows promise, but it’s the only digital wallet which can’t buy things anywhere except Starbucks (or the Apple Store). Android supports near field communication (NFC) and Google Wallet which lets you buy things at over 300,000+ PayPass cash registers. After setting up Google Wallet on an NFC equipped phone like a Samsung Galaxy S III, you simply place your phone on the terminal for a second, enter your PIN and your Google Wallet will be debited by the amount of the purchase. Google Wallet is currently accepted at more than twenty retail chains including 7 Eleven, Best Buy, CVS Pharmacy, Duane Reade, Einstein Bros Bagels, Footlocker, Home Depot, Jack in the Box, McDonald’s, Peet’s Coffee, Pinkberry, Rite Aid, Sports Authority, Whole Foods and more. You can learn more about Google Wallet here.
    3. Better Sharing Between Apps – It’s easiest to explain system intents by contrasting the sharing options between an iOS app and an Android app. When you share on my iOS Notes app you’re given four different sharing choices: Mail, Message, Print and Copy. When you share from the Android Notes app, you’re allowed to share via Bluetooth, Google Drive, Dropbox, Email, Facebook, Gmail, Google+, Read It Later, SkyDrive, Text Message, Twitter, Wi-Fi Direct, WordPress Blog and 17 other apps. The actual list varies, depending on which apps you have installed. Google realizes Android cannot be best at everything, and allows you to choose which apps you want to interact with.
    4. Android lets NFC-enabled phones touch to share

    5. Touch-to-Share Anything – Android Beam allows any two NFC-equipped devices to exchange data wirelessly by simply by tapping them together. This allows Android users to share web pages, maps, You Tube videos, contacts, links to apps and more. Starting with Android 4.1, Android Beam made it possible to share photos and video bover Bluetooth for the data transfer. Samsung’s S Beam combines NFC with Wi-Fi Direct. This makes it possible to transfer almost anything including music playlists, documents, photos and longer videos between two Samsung devices. Here is a video of S Beam in action. It’s even possible for Android devices to share data with Windows mobile phones.
    6. Multi-user Support on a Single Device– Multiuser support was a new feature in Android 4.2. For now, it’s restricted to tablet use. When enabled on the quick settings menu, you’re taken to a lock screen similar to a log-in screen you’d see on a PC. Choose the user, swipe to unlock, and you’re in. Each user has their own home screen, background, apps, and widgets. Even when multiple users share an app, you’re still able to keep your app settings, game-progress and high-scores separate. You can even set up a guest profile so a friend can check their email, but can’t update your Facebook status. All iOS devices are tied to a single iTunes account and changes made by one user will affect all other users of that device. Multiuser support is a very difficult feature to add, so it’s very unlikely we’ll see this in iOS soon.
    7. Associate Multiple Gmail Accounts with a Single User – iOS only allows you to associate a single iTunes account with a single device. Android lets you add extra Google Accounts to a device running Android 4.0 (or later). Each account has its own email, contacts, calendar, apps and Google Play media. This allows you to use one email for work and another for your personal use, or one email for you, and another other for your significant other. By adding both accounts to your tablet, you’ll be able to view the merged data.
    8. More Advanced Multitasking – Apple places restrictions on third-party apps which run in the background. In most cases, they are suspended and not allowed to communicate with other apps. This improved with iOS 7, but it still very different than what Android is capable of. Android supports true-multitasking without any of the above restrictions. This makes it possible to do things which cannot be done on iOS.
    9. For example, Samsung’s “Pop up Play” feature, allows videos to hover, so you can text and watch a video at the same time. It’s also possible to have two apps visible at one time on devices like the Samsung Galaxy Tab.

      Widgets update in real-time w/o needing to launch an app

    10. Smart Widgets – Widgets provide you with real-time weather updates, stock quotes, recent e-mails and more. Widgets are always visible and updated in the background — without needing to launch an app. Widgets provide easy access to system and application settings. Want to disable Wi-Fi or GPS services? Use a widget. When using Android widgets are “smart” and automatically resize themselves based on the amount of room available on the screen. You can get widget-like iOS apps, but they can only run on your lock screen, and some require a jail-broken phone, or third-party software to run.
    11. An Open Source Foundation – The underlying architecture of the Android is open-source. This makes it much more customizable than iOS. Not only is the Android OS customizable, handset manufacturers like Samsung open source their software for individual phones like the Galaxy Series. This makes it relatively easy for developers to improve on what Google and Samsung have done. A wide range of different custom ROMs can be easily loaded onto rooted phones or tablets. These ROMs often have significant benefits when it comes to performance and battery life, and also provide additional features. iOS 7.1 is a totally closed operating system. Although it can be jail-broken, it’s much harder to do. At the time of this writing, the iPhone 5 had not yet been jail broken. Expert say iOS jailbreaks are going to be harder in the future.

      The Android Market has several advantages. In this example, I’m using an iPad to install an Android app which will be remotely downloaded to my Android phone.

    12. A Better and More Open App Store – Although this may not sound like a platform benefit, it’s very important. Google Play has far less restrictions than the App store. There is a long list of apps Apple won’t allow, including apps which compete with iTunes, free Wi-Fi tethering apps, VoIP apps which use technologies like Google Talk, and great utilizes like Farproc’s Wi-Fi Analyzer. Apple also practices their own form of censorship by removing apps like “500px” from the App store, while leaving other apps that feature hard-core porn like Twitter’s “Vine” app. Update 2/3: 500pix is back with an NC+17 rating, while Vine remains.

      Another Android advantage is the number of quality alternative app stores including AppBrain, GetJar, Handango, Handmark, and the Amazon App Store, which offers one paid app a day for free. The only apps which can be installed outside the Apple app store are Cydia apps, which are only available for jailbroken devices. Another Google Play advantage is the fact that it lets developers upload videos as well as screenshots for their apps. This gives you a much better idea what the app does without having to download it first.

    Other Areas Where Android Is Still Ahead of iOS

    1. Apps Crash Less – I use iOS and Android 4.4 many hours each day. Apps occasionally crash on both, but I experience more crashes on iOS — especially while using the Safari app with multiple tabs open. Studies have confirmed that iOS apps crash more than Android apps.
    2. Fewer Security Vulnerabilities than iOS – This is going to surprise many of you because companies spend millions trying to convince you that malware is a serious problem on the Android platform, but security expert Symantec released a study in April 2013 that says Apple’s iOS had more security vulnerabilities than Android in 2012. Symantec’s report revealed that there are 387 documented vulnerabilities on Apple’s iOS software, compared to a mere 13 on Android.

    3. Much better account security – Like Apple, Google requires an e-mail address and password to setup any device. However this is easy to hack, so Google offers optional two-step authentication. This is done by downloading a Authenticator app on your mobile device. This app generates unique verification codes that are entered along with your password. Apple’s iCloud was cracked because of the lack of two-factor authentication.
    4. Notifictions are now actionable

    5. More Advanced Notifications – Although notifications have improved in iOS, Android still has advantages in this area. You can tell at a glance what types of notifications have occurred, and clear all notifications with a single click. Devices running Android 4.1 (or later) have rich push notifications, which can be expanded and collapsed with a pinch. These notifications offer even more contextual information and are now actionable. That means if you’re notified about a meeting, you can dismiss it from the Android notification bar, or email others about the meeting. You can also call (or text) someone right from the pull-down notification menu.
    6. Flash Video Support – Flash may be a dying format, but there are still millions of Flash videos around and iOS can’t play any of them. All Android devices running 4.0 (and earlier) can play Flash videos out of the box. If you have an Android device running Android 4.1 (or later) and you didn’t previously install Flash, you’ll need to side-load it by following these easy instructions.
    7. Extensive Customization Options – There are so many ways you can customize Android devices it would be impossible to list them all here. Almost anything can be changed in the Android ecosystem.
    8. More Effective Parental Controls – Apple finally added Parental Controls to iOS 6, but they are buried is Settings and disabled by default. Even if mom is smart enough to find and enable them, her kids will still be able to read the copy of “50 Shades of Grey” that she bought six months ago. This is because Apple’s Parental Controls do not hide explicit books which are already in your library. iOS is a single-user OS and this prevents effective parental controls. Android 4.2 allowed each family member to have their own password-protected account. All of the media is only visible when logged in to their own account. This prevents children from accessing inappropriate content.
    9. Restricted User Profiles – In addition to parental controls, Android 4.3 allows you to control access to apps and content at a user level. This allows you to control which apps each user can see and which are hidden. It also allows an app to behave differently when it’s running in a restricted profile. For example, an app can hide unpurchased levels and not allow in-app purchasing. Restricted profiles are also ideal for retail kiosks or POS systems.
    10. Easy File Transfers – It’s a hassle to get anything but photos off of an iOS device. With Android devices there’s no need to use iTunes or iCloud to copy media. Just connect a USB cable and your mobile device appears on your desktop like a hard disk. You can then drag and drop any number of file onto your mobile device to copy them. This is a really big advantage.
    11. Virtual surround sound audio – There are several iOS apps with surround-sound capabilities, the Android 4.3 OS has advanced surround-sound technology from German audio pioneer Fraunhofer built-in. Android 4.3 supports surround sound three different ways: Over HDMI, over any headphones and using the stereo speakers on supported devices including the Nexus 7 and Nexus 10.

      Instagram on iPad

    12. No Need to Use 2x Zoom on Some Apps – Android automatically stretches apps so they look good on screens of all sizes. Many iOS apps like Instagram still appear small when they are run on a tablet, or have to be blown up to twice their regular size in order to occupy the entire screen. When you do this, the graphics look distorted and funny.
    13. Ability to Set Default Software – One of the most powerful Android features is the ability to change the default software the OS uses for different tasks. For example, if you want to the Dolphin browser to open any URL (instead of the stock Android browser), just pick the app you want to use. Want to use a different app for turn-by-turn directions or media playback? Pick one, and it will use that app every time. This is an incredibly powerful feature. You can even replace the stock keyboard with a 3rd party keyboard like SwiftKey. Apple doesn’t allow this.
    14. Fewer Image Scaling Issues – The way Android is structured, apps automatically support all new resolutions without needing to be modified like iOS apps do. Every time Apple releases a product with a different sized screen like the iPhone 5, developers have to scramble to make their apps look great. If they don’t, text will be less crisp and there may be screen layout issues. Android seems to have fewer issues in this area. It seems Google has a better method of scaling up low-resolution images which makes them less ugly than they appear on Apple devices.
    15. 3rd-party Keyboards Improve Your Typing Speed

      3rd-party Keyboards Improve Your Typing Speed

    16. Third-party Alternate Keyboards – There are some outstanding third-party keyboard apps that run on all Android phones and have many advantages over the stock iOS 6 keyboard. Some of the best keyboards include Swype, which lets you create words by tracing between the letters on the keyboard. Swype can even sync your personal dictionary across all of your Android devices. SwiftKey 3 goes even further by predicting the next word in your sentence based on past behavior. To save time you can personalize it using your Gmail, Facebook, Twitter or blog posts. This can save you a massive number of keystrokes, as you can see from the screenshot on the right. SwiftKey and other 3rd-party keyboards also have extensive customization options unlike iOS. You can see the dramatic difference here. There are other good keyboards as well. Here’s a good review of some of the best ones.
    17. Smoother Scrolling & Transitions – Starting with Android 4.1, the CPU and graphics run in parallel and the entire interface runs at 60 frames per second. The processor jumps into action the moment you touch the screen to keep input lag at a minimum and graphics are now also triple-buffered to keep scrolling and transitions smooth. It’s true that iOS had less of a problem with this, but its interface doesn’t currently run at 60fps.
    18. Smart App Updates – Google Play now delivers only the parts of an updated app which have changed to devices, rather than the entire app. This makes the app updates much faster to download, and conserve both battery and data usage.
    19. You can zoom-in on offline maps with no signal

    20. Better Speech-to-Text Entry – Android’s speech-to-text entry is second to none. Unlike iOS, Android is capable of doing the speech-to-text conversion without a network connection. It’s also more accurate. Siri does not work well on voices with certain types of accents and certain dialects. It’s normal for voice recognition systems to require some training, but Siri doesn’t seem to improve over time. By contrast, Google’s voice recognition technology requires no training on voices with strong accents as long as they speak close to the microphone and talk a little slower than usual.
    21. Intelligent Switching between Wi-Fi and Cellular – iOS sometimes has problems switching between cellular and Wi-Fi connections. If a Wi-Fi signal is present it will select it — even though its signal strength is low, and its data is slower than the current 3G or 4G connection. Devices running Android 4.1 (or later) don’t have this problem when the “Wi-Fi Only Connects to Strong Signal” option is enabled. This forces your mobile device to only connect to strong Wi-Fi signals.
    22. Offline Maps – Although Google Maps was mentioned above, offline maps are important enough to have their own section, because the time you need a map the most is when you don’t have Internet access and are lost. Android allows you to download any number of maps to your device and access them without an Internet connection.
    23. A Media-centric Home Screen – Android tablets like the Nexus 7 and Nexus 10 displays your media library on the first screen you see. You’ll see the last book, magazine and CD you played (or read) larger than the others. This is a feature which has really grown on me. Of course you can move or delete this, if you don’t want it on your home screen.
    24. Predictive text is one advantage the Android keyboard has over iOS

    25. A More Advanced Default Keyboard – Android’s in-line spell checker and suggestion modes work better than Apple’s today. The Android keyboard (4.1 and later) guesses what the next word will be before you’ve started typing it. You don’t even need an Internet connection to see the suggestions. The Android keyboard also lets you add dictionaries, gives you control over auto-correct and has advanced settings. Android 4.2 also included a new feature called Gesture Typing, which lets you glide your finger over the letters you want to type on the keyboard.
    26. Attach Any File to An Email – Android allows you to attach any file to an e-mail — not only images or video like iOS 7 does. This is important, because it’s common to attach Word docs or Powerpoint presentations to work-related emails.
    27. Photo Sphere goes beyond Apple’s Panorama and lets you capture 360 degree photos

    28. 360-degree Photos – Android 4.2 introduced a new camera feature called Photo Sphere, which lets you capture Google Street View-style images that are larger than life. While you take photos in every direction Android stitches them together to create 360-degree experiences that you can share on Google+ with friends and family, or add to Google Maps.You can see Photo Sphere in action here.
    29. Superior Music Scan & Match feature – The new Google Play Music service has a free “Scan and Match” option that goes through your entire music library and saves it to the cloud, so it’s accessible from any Internet-connected device. Like iTunes Match, you don’t have to upload most songs because they are already there. Unlike iTunes Match, Google lets you store 20,000 songs on its servers for free. Apple charges $24.99 a year for the iTunes Match feature and transcodes all of your high-bit rate songs down to 256kbps prior to uploading to iCloud. Google allows songs up to 320Kbps.
    30. Advanced photo editing comes standard

    31. More Advanced Photo Editing Features – The stock iOS camera and photo viewer apps are very limited on features. The Android Gallery app let you tweak your photos in a similar manner as you would with Photoshop. This goes far beyond the four options Apple has (rotate, enhance, red-eye and crop). Starting with Android 4.1 Google let you apply Instagram-style filters to still or video footage including warm vintage, posterize, black and white, and sepia. You can also edit different video clips together by simply pausing and resuming video recording.
    32. A True Full-screen Mode – Android 4.4 supports a new ‘Immersive mode’ that allows apps to take over the entire screen when needed. That means you won’t see any controls on the top of the bottom of the screen. To get the controls back just swipe from the top or bottom of the screen. On the iPhone, this type of full screen mode isn’t possible.

    33. File Management on Your Device – iOS apps like iExplorer claim to be file explorers, but they don’t allow you to browse, copy, paste, rename and delete any visible file or folder on your device. This is because Apple doesn’t allow you to access the iOS file system. Android file explorers like ES File Explorer do all of this and much more. The 10 best Android File Explorers.
    34. Individual App Volumes – Android lets you adjust the volume for individual apps and functions. To do this, press the volume keys along the side of your device and wait for the on-screen volume slider to pop up. Touch the Settings button on the right and you’ll see sliders for music, video, notifications, ringtones and alarms.
    35. A Persistent Back Button – Android’s Back button is available at all times. Some iOS apps display a Back button, but it’s not always available and some apps don’t include it at all. This is one of the features I miss the most when moving back and forth between Android and iOS.
    36. A Live Wallpaper

    37. Miracast Wireless Video Streaming– Android 4.2 added support for a wireless video streaming standard called Miracast, which is an open alternative to Apple’s AirPlay. One advantage that Miracast has over AirPlay and DLNA is that it streams over Wi-Fi Direct and does not require a Wi-Fi hotspot. Miracast allows you to stream anything that’s on your phone (or tablet) to a Miracast-ready HDTV. Although there aren’t many TVs that support Miracast yet (LG will be among the first), experts are expecting many to be released next year, along with low-cost dongles that plug into the HDMI port of older TVs. Most of the newest smartphones and tablets already support Miracast — including the Samsung Galaxy Series, LG Optimus G, Nexus 4 and more. You can see Miracast in action here.
    38. Moving Screen Backgrounds – iOS 7 has dynamic backrounds that give the illusion of moving, like Android apps, but this is very different than the live wallpapers that run on Android devices. They allow you to run cool animations or videos on your home screens. Most live wallpapers like Ocean HD span across all five of your home screens and pan when you move from screen to screen. You can interact with some live wallpapers by touching the screen. For example, touching the screen on Ocean HD causes the swimming fish to change direction. You can even have a 360 degree panoramic photo as your live wallpaper (e.g. PanoPlanet Live Wallpaper).
    39. High-definition Magazines – Traditional magazines are printed at 300 dpi. Since Android tablets like the Nexus 10 have a screen that supports 300 ppi, it makes sense to offer magazines at their native 300 dpi resolution. Look for HD magazines in Google Play that only be viewed on Android devices.
    40. Full Stylus Support – Although you can use a capacitive stylus on an iOS device, the OS has very limited support for it. You won’t get the same level of expression you get on a Samsung Galaxy Note II, which has 1,024 levels of pressure sensitivity. iOS also won’t let you toggle between a brush, pencil or eraser by simply holding the stylus above the screen and clicking a button. The stylus on Note II even lets you preview emails, photos or videos by hovering slightly above the screen. Here are some more things you can do with a stylus.

      Android has better resource monitoring than iOS

    41. Data & Resource Monitoring – Android shows you exactly how much data you have used so far each month and warns you when you’re getting close to your data cap. You can even disable mobile data entirely if you’d like, once a certain threshold has been reached. Android also lets you see how much battery and memory and data each app is using.
    42. Haptic Feedback Support – The Android OS and most Android devices support haptic feedback natively. This gives you a tactile vibration when you type, long press, or touch any of the navigation buttons. This is done to make it clear your touch was acknowledged, so you don’t have to tap twice. Haptic feedback also makes games much more enjoyable to play.

    43. More Screen Unlock Options – Android now has five different ways to unlock your screen: A slider (which lets you access the home screen or camera), pattern unlock, PIN unlock, password unlock and Face unlock.
    44. No Bluetooth Transfer Restrictions – Most iOS Bluetooth apps have limitations which Android apps don’t have. They cannot send data over Bluetooth to an Android device (unless the iOS device has been jailbroken). Most apps available in the App store can only send photos, and cannot send audio, video and other documents.
    45. Speed Dials – Android allows you to add icons for contacts directly to your home screen(s), so you can quickly call or text them. iOS users must first open the Phone or Messaging apps before communicating with contacts.
    46. Multicolored LED alerts – Most Android devices have a small LED that alerts you to missed calls, new messages and other system events like low-battery. As with other Android phones, you can customize exactly how and when the LED works by installing a third-party LED control app like Light Flow. The iPhone does have a setting buried under Accessibility, which flashes an LED when a calls or text message is received, but it’s not nearly as flexible as this feature. Light Flow lets you assign different colors to voice mail, missed calls, calendar reminders, Gmail, Facebook notifications, SMS messages and many more things.

    The Tide is Turning

    Although iOS still has some very important advantages over Android, it seems that every time I update this article, the list of Android advantages gets longer, and the list of iOS advantages gets shorter. Even the most die hard Apple fans admit that iOS is showing its age and Apple still hasn’t figured out Sharing or the Cloud. Apple’s between a rock and a hard place, because they have to add some of the above features at some point, but when they do they will be accused of copying Android. Sure Apple still has a few tricks up their sleeve, and an amazing patent pool, but they are clearly playing catch up at the moment.

    “Real Men Use Android”

    After many years of promoting Apple’s products Apple evangelist Guy Kawasaki recently switched to Android. Really. He recently did a interview where he said, “People are kind of amazed, but I don’t use any iOS products, none at all. I fell in love with Android on the smartphone, and then I got a Nexus 7 and started using Android on the tablet as well. To me the great irony is that Apple’s slogan was `Think Different,’ but today if you think different you’re looking at Android.” Guy uses a Samsung Galaxy Note 2. Now that Apple has finally caught up to Android hardware in areas like 4G , Guy says it’s Android’s “superior software that keeps him from moving astray.”

    Guy Kawasaki’s Five Favorite Android Features

    1. Multiple apps running in multiple windows
    2. Widgets
    3. Ability to launch files and choose default apps
    4. Ability to see all your apps in an alphabetical listing no matter what folder they are in
    5. Ability to pick your own keyboard (he uses SmartKey)

    – Rick

    Copyright 2013 Rick Schwartz. All rights reserved. Linking to this article is encouraged.


    Follow me on Twitter @mostlytech1